Set Up Raspberry Pi as a Web Server – Apache, PHP & MariaDB
This guide shows you how to set up a Raspberry Pi web server with Apache, PHP and MariaDB, whether you want to host your own site, run PHP apps like WordPress or keep a database on your home network. Together, these make up a LAMP stack: Linux as the operating system, Apache as the web server that sends pages to the browser, MariaDB as the database and PHP as the language that builds pages on the fly.
This guide takes you from installation and database setup all the way to HTTPS access from the internet. It works with Raspberry Pi OS (64-bit) on the Raspberry Pi 3, 4 and 5. We tested the installation and configuration in October 2026 in a Raspberry Pi OS environment on a Raspberry Pi 5, with Apache 2.4, PHP 8.4 and MariaDB 11.8.
In short
Apache, PHP and MariaDB all come straight from the Raspberry Pi OS repositories. You’ll have the web server running on your home network in about half an hour.
- Secure the database with
sudo mariadb-secure-installation. You log in as the database admin withsudo mariadb, so there’s no root password to set. - Access from the internet: use port forwarding and dynamic DNS. If your connection doesn’t have a public IPv4 address of its own, use a Cloudflare Tunnel instead.
- HTTPS: Certbot gets a free certificate from Let’s Encrypt and renews it automatically.
What You Need
- Raspberry Pi 3, 4 or 5*. A Pi 3 is fine for simple sites, but for PHP apps like WordPress a Pi 4 or 5 is the better choice.
- Raspberry Pi OS (64-bit). The Lite version without a desktop is all you need and leaves more memory for the server.
- A wired network connection. For a server, Ethernet is more reliable than Wi-Fi.
- SSH access, since you’ll type every command in the terminal. See how to enable SSH on the Raspberry Pi.
- For access from the internet: admin access to your router, or a Cloudflare account with your own domain (step 7).
Step 1: Update the System
Before you install anything, bring the system up to date:
sudo apt update && sudo apt upgrade -yStep 2: Install Apache
Apache is the web server. It receives requests from the browser and sends back the right files.
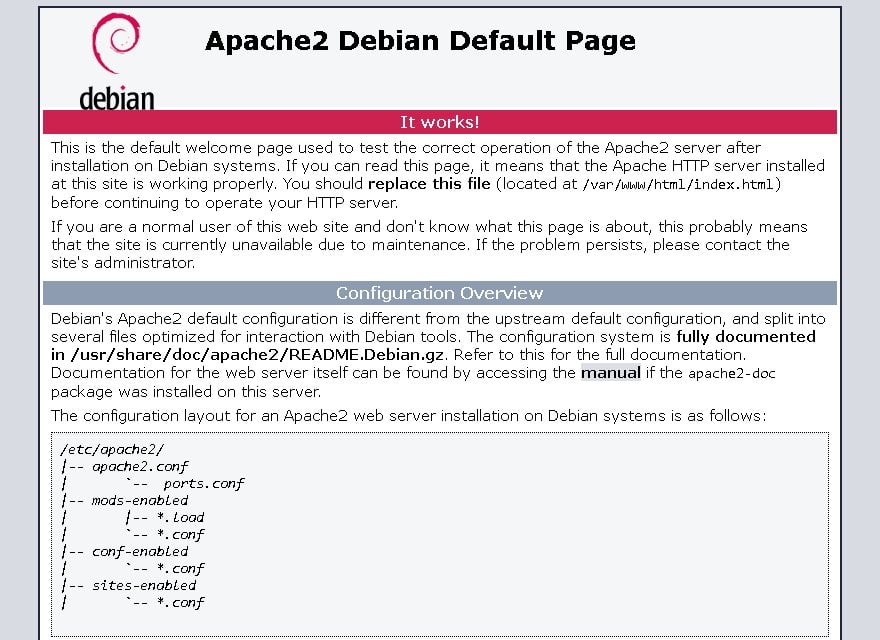
sudo apt install apache2 -yApache starts right after installation and every time the Pi boots, so there’s nothing to enable. To test it, open http://raspberrypi.local in a browser on another computer. If you gave your Pi a different hostname in Raspberry Pi Imager, use that instead of raspberrypi. If the name doesn’t work, use the Pi’s IP address, which this command shows you:
hostname -IYou should see the Apache start page with the line “It works!”:
You’ll often see the message “AH00558: Could not reliably determine the server’s fully qualified domain name” in Apache’s output. It’s not an error, Apache just doesn’t know a server name. The troubleshooting section shows how to get rid of it.
Step 3: Install PHP
PHP builds pages every time someone requests them, for example from database content. Raspberry Pi OS ships with PHP 8.4. Install it together with the Apache module and the extensions most PHP apps need:
sudo apt install php libapache2-mod-php php-cli php-curl php-gd php-mbstring php-xml php-zip -y
sudo systemctl restart apache2
libapache2-mod-php plugs PHP into Apache. The packages from php-curl to php-zip add support for downloads, image processing, multibyte characters, XML files and ZIP archives. Then check the version:
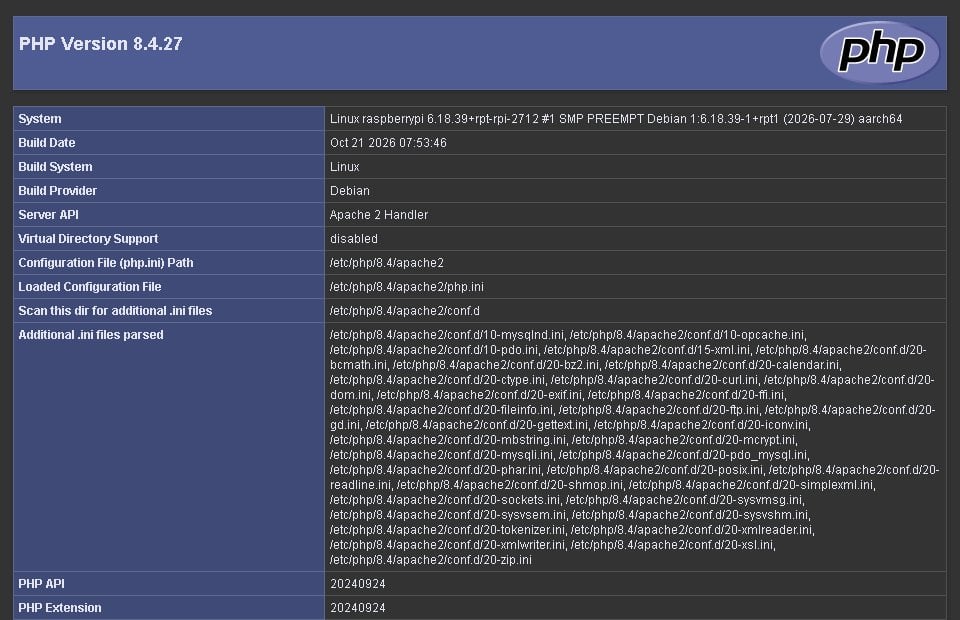
php -vThe first line of the output starts with PHP 8.4. To make sure Apache actually runs PHP files, create a test file:
echo "<?php phpinfo(); ?>" | sudo tee /var/www/html/info.phpOpen http://raspberrypi.local/info.php. The PHP version is at the top, and “Server API” further down says “Apache 2 Handler”:
This page reveals a lot about your system, so delete it once you’re done:
sudo rm /var/www/html/info.phpPHP security updates arrive with the regular Raspberry Pi OS updates, and according to php.net, PHP 8.4 gets security fixes until the end of 2028. The newer PHP 8.5 is only available from third-party repositories, and you don’t need it for this guide.
Step 4: Install and Secure MariaDB
MariaDB is the database where apps like WordPress store their content. It started as a fork of MySQL, understands the same commands and is the default database on Raspberry Pi OS. The php-mysql package lets PHP talk to the database, so restart Apache afterwards:
sudo apt install mariadb-server php-mysql -y
sudo systemctl restart apache2
Secure the database
The bundled script clears out the usual weak spots: anonymous users, remote root login and the test database. A fresh install on Raspberry Pi OS has none of these, even though the script itself still talks about anonymous users. Running it does no harm, though, and it pays off if you take over an older setup:
sudo mariadb-secure-installationThe mysql_secure_installation command from older guides no longer comes with current MariaDB. One thing to know before you answer the questions: on Raspberry Pi OS, the database admin account root logs in via unix_socket. Instead of checking a password, MariaDB checks which Linux user runs the command. If you use sudo, you’re root in the database. Without sudo, access is denied. Here’s how to answer the seven questions:
- Enter current password for root: just press Enter.
- Switch to unix_socket authentication:
n, since unix_socket is already set up. - Change the root password?
n. Thanks to unix_socket, root doesn’t need a password. - Remove anonymous users?
Y - Disallow root login remotely?
Y - Remove test database and access to it?
Y - Reload privilege tables now?
Y
Create a database and user
Give each app its own database and its own user. Open the MariaDB console:
sudo mariadbEnter the following commands, replacing myproject, webuser and the password with your own values:
CREATE DATABASE myproject CHARACTER SET utf8mb4 COLLATE utf8mb4_unicode_ci;
CREATE USER 'webuser'@'localhost' IDENTIFIED BY 'securePassword';
GRANT ALL PRIVILEGES ON myproject.* TO 'webuser'@'localhost';
FLUSH PRIVILEGES;
EXIT;
Your PHP app will use this username and password to connect, and it’s also what you’ll log in to phpMyAdmin with. For remote database access and backups, see our guide on installing MariaDB on the Raspberry Pi.
Step 5: Install phpMyAdmin (Optional)
phpMyAdmin is a web interface for managing your databases in the browser instead of typing SQL commands:
sudo apt install phpmyadmin -yThe installer asks two questions. When it asks which web server to configure, select apache2 with the spacebar so an asterisk appears next to it, then press Enter. When it asks whether to set up phpMyAdmin’s database with dbconfig-common, choose Yes. The password that follows is only used internally by phpMyAdmin. Leave it blank and the installer generates a random one.
You can now reach phpMyAdmin at http://raspberrypi.local/phpmyadmin. Log in with the user from step 4. In our test, phpMyAdmin refused a root login, because phpMyAdmin connects with a password and root is only allowed through unix_socket.
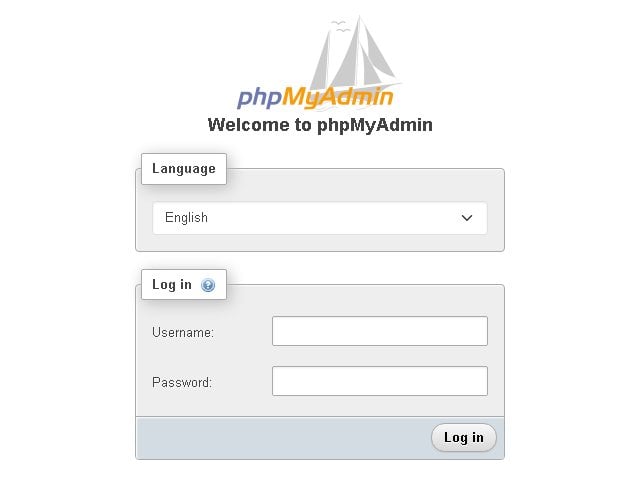
phpMyAdmin is a popular target for attacks. Before you open your Pi to the internet in step 7, turn it off and only switch it on when you need it:
# turn off
sudo a2disconf phpmyadmin
sudo systemctl reload apache2

# turn back on
sudo a2enconf phpmyadmin
sudo systemctl reload apache2
Step 6: Set Up the Website Folder
Your website files live in /var/www/html, which belongs to root. To add files there without sudo, hand the folder over to your user:
sudo chown -R $USER:$USER /var/www/html/The permissions are already right: 755 for folders, 644 for files. Apache only needs read access. A blanket chmod -R 755 isn’t necessary and makes every file executable on top of that. Our guide to chmod and chown on the Raspberry Pi explains what the numbers mean.
Create a simple test page. It replaces the Apache start page:
echo "<h3>My Raspberry Pi Web Server</h3>" > /var/www/html/index.htmlReload http://raspberrypi.local in your browser and your heading appears.
Step 7: Make It Reachable from the Internet
So far, you can only reach the web server from your home network. There are two ways to open it up to the internet. If your connection has a public IPv4 address of its own, go with option A and port forwarding. If your provider uses CGNAT or you’d rather not open any ports, go with option B and a Cloudflare Tunnel. To find out, compare the internet (WAN) IPv4 address your router shows with the one a “what’s my IP” website shows. If they differ, or the router shows an address starting with 100.64 to 100.127, you’re behind CGNAT.
- Install updates regularly:
sudo apt update && sudo apt upgrade. - With option A, only forward ports 80 and 443, never SSH on port 22.
- Turn off phpMyAdmin (step 5).
Option A: Port forwarding and dynamic DNS
The classic approach has your router pass requests from the internet on to the Pi. This only works if your connection has a public IPv4 address of its own.
- Fixed IP address: Reserve a fixed local IP address for the Pi in your router so the forwarding still works after a reboot (set a static IP address).
- Port forwarding: Forward ports 80 (HTTP) and 443 (HTTPS) to that address (set up port forwarding).
- Dynamic DNS: Most home connections get a new public IP address every so often. A dynamic DNS service gives you a fixed name that always points to your current address (set up dynamic DNS).
Then set up HTTPS in step 8.
Option B: Cloudflare Tunnel
Some connections don’t come with a public IPv4 address of their own. Instead, your provider shares one address between several customers, which is known as CGNAT (DS-Lite is one variant). Port forwarding over IPv4 is impossible in that case. Your Pi might still be reachable over IPv6, but visitors without IPv6 can’t get to it.
If that’s you, or you’d rather not open any ports, use a Cloudflare Tunnel. A small program on the Pi opens an outgoing connection to Cloudflare, and visitors reach your site through Cloudflare. You’ll need your own domain that runs through Cloudflare. Point the tunnel at Apache on the Pi, which is http://localhost. The connection is encrypted with HTTPS from the start, so you can skip step 8. Our guide to setting up Cloudflare Tunnel on the Raspberry Pi walks you through it.
Step 8: Set Up HTTPS with Let’s Encrypt
HTTPS encrypts the connection between the browser and your Pi. Let’s Encrypt issues the certificate for free, and a program called Certbot requests and installs it. You only need this step for option A. Before you start, you need a domain name (your own domain or your dynamic DNS name) that points to your connection, and port 80 has to be reachable from the internet. Let’s Encrypt uses port 80 to check that the domain is yours.
sudo apt install certbot python3-certbot-apache -y
sudo certbot --apache -d your-domain.com
Certbot asks a few questions and then adds the HTTPS configuration for your domain to Apache. Let’s Encrypt certificates are currently valid for 90 days. Certbot checks twice a day whether a renewal is due and renews a certificate 30 days before it expires, so after about 60 days for a 90-day certificate.
Let’s Encrypt is shortening certificate lifetimes in stages: to 64 days from February 2027 and to 45 days from February 2028 (Let’s Encrypt announcement). Certbot still renews in good time before expiry, so you don’t have to change anything. To check that automatic renewal works, run:
sudo certbot renew --dry-runHost Several Websites with Virtual Hosts
Virtual hosts let you run several websites on one Pi. Apache looks at the name in the address bar to decide which site to serve. Start by creating a folder for the second site:
sudo mkdir -p /var/www/myproject
sudo chown -R $USER:$USER /var/www/myproject
Then create its configuration:
sudo nano /etc/apache2/sites-available/myproject.conf<VirtualHost *:80>
ServerName myproject.your-domain.com
DocumentRoot /var/www/myproject
ErrorLog ${APACHE_LOG_DIR}/myproject-error.log
CustomLog ${APACHE_LOG_DIR}/myproject-access.log combined
</VirtualHost>Save with Ctrl+O and Enter, then exit nano with Ctrl+X. Enable the site, test the configuration and reload Apache:
sudo a2ensite myproject.conf
sudo apache2ctl configtest
sudo systemctl reload apache2
For the name to work, it has to point to your Pi. That takes a domain of your own where you can create subdomains, since a single dynamic DNS name won’t do. With option A, add a DNS record for the subdomain at your domain provider and get a certificate with sudo certbot --apache -d myproject.your-domain.com. With option B, add the subdomain to your Cloudflare Tunnel instead, and you won’t need Certbot. To test on your home network, add the name to your computer’s hosts file, for example 192.168.1.50 myproject.your-domain.com with your Pi’s IP address. On Windows, the file lives at C:\Windows\System32\drivers\etc\hosts and you need admin rights to save it. On macOS and Linux, it’s /etc/hosts.
Useful Apache Commands
# Check the status
sudo systemctl status apache2

# Start / stop / restart
sudo systemctl start apache2
sudo systemctl stop apache2
sudo systemctl restart apache2

# Test the configuration (before every reload)
sudo apache2ctl configtest

# Follow the error log live (Ctrl+C to quit)
sudo tail -f /var/log/apache2/error.log

# List loaded modules
apache2ctl -M
Troubleshooting
| Problem | Cause | Fix |
|---|---|---|
| The browser shows a connection error | Apache isn’t running | sudo systemctl start apache2, then check sudo systemctl status apache2 and the error log for the cause |
| PHP code shows up as text or gets downloaded | The PHP module for Apache is missing | sudo apt install libapache2-mod-php, then sudo systemctl restart apache2 |
| Your PHP app can’t connect to the database | php-mysql is missing, or the username or password is wrong | sudo apt install php-mysql and restart Apache, then double-check the login from step 4 |
mysql_secure_installation: command not found | Current MariaDB uses a different name for the script | sudo mariadb-secure-installation |
| phpMyAdmin won’t let you log in as root | root can only log in through unix_socket | Log in with the user from step 4 |
| 403 Forbidden | Apache isn’t allowed to read the files or folders | Reset the permissions (see the commands below the table) |
| Message “AH00558: Could not reliably determine the server’s fully qualified domain name” | Apache doesn’t know a server name | Harmless. Get rid of it with the command below the table |
| Certbot fails | Port 80 isn’t reachable from the internet, or the domain points to the wrong IP address | Check your port forwarding and DNS record |
| Not reachable from the internet even though port forwarding is set up | Your connection has no public IPv4 address of its own (CGNAT/DS-Lite) | Option B: Cloudflare Tunnel |
| Apache won’t start because port 80 is in use | Another service, such as Nginx, is using port 80 | sudo ss -tlnp | grep ':80 ' shows which one, then stop it |
Reset folder and file permissions (for 403 Forbidden):
find /var/www/html -type d -exec chmod 755 {} +
find /var/www/html -type f -exec chmod 644 {} +
Set a server name to get rid of the AH00558 message:
echo "ServerName localhost" | sudo tee /etc/apache2/conf-available/servername.conf
sudo a2enconf servername
sudo systemctl reload apache2
Where to Go from Here
Your web server is ready for PHP apps, such as your own cloud with Nextcloud on the Raspberry Pi. If you’d like to use Nginx instead of Apache, or put Nginx in front of Apache as a reverse proxy, our comparison of Apache vs. Nginx on the Raspberry Pi covers the differences.
Raspberry Pi Web Server: FAQ
For beginners and PHP apps like WordPress, Apache is the easier choice: PHP runs directly as an Apache module, and WordPress relies on .htaccess files, which only Apache reads. Nginx uses less memory and works well for static sites and as a reverse proxy in front of other services.
The current Raspberry Pi OS installs PHP 8.4 when you run sudo apt install php. Security updates come with the regular system updates. According to php.net, PHP 8.4 gets security fixes until the end of 2028. The newer PHP 8.5 is only available from third-party repositories.
Run sudo mariadb in the terminal, no password needed. Raspberry Pi OS sets up MariaDB’s root account with unix_socket, so the database trusts the Linux user who runs the command with sudo. That’s also why a root login in phpMyAdmin doesn’t work. Use a separate database user there.
Use Certbot with a free Let’s Encrypt certificate: sudo apt install certbot python3-certbot-apache, then sudo certbot --apache -d your-domain.com. You need a domain that points to your connection and port forwarding for ports 80 and 443. Certbot then renews the certificate automatically. With a Cloudflare Tunnel, Cloudflare takes care of the encryption.
If your connection has its own public IPv4 address, reserve a fixed local IP for the Pi in your router, forward ports 80 and 443 and set up a dynamic DNS name. If it doesn’t, for example because your provider uses CGNAT, use a Cloudflare Tunnel, which works without port forwarding.
Yes. The PHP extensions in this guide cover WordPress’s main requirements. Create a database with its own user as in step 4 and unpack WordPress into /var/www/html. For WordPress, a Raspberry Pi 4 or 5 is the best choice.
On Raspberry Pi OS, go with MariaDB: it’s the default database in the repositories, and there’s no MySQL server package there. MariaDB started as a fork of MySQL, so apps like WordPress and Nextcloud run without changes, and the mysql command still works.
Have fun with your new web server!