Z-Wave in Home Assistant: Set Up Aeotec Z-Stick 10 Pro, TriSensor 8 & Z-Pi 7
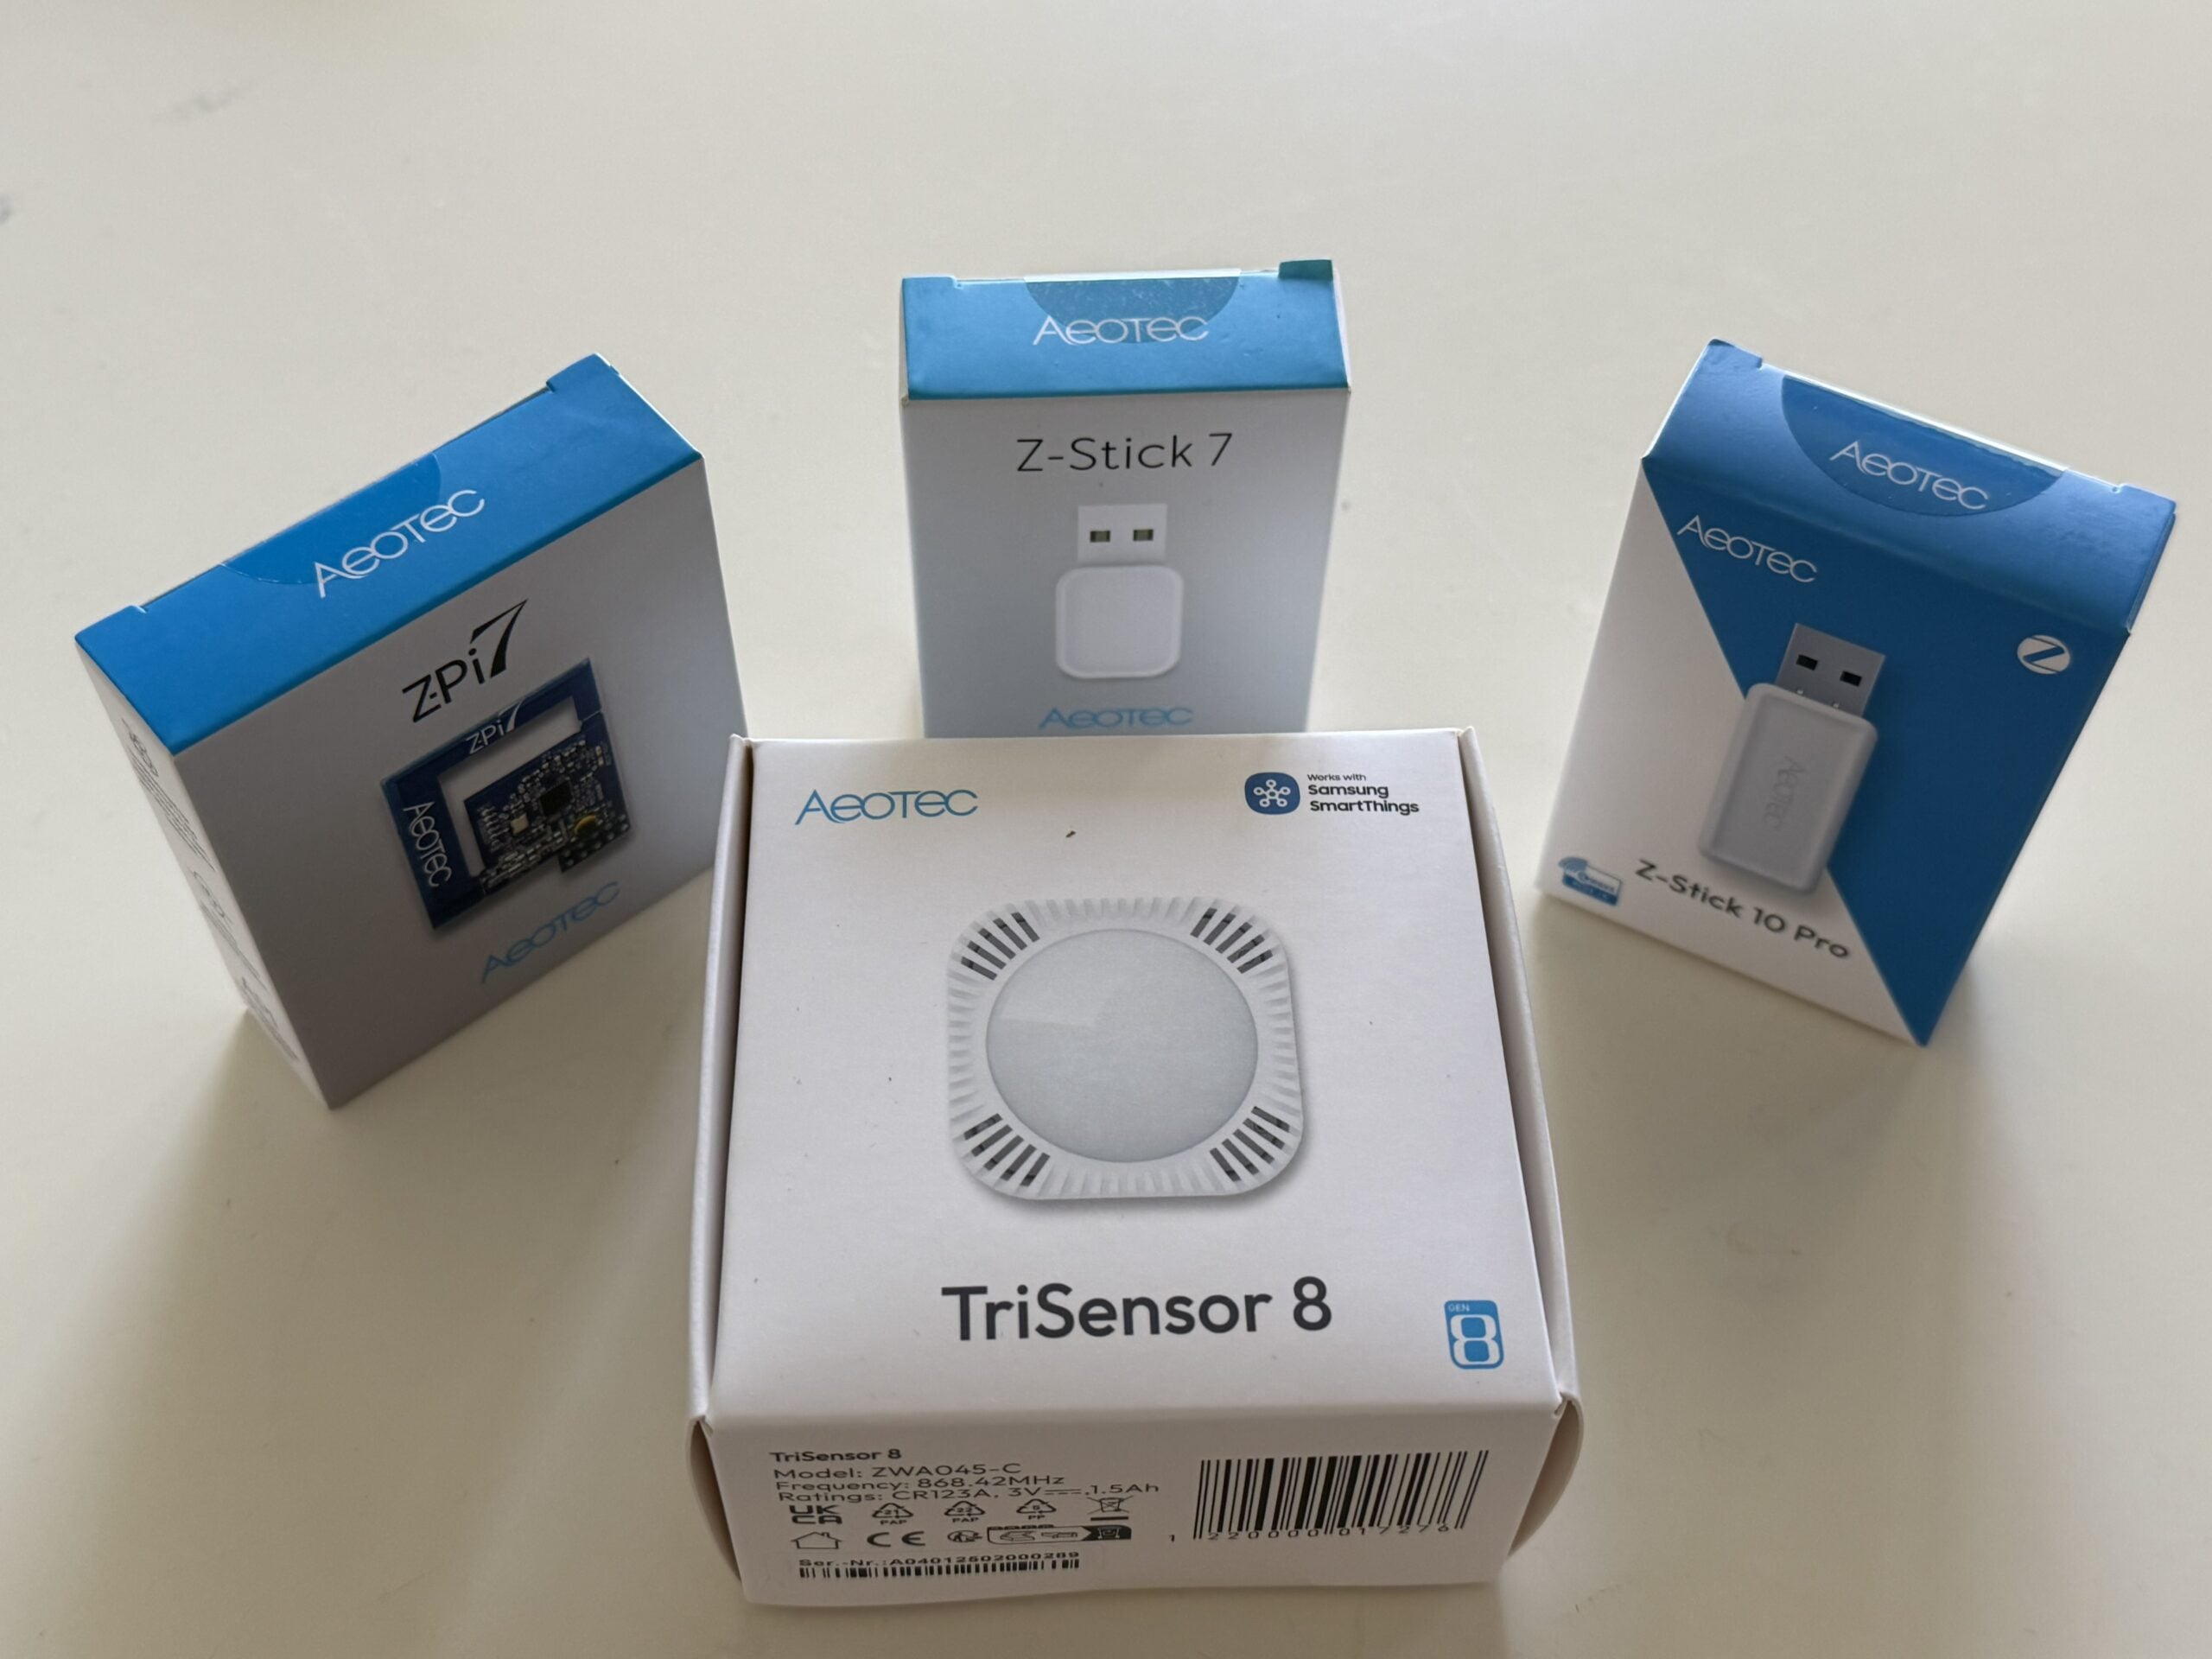
This article is for anyone already running Home Assistant who wants to extend their network with Z-Wave devices – whether via USB stick or GPIO module. Want to bring sensors, switches, and actuators into Home Assistant reliably and without cloud lock-in? Z-Wave has been one of the most robust options for years: an encrypted mesh radio network, a huge device ecosystem built on the open Z-Wave Alliance standard, and control that runs entirely locally on your Raspberry Pi – no manufacturer cloud or app lock-in required. In this article we test four Z-Wave components from Aeotec: the USB controller Z-Stick 10 Pro (Z-Wave and Zigbee in one stick), the simpler Z-Stick 7, the GPIO controller Z-Pi 7 for anyone who doesn’t want to (or can’t) give up a USB port, and the 3-in-1 sensor TriSensor 8 for pairing. We’ll show you step by step how to get the Z-Stick 10 Pro running, set up Z-Wave JS in Home Assistant, and pair your first sensor – plus a look at the GPIO alternative for purists.
Last updated on July 4, 2026.
Z-Wave is a radio standard for smart home devices developed in 2001 that operates at 868 MHz in Europe and forms a self-healing mesh network – every mains-powered device relays the signal to its neighbors, significantly extending range. Unlike many cloud-based systems, control in Home Assistant via Z-Wave JS runs entirely locally, with no manufacturer account required. A Z-Wave network always needs a controller (USB stick or GPIO module) as its hub. Which devices are specifically compatible with Z-Wave JS can be looked up in the official Z-Wave JS device database.
- A simple USB stick (Z-Stick 10 Pro or Z-Stick 7) is enough as a controller – if you don’t want to give up a USB port, use the GPIO module Z-Pi 7 instead.
- Home Assistant uses the official “Z-Wave JS” app, not the phased-out “Z-Wave JS UI”.
- With automatic setup, a single wizard installs the app and the integration together – with manual setup, you’ll need to add the integration separately afterward.
- Once the controller is running, sensors like the TriSensor 8 pair within minutes and are immediately usable in automations – even alongside devices from other systems like Homematic IP.
The Z-Stick 10 Pro, Z-Stick 7, Z-Pi 7, and TriSensor 8 were kindly provided to us free of charge by Aeotec.
Z-Wave vs. Zigbee: The Key Differences
Z-Wave and Zigbee are the two most established radio standards for mesh-based smart home devices – Home Assistant supports both natively, and the Z-Stick 10 Pro in this test even covers both at once. Before we get into setup, here’s a quick rundown of the key differences so you can judge where the two standards diverge.
| Feature | Z-Wave | Zigbee |
|---|---|---|
| Frequency band | 868 MHz (EU, sub-GHz) | 2.4 GHz (uniform worldwide) |
| Interference | Low – the frequency band is barely used by other devices | Shares the band with Wi-Fi and Bluetooth, making it potentially more interference-prone |
| Range per hop (indoor) | approx. 30–100 m, good wall penetration thanks to sub-GHz | approx. 10–20 m |
| Max. hops in mesh | 4 (Z-Wave Plus/classic) | practically unlimited |
| Data rate | up to 100 kbit/s | up to 250 kbit/s |
| Long Range variant | Z-Wave LR: star topology instead of mesh, up to 4,000 nodes, several kilometers of range at high transmit power | no direct equivalent, still relies on classic mesh |
| Device interoperability | Strictly, centrally certified – Z-Wave devices from different brands are, by specification, generally compatible | Open standard with many profiles – cross-brand compatibility depends on implementation |
| Region setting required | Yes – EU, US, and AU use different frequencies | No – 2.4 GHz is identical worldwide |
| Home Assistant integration | Z-Wave JS | ZHA (native) or Zigbee2MQTT |
| Device ecosystem | Smaller, but consistent (Aeotec, Fibaro, Danfoss, Qubino …) | Larger and cheaper (Philips Hue, IKEA, Aqara, Sonoff …) |
When to Use Z-Wave, When to Use Zigbee?
Z-Wave plays to its strengths in larger homes with lots of walls, where better sub-GHz penetration and lower interference tip the scales – and where guaranteed cross-brand interoperability matters to you. Zigbee pays off if you want access to a larger, generally cheaper device selection, or if you already have Zigbee devices in use (e.g., from Philips Hue or IKEA). With the Z-Stick 10 Pro, you don’t have to commit either way: it covers both networks in parallel over a single USB stick.
Aeotec Z-Wave Test Kit at a Glance
We ran this setup with these four Aeotec components – a controller of your choice (USB stick or GPIO module) plus a sample sensor to pair.
| Device | Model | Type | Function | Manufacturer page |
|---|---|---|---|---|
| Z-Stick 10 Pro* | ZWA060 (EU: ZWA060-C, US: ZWA060-A) | USB stick | Dual controller Z-Wave + Zigbee, 800 series | Manufacturer page |
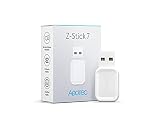
| Z-Stick 7* | ZWA010 | USB stick | Z-Wave controller, 700 series | Manufacturer page |
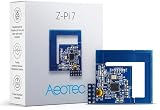
| Z-Pi 7* | ZWA025 | GPIO HAT | Z-Wave controller directly on the Raspberry Pi | Manufacturer page |
| TriSensor 8* | ZWA045 | Battery sensor | Motion, light, temperature (3-in-1) | Manufacturer page |

Z-Wave Controllers Compared
With the Z-Stick 10 Pro, Z-Stick 7, and Z-Pi 7, Aeotec offers three different ways to connect Z-Wave to your Raspberry Pi. For most people, a USB stick is the easiest way in; if you don’t want to give up a USB port, go with the GPIO module Z-Pi 7. Aeotec has since discontinued the Z-Stick 7 and Z-Pi 7, so any you find in shops is leftover stock.
| Controller | Connection | Protocols | Series | Notable feature |
|---|---|---|---|---|
| Z-Stick 10 Pro | USB | Z-Wave + Zigbee | 800 | Two radio chips in one stick, Long Range capable, plug & play |
| Z-Stick 7 | USB | Z-Wave | 700 | Simplest setup, plug & play |
| Z-Pi 7 | GPIO (Pi 3/4/5) | Z-Wave | 700 | No USB port used, but conflicts with Bluetooth (UART), manual setup |
- Z-Stick 10 Pro (800 series): The most current chipset in this test, including the latest-generation S2 security and support for Z-Wave Long Range – on top of classic mesh operation, it can also be used in a star topology with significantly greater range. The only controller in this test with a second, independent Zigbee radio chip. The most expensive, but also the most future-proof controller.
- Z-Stick 7 (700 series): The previous chipset generation, Z-Wave only, no Long Range. Setup works almost identically to the Z-Stick 10 Pro – just without the port selection between two radio chips. An option if you only need Z-Wave and can still find one.
- Z-Pi 7 (700 series, GPIO): Technically on par with the Z-Stick 7, but doesn’t use a USB port – in exchange, it has a UART/Bluetooth conflict and isn’t automatically detected by Home Assistant (details in the “For Pi purists” section further below). That makes it the controller with the most setup effort in this test.
For our main walkthrough in this article, we use the Z-Stick 10 Pro: the most current 800 series, Long Range capable, and with its extra Zigbee radio chip also interesting for anyone who wants to cover both worlds down the line. If you only need Z-Wave and can still get hold of a Z-Stick 7, it works just as well – setup runs almost identically. Further below, we also show what to watch out for with the Z-Pi 7 as a GPIO alternative.
Requirements
- A running Home Assistant instance – ideally on a Raspberry Pi, as described in our Home Assistant installation guide
- For the USB sticks (Z-Stick 10 Pro / Z-Stick 7): a free USB port on the Raspberry Pi
- For the Z-Pi 7: access to the microSD card or boot drive of Home Assistant OS to edit
config.txt - For the TriSensor 8: a CR123A battery (included)
Which Z-Wave Integration / App?
There are two apps/integrations for Z-Wave: “Z-Wave JS” and “Z-Wave JS UI”. I use the “Z-Wave JS” integration.

Z-Wave JS UI (formerly Zwavejs2Mqtt) was built because the lean Z-Wave JS backend long lacked its own UI and MQTT connectivity. That UI functionality has since been merged directly into the interface (the Z-Wave panel under Settings → Connectivity → Z-Wave). The developers write: “The Z-Wave JS UI app is being phased out, as its feature-rich UI is now included in the Z-Wave JS app.” There’s an official migration script to move existing Z-Wave JS UI networks to the new app without re-pairing.
Step 1: Connect the Z-Stick 10 Pro and Set Up Z-Wave JS
I ran this setup on my Home Assistant OS (HAOS) test system, a VM running on Proxmox – that way I can test much more freely without affecting my production setup or devices. In this article, I’m covering exclusively the use of Z-Wave via the Z-Wave integration via the “Z-Wave JS” app in Home Assistant. We’ve already covered using and setting up Zigbee in our Zigbee2MQTT tutorial.
Automatic Setup of the Z-Wave Stick
Since a few Home Assistant versions ago, initial setup of a Z-Wave controller runs through a single guided dialog – just plug in the adapter and follow the Z-Wave integration’s setup wizard, done. A manual installation is also possible, see below:
- Plug the Z-Stick into a free USB port on the Raspberry Pi (see the note about using a USB extension cable above)
- Open Settings → Devices & Services and add the “Z-Wave” integration there.


- The Z-Stick 10 Pro reports as two serial ports (one chip for Z-Wave, one for Zigbee) – in the selection dialog, choose the Z-Wave port (labeled “if01”). With a Z-Stick 7, only one device is shown.

- Assign an area and finish with Finish. Home Assistant then interviews the entire Z-Wave network (with a freshly paired controller and no legacy devices, this goes quickly).

- Check the radio region: under Settings → Apps → Z-Wave JS → Configuration → Radio Frequency Region, Home Assistant usually sets the region automatically based on the location configured in Home Assistant. If needed, switch it manually to “Europe” or “Europe (Long Range)”. Long Range support is available on the Z-Stick 10 Pro; on the Z-Stick 7, choose “Europe” without Long Range.

Now you can dive right in via the Z-Wave integration or the Z-Wave JS app (installed automatically alongside it) and start pairing devices – further below we’ll show that using the TriSensor 8 as an example, including a matching automation.
Manual Setup of the Z-Wave Stick
In some cases, depending among other things on your Home Assistant version, the Z-Wave stick may not be detected automatically – for me, for example, because my Home Assistant OS test system runs as a VM on Proxmox and the stick is passed through to the VM via USB passthrough. Running directly on a Raspberry Pi, this normally isn’t an issue, but for completeness I’ll show the manual path here too.
Only for Virtualized Home Assistant: USB Passthrough in Proxmox
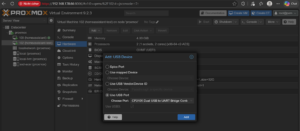
If your Home Assistant OS runs as a VM (e.g., on Proxmox), the stick first needs to be passed through to the VM before Home Assistant can even see it. In Proxmox, open Hardware → Add → USB Device for the relevant VM, select “Use USB Port”, and choose the Z-Stick 10 Pro in there – it reports as “CP2105 Dual USB to UART Bridge Controller” (the chipset used to address both radio modules on the stick). Confirm with Add.
Manually Installing the Z-Wave JS App
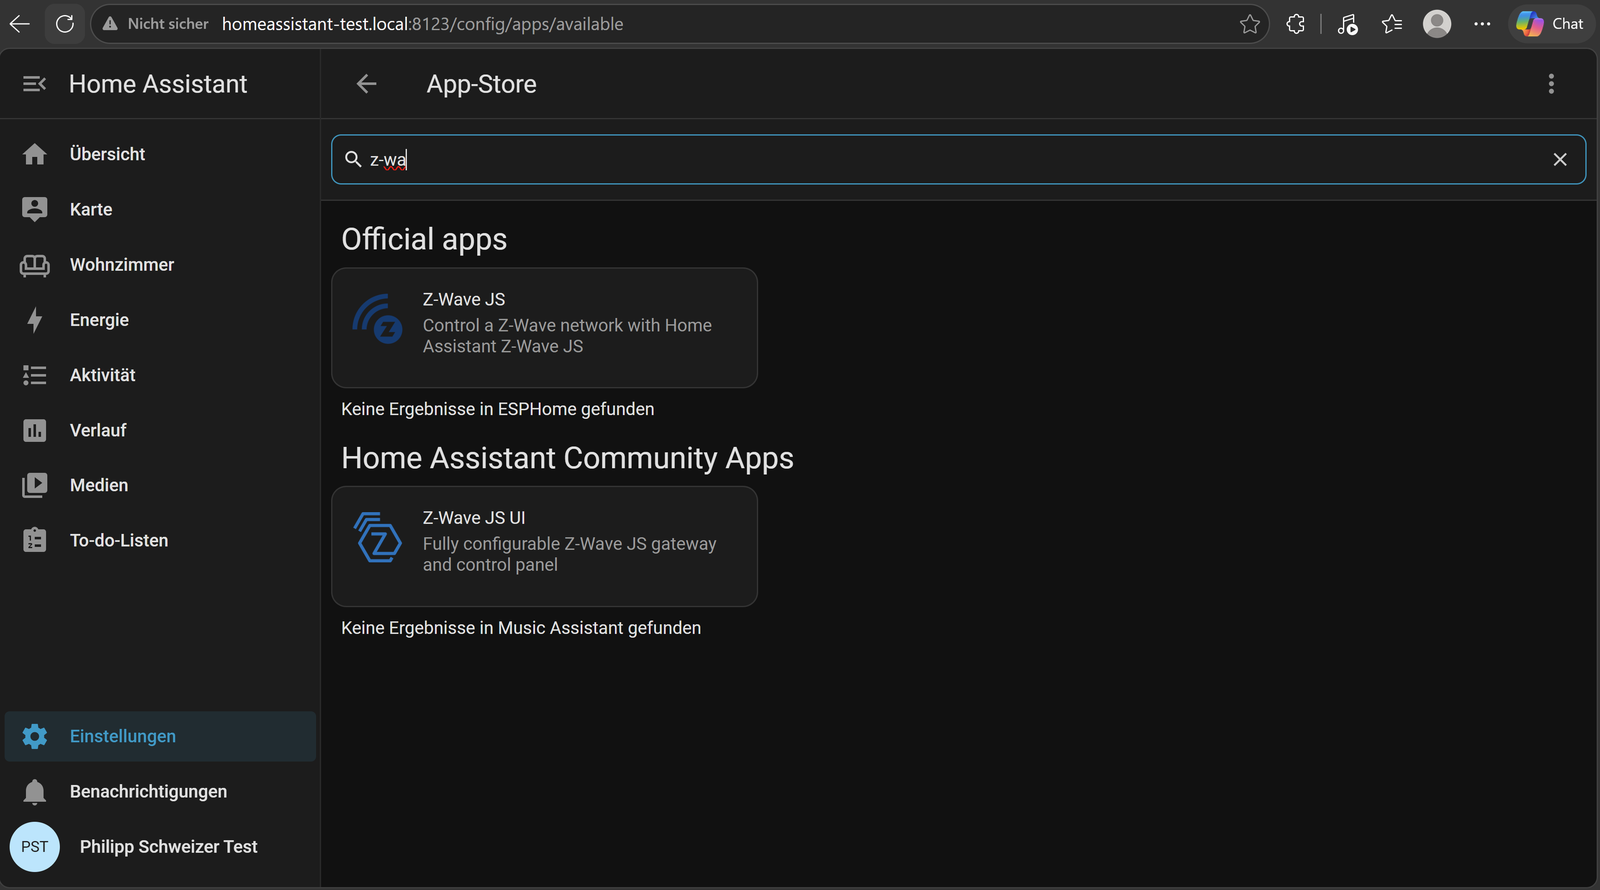
In Home Assistant, continue under Settings → Apps. Click “Install app” to open the app store and search for “z-wa”. Here you’ll also immediately see the distinction described earlier in this article: under “Official apps” you’ll find Z-Wave JS – the app we’re installing – while under “Home Assistant Community Apps” you’ll find the older, phased-out Z-Wave JS UI.
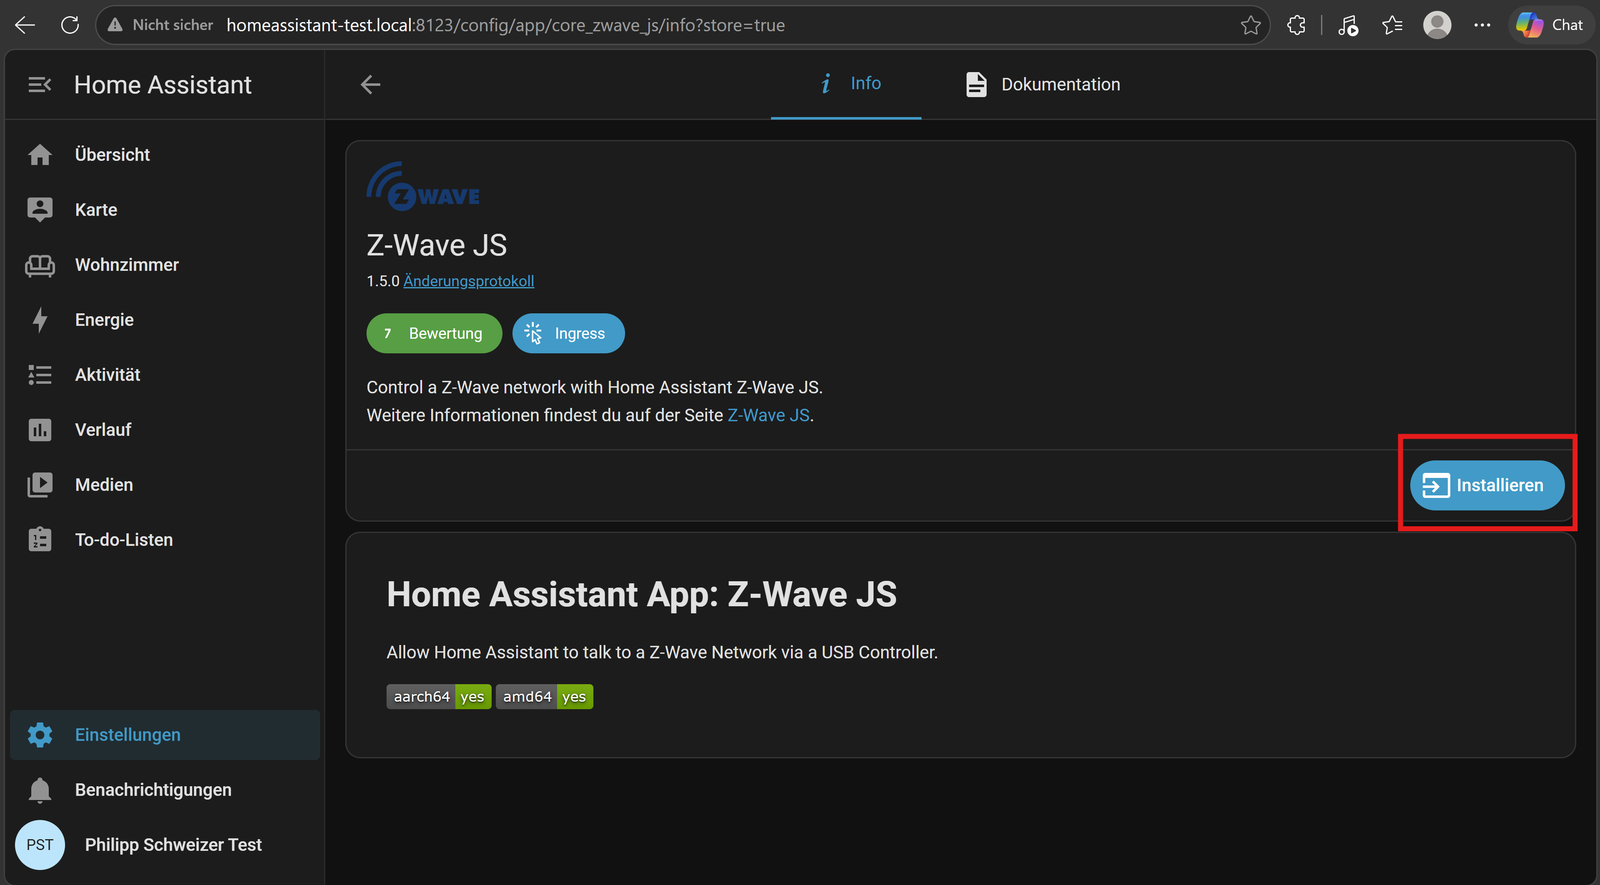
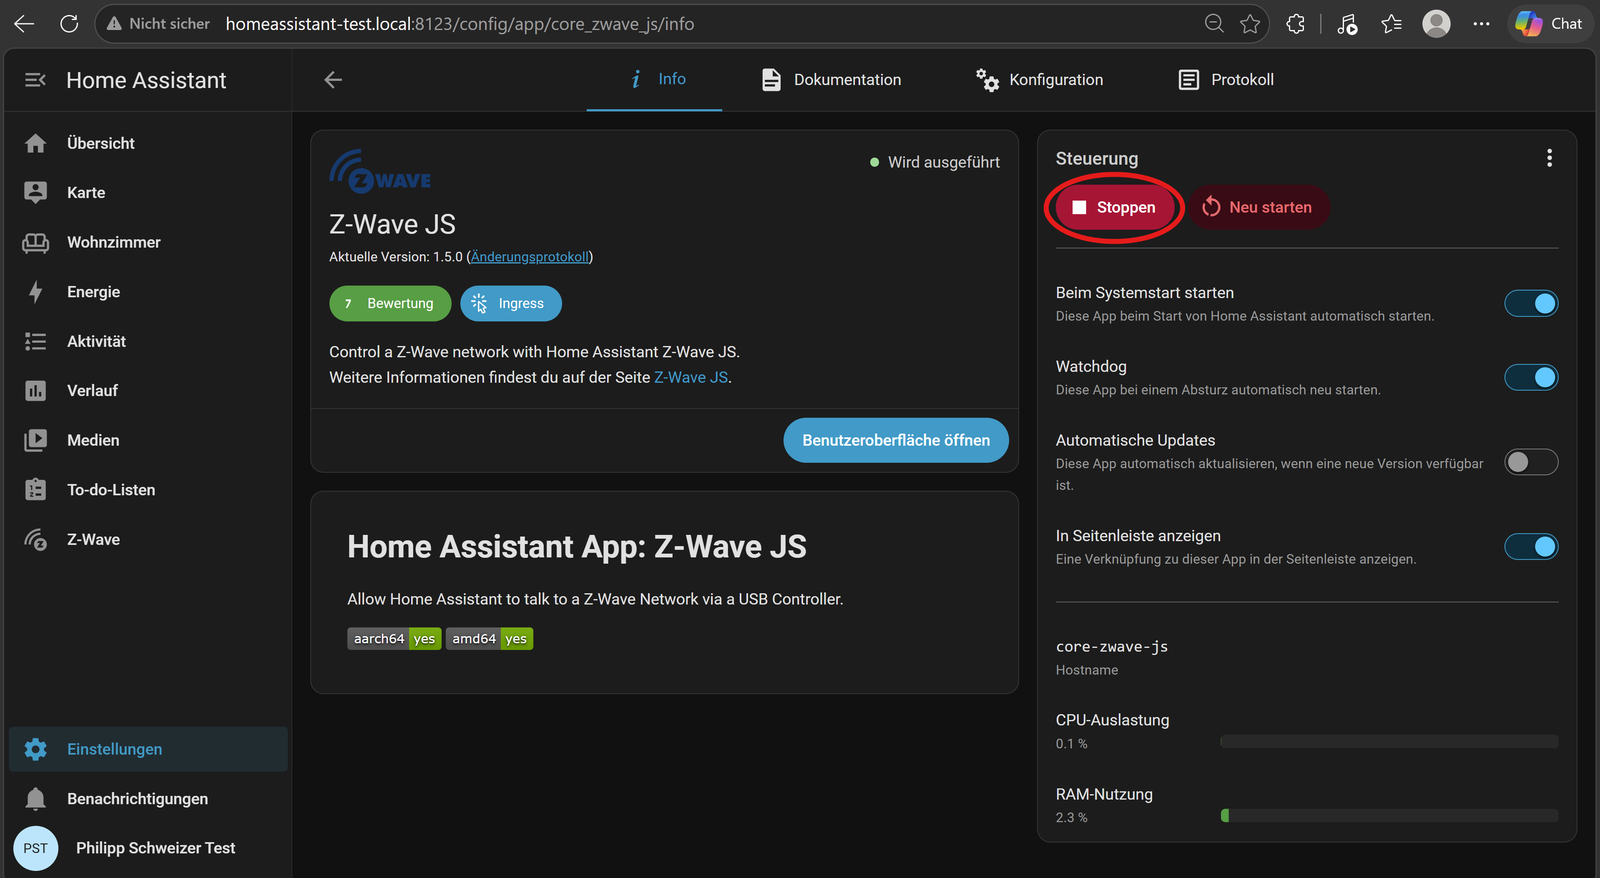
On the Z-Wave JS info page, a click on Install is all it takes.
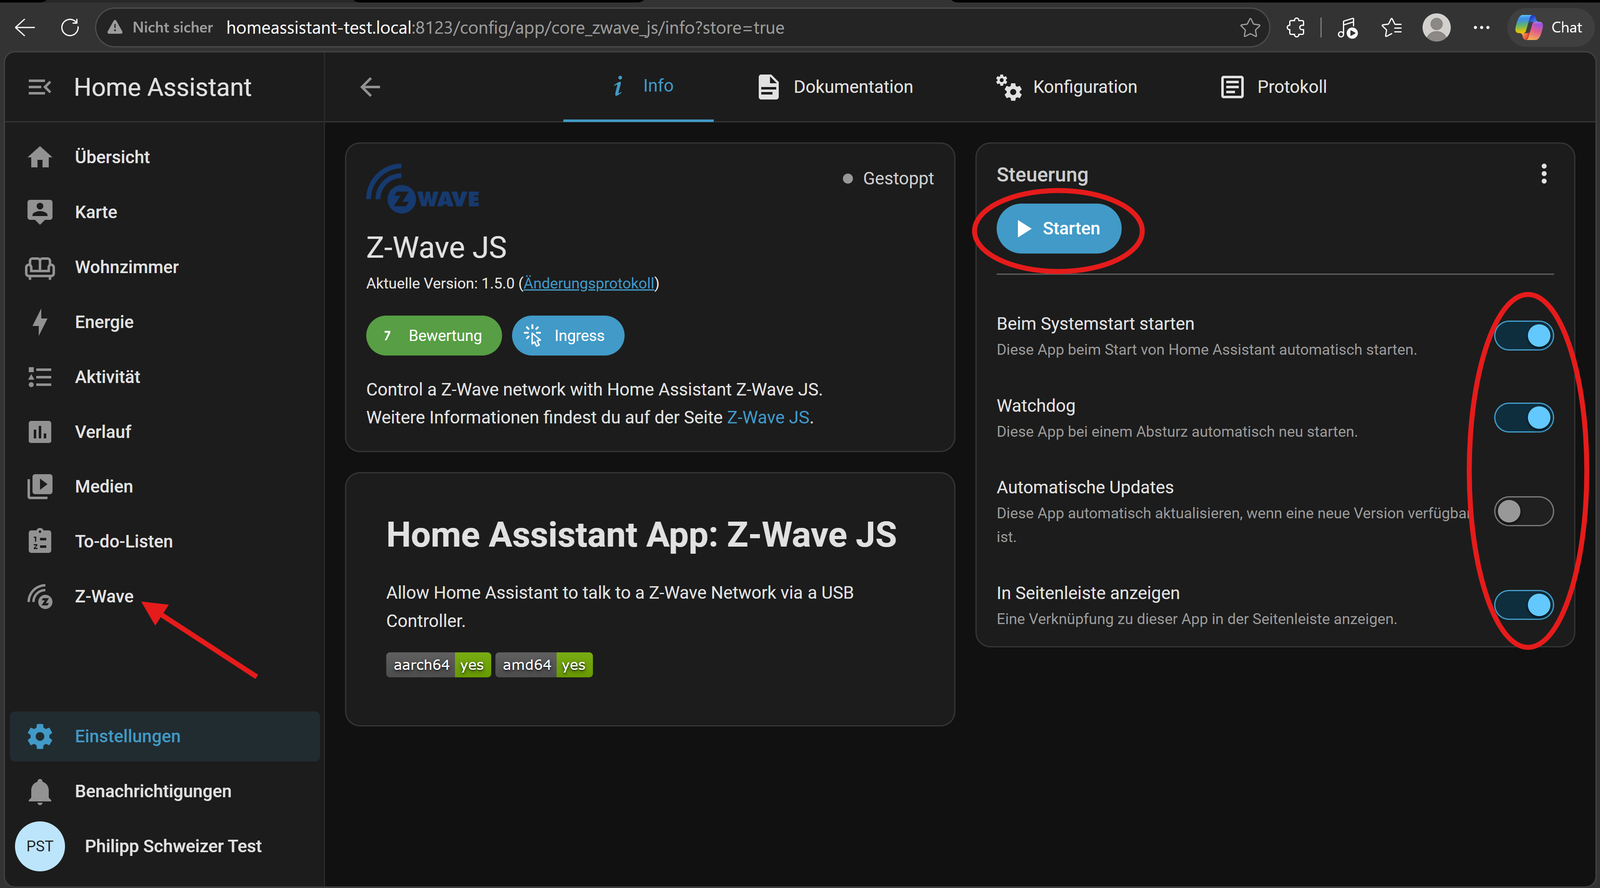
After installation, start the app via Start. I also enable “Start on boot”, “Watchdog” (automatic restart on crash), and “Show in sidebar” – after that, a new “Z-Wave” entry appears in the menu on the left.
Manually Determining the Serial Device Path
Because the stick wasn’t detected automatically, Home Assistant doesn’t yet know the right serial port – you’ll have to find it manually. Go to Settings → System → Hardware and switch to the “System Hardware” tab, then search for “tty”.
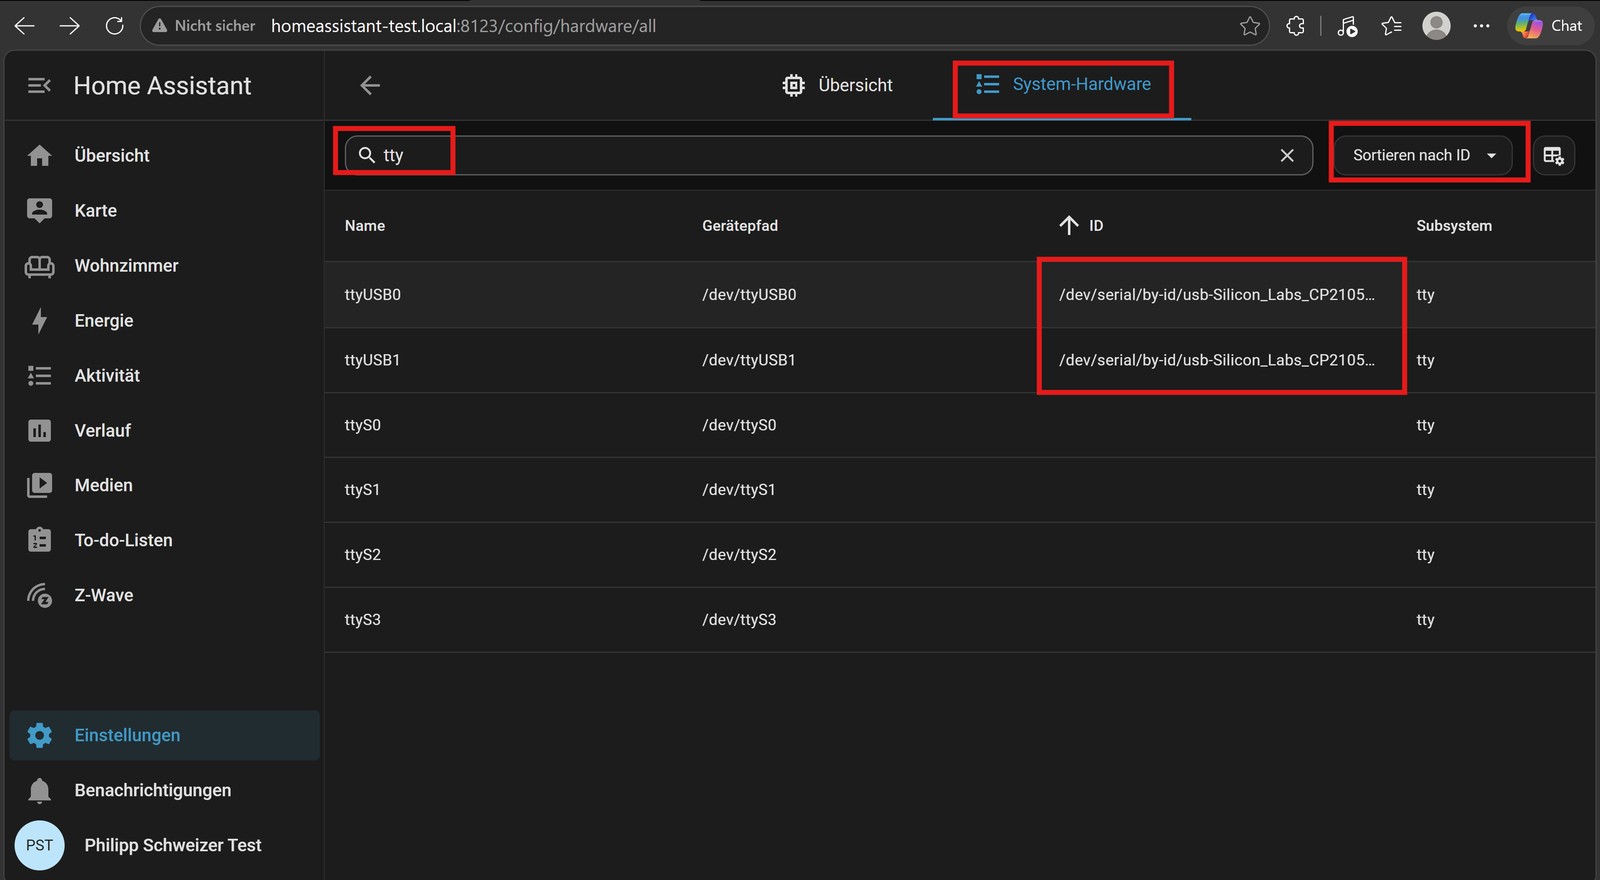
Because the Z-Stick 10 Pro addresses two radio modules (Z-Wave and Zigbee) through the same CP2105 chip, you’ll see two nearly identical entries here – ttyUSB0 and ttyUSB1. The difference is the interface suffix at the end of the path:
…usb-Silicon_Labs_CP2105_Dual_USB_to_UART_Bridge_Controller_…-if00-port0→ Zigbee…usb-Silicon_Labs_CP2105_Dual_USB_to_UART_Bridge_Controller_…-if01-port0→ Z-Wave
Watch out!
On some revisions of the Z-Stick 10 Pro, the Z-Wave chip may be on “if00” instead of “if01”. If one path doesn’t work, just try the other of the two serial devices.
Entering the Device Path in the Z-Wave JS Configuration
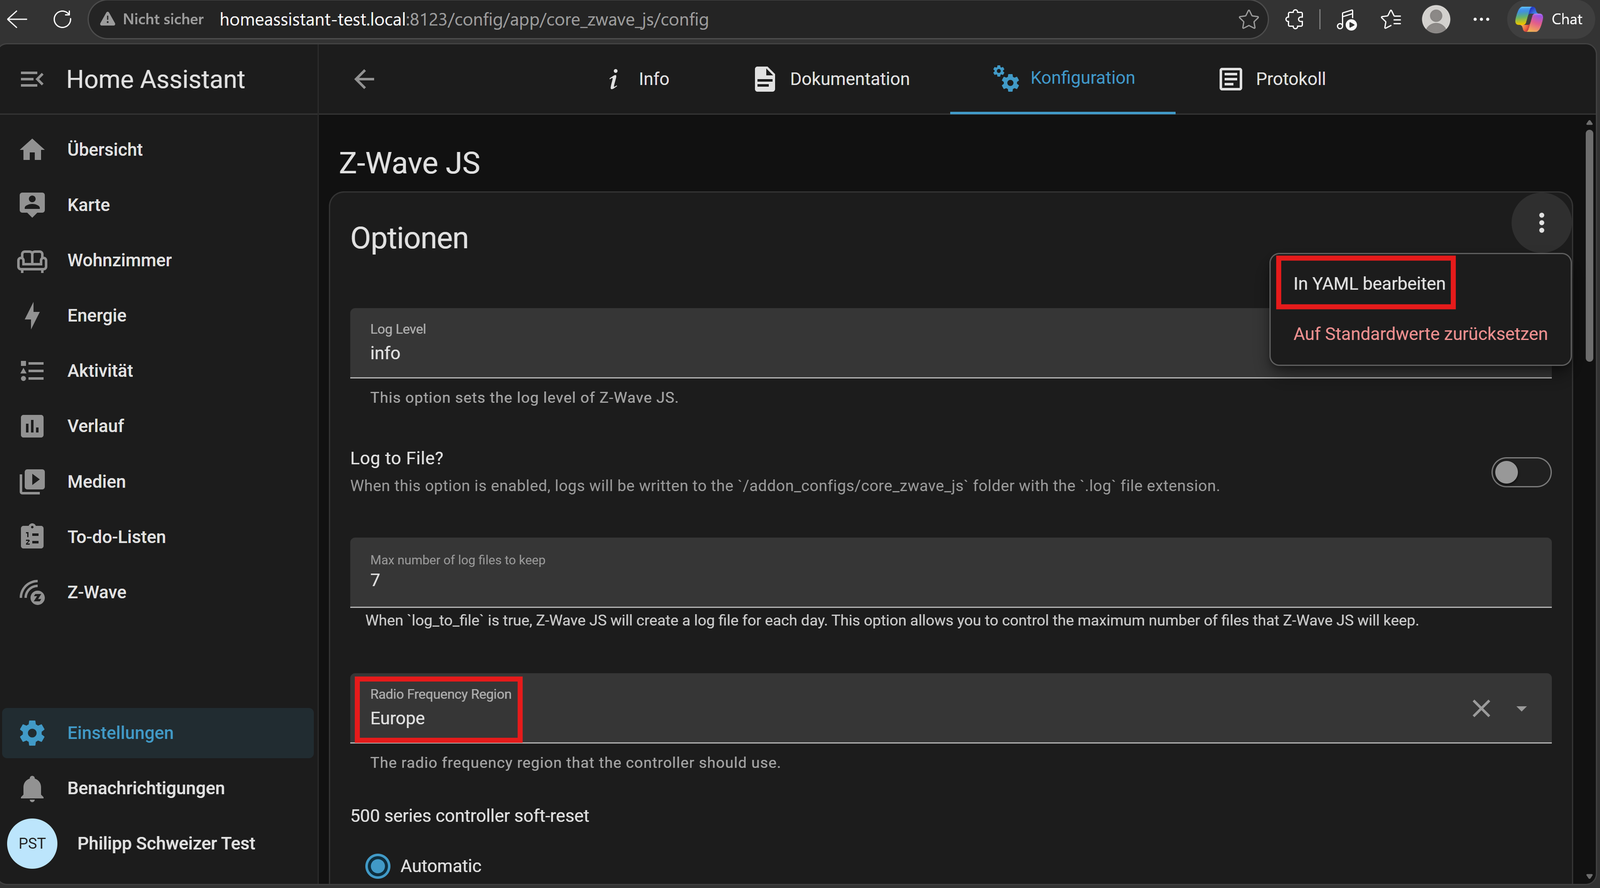
Back in the Z-Wave JS app: in the Configuration tab, use the three-dot menu at the top right to choose “Edit in YAML” – here you can also see that rf_region was already correctly set to “Europe” automatically for me.
In the YAML editor, set the device value to the path you determined earlier, ending in -if01-port0 (the Z-Wave port), and save. The app generates the security keys (s0_legacy_key, s2_access_control_key, etc.) automatically on first start, so you don’t need to edit them. If you still have an old network_key from a previous install, it gets migrated to s0_legacy_key. I simply added this line:
device: /dev/serial/by-id/usb-Silicon_Labs_CP2105_Dual_USB_to_UART_Bridge_Controller_0160A613-if01-port0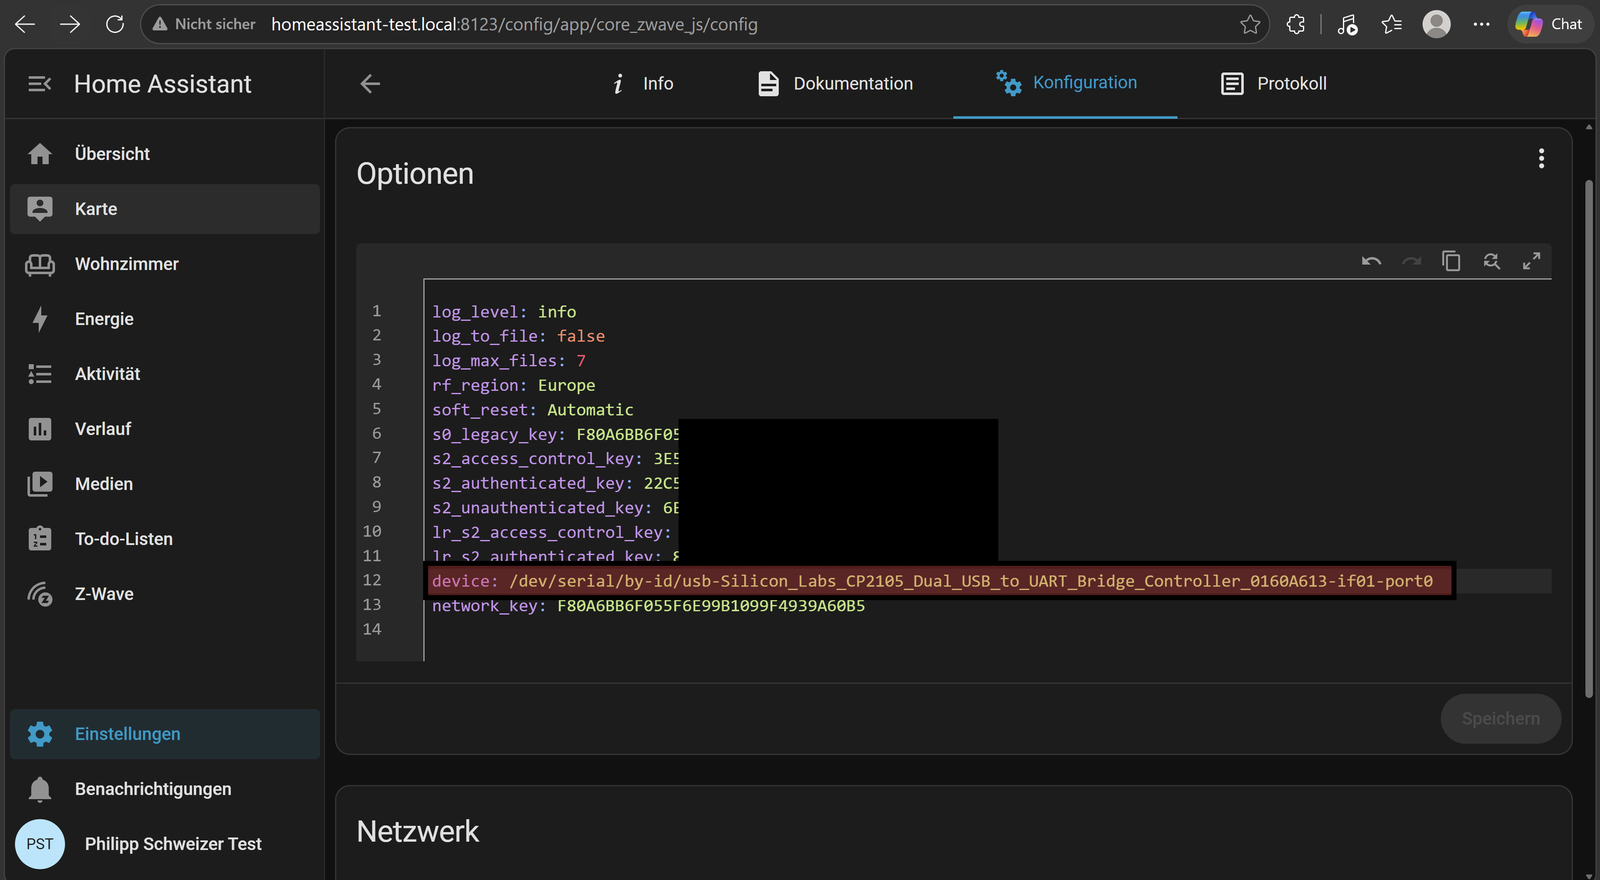
After saving, start the app via Start or Restart. Startup can take a few seconds; if you entered the wrong device, the app won’t start, and the log file will show a corresponding message.
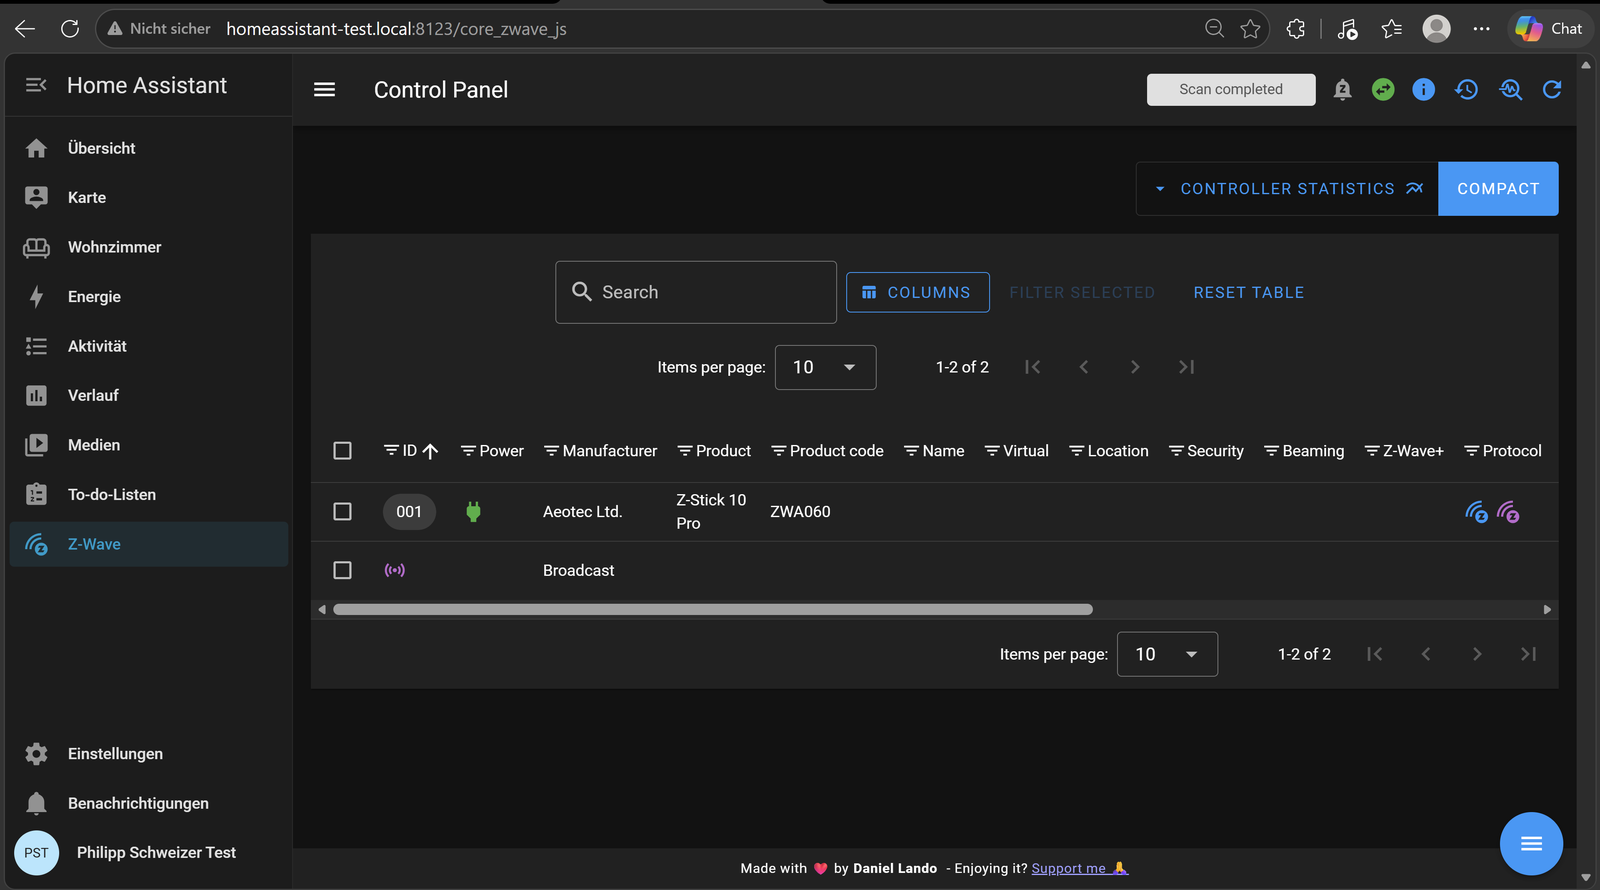
Click “Open Web UI” to reach the Z-Wave JS Control Panel. If the controller shows up there as Node 001 with manufacturer “Aeotec Ltd.”, product “Z-Stick 10 Pro”, and product code “ZWA060”, the manual setup was successful.
Adding the Z-Wave Integration in Home Assistant
At this point, the Z-Wave JS app is running and the stick is visible in the Control Panel – but not a single device shows up in Home Assistant itself yet. The reason: the app and Control Panel only manage the Z-Wave network at the protocol level. For Home Assistant to turn that into actual devices and entities, it also needs the Z-Wave integration, which connects to the running app.
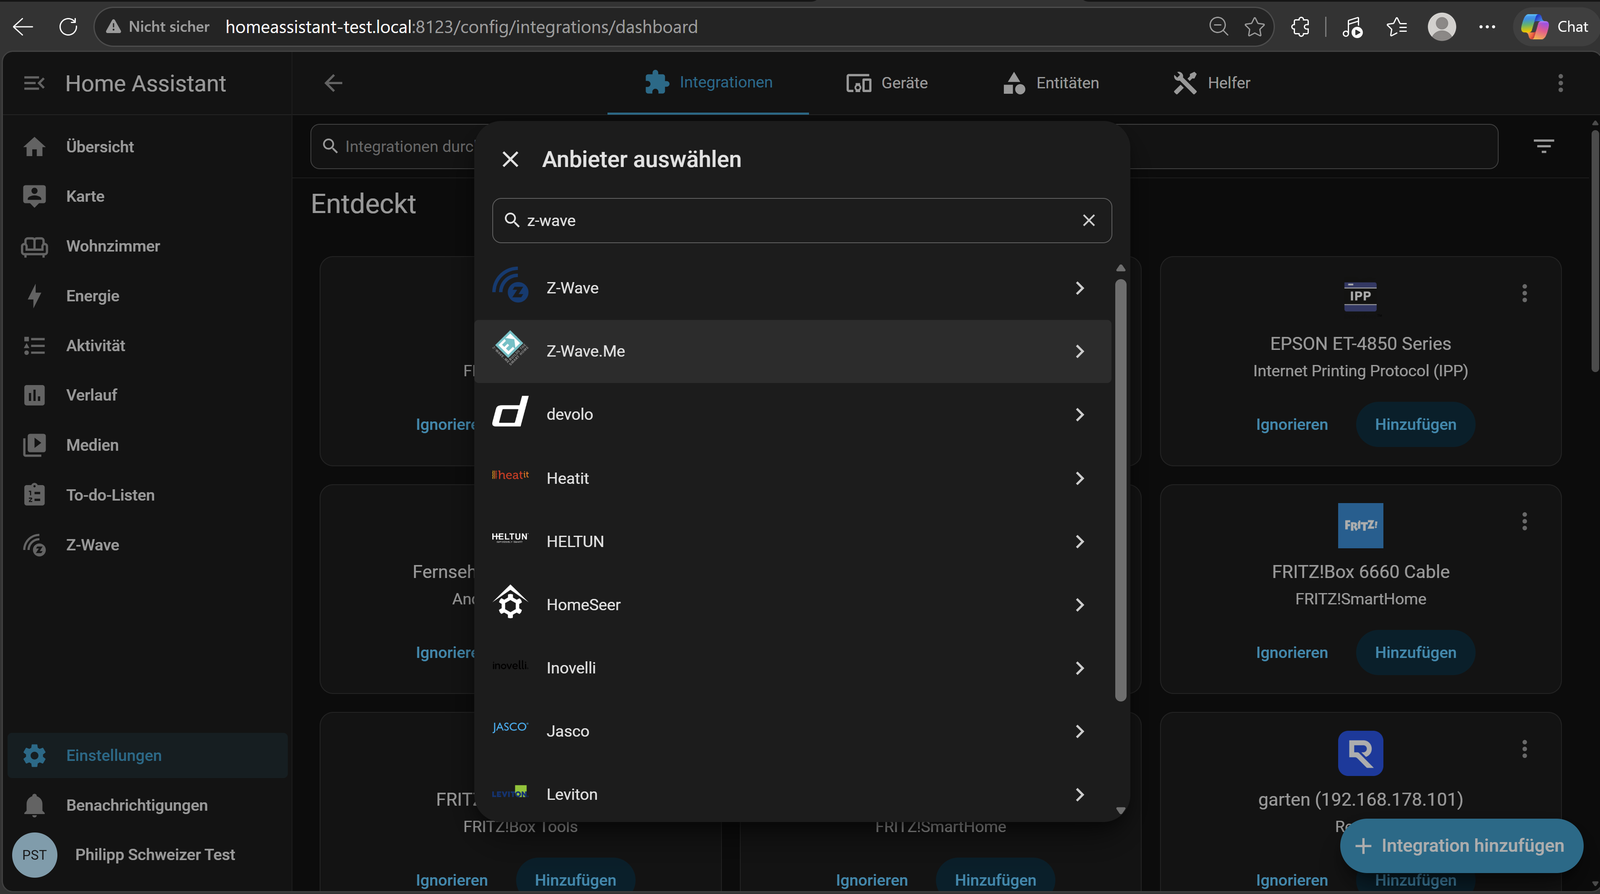
- In Home Assistant, go to Settings → Devices & Services, click Add Integration at the bottom right, and search for “z-wave”. In the results, pick the top entry “Z-Wave” (not “Z-Wave.Me” or any of the other manufacturer entries below it).
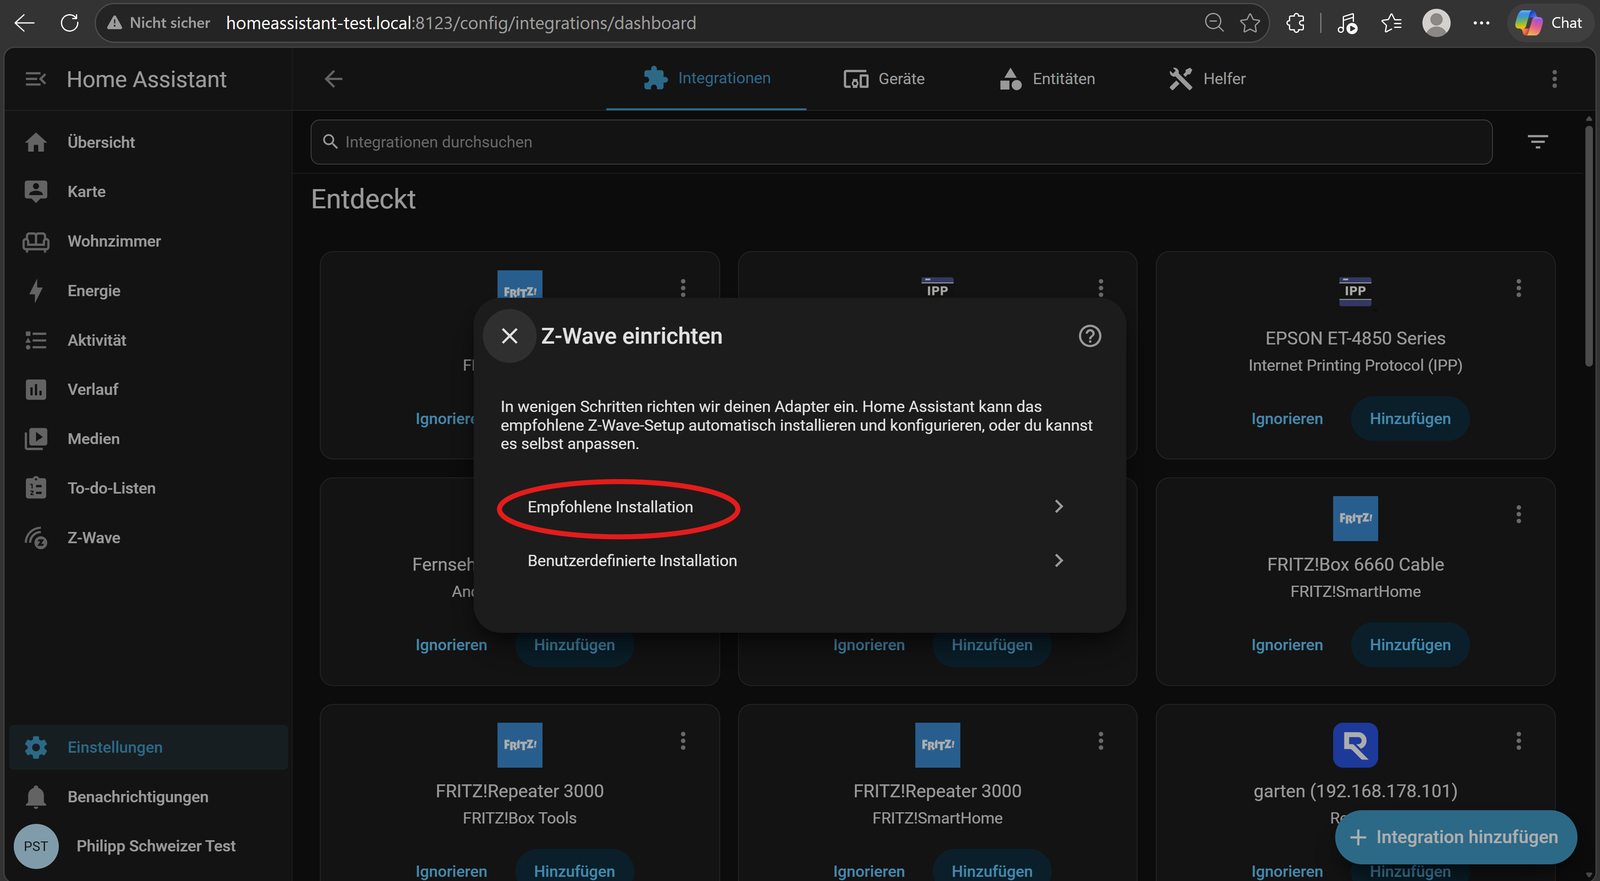
- In the “Set up Z-Wave” dialog, choose Recommended installation. Since the Z-Wave JS app is already running, Home Assistant detects it automatically and connects to it internally – no manual WebSocket URL needed.
- Home Assistant now briefly interviews the existing Z-Wave network and then shows “Name and assign” – all nodes already paired in the Control Panel show up here, in our case the Z-Stick 10 Pro (ZWA060). Names and areas from pairing are carried over directly. Finish with Finish.
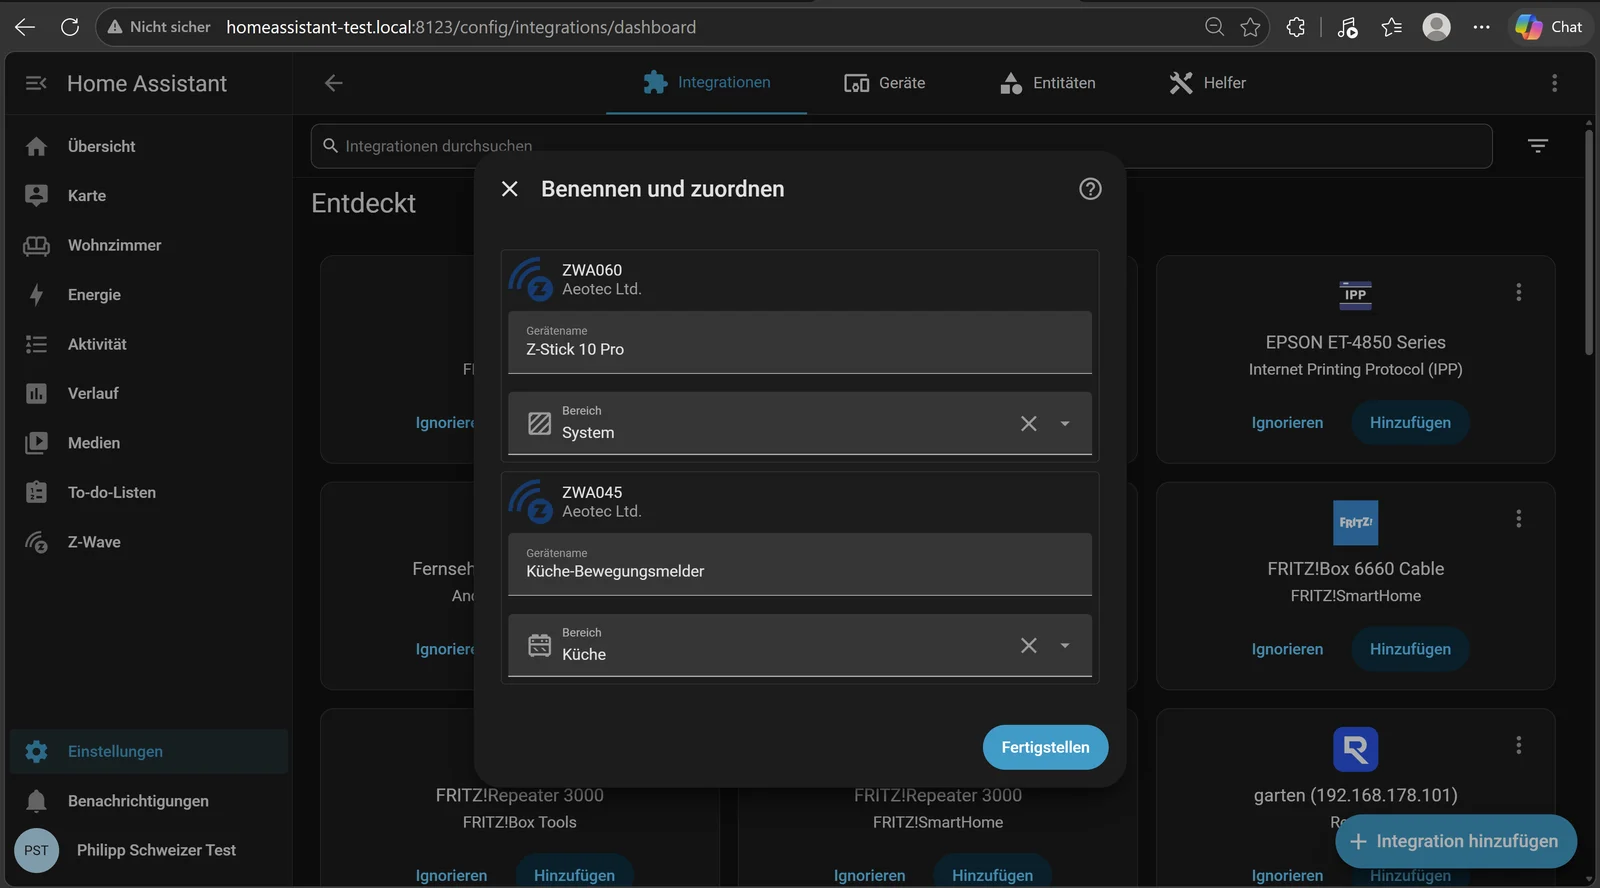
After that, the Z-Wave integration is ready to use and shows all devices with their entities – from here you can pair further devices as usual, for example the TriSensor 8 in the next step.
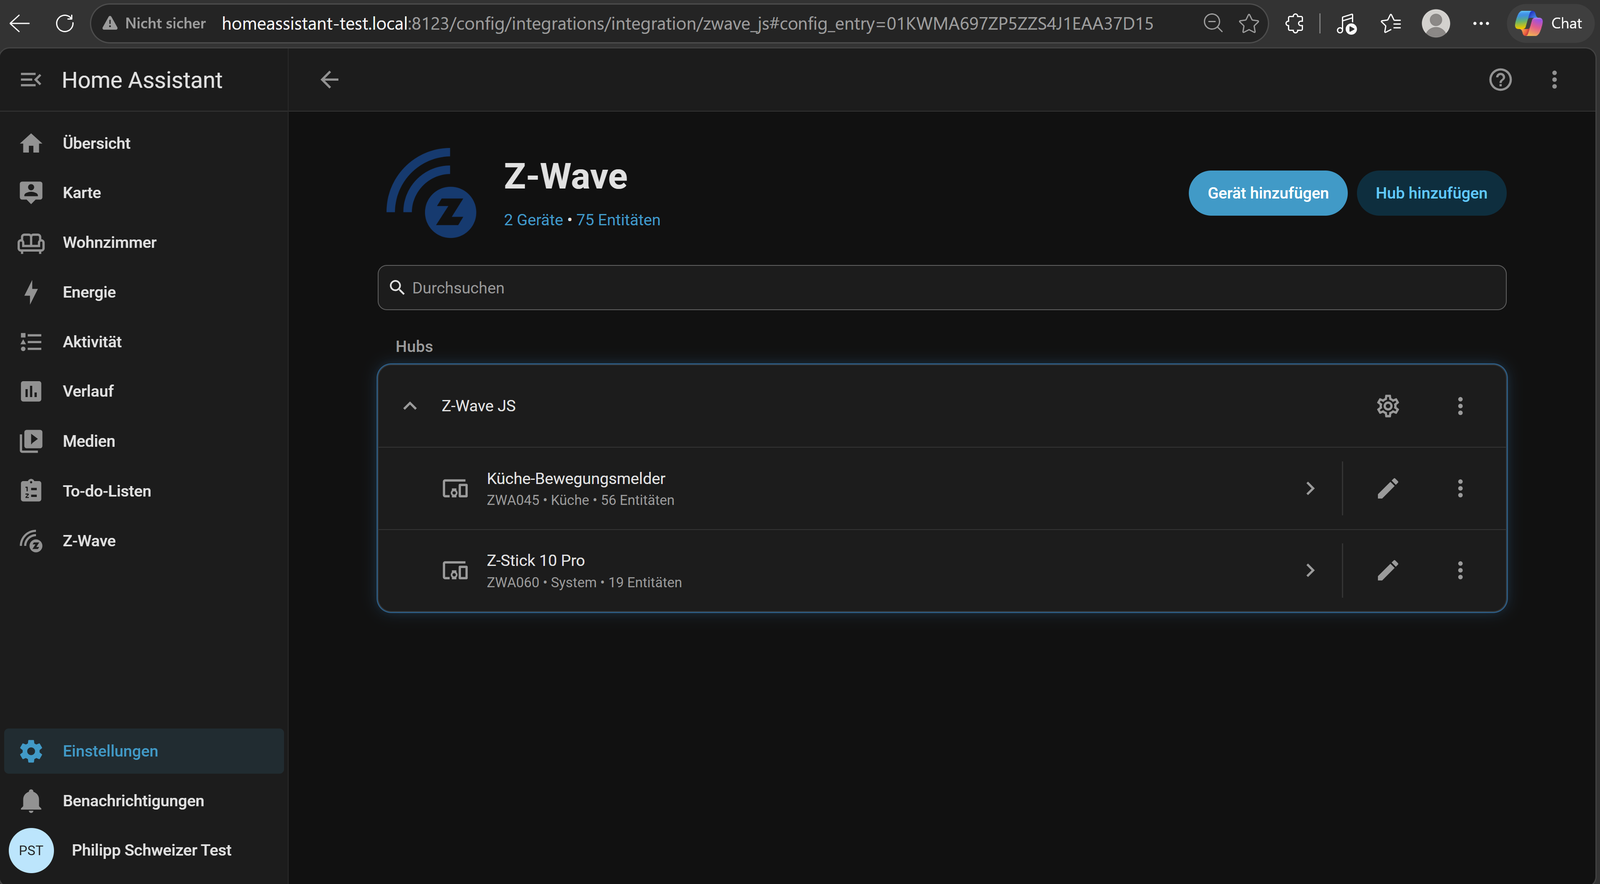
Step 2: Pairing the TriSensor 8
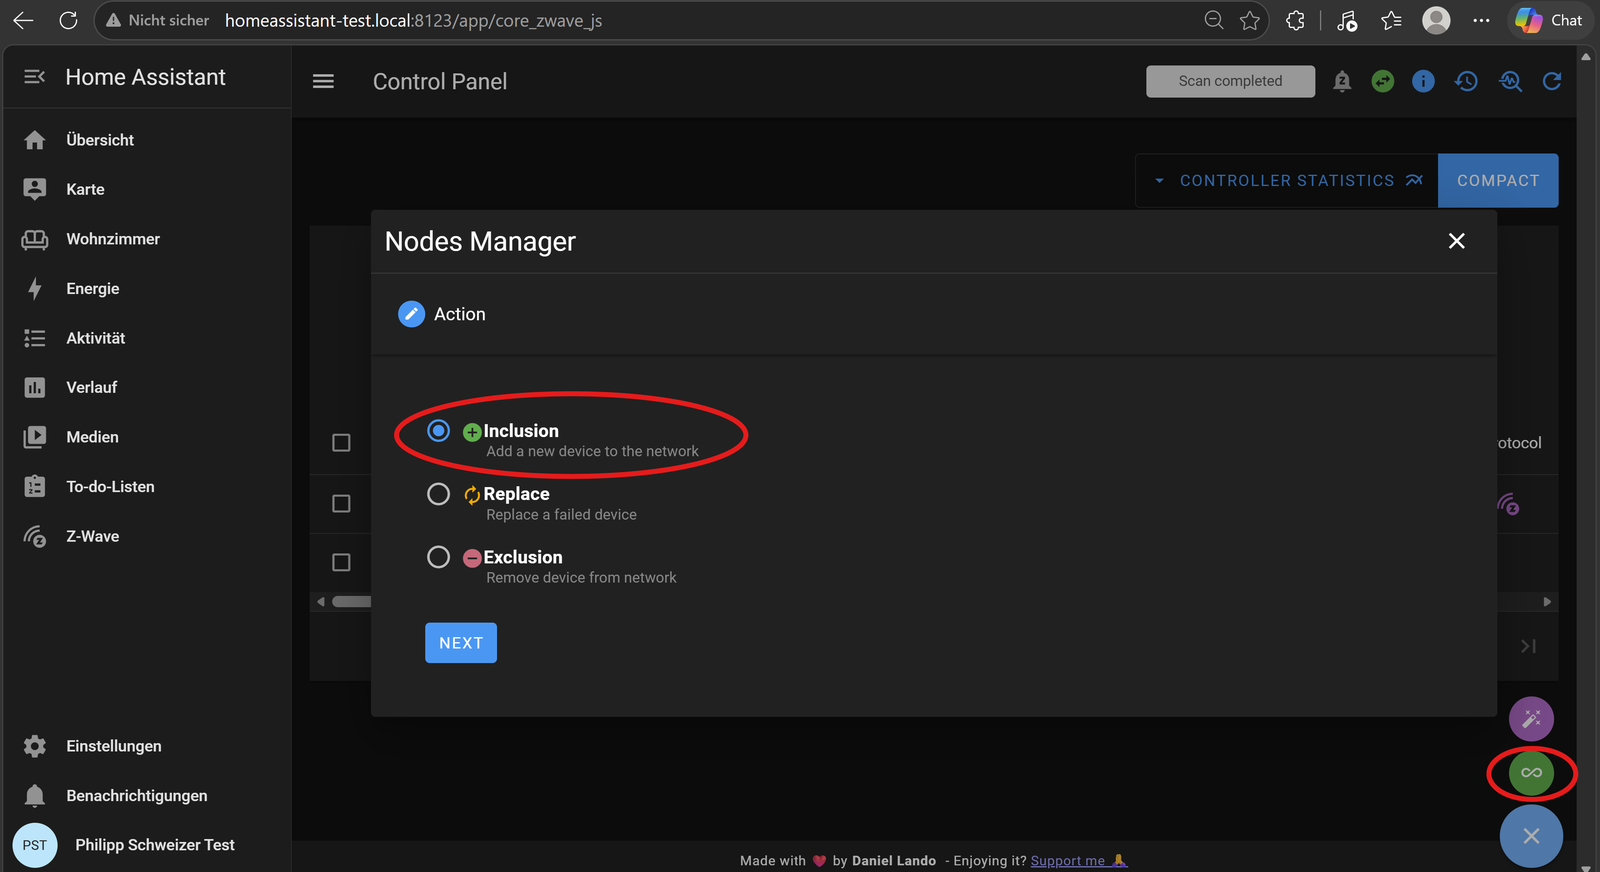
Pairing new devices works easiest directly through the Z-Wave JS Control Panel (reachable via “Open Web UI” in the Z-Wave JS app). There, the Nodes Manager opens a multi-step wizard for inclusion.
- Click the infinity icon at the bottom right of the Control Panel to open the Nodes Manager. In the “Action” tab, Inclusion (“Add a new device to the network”) is already pre-selected – confirm with Next.
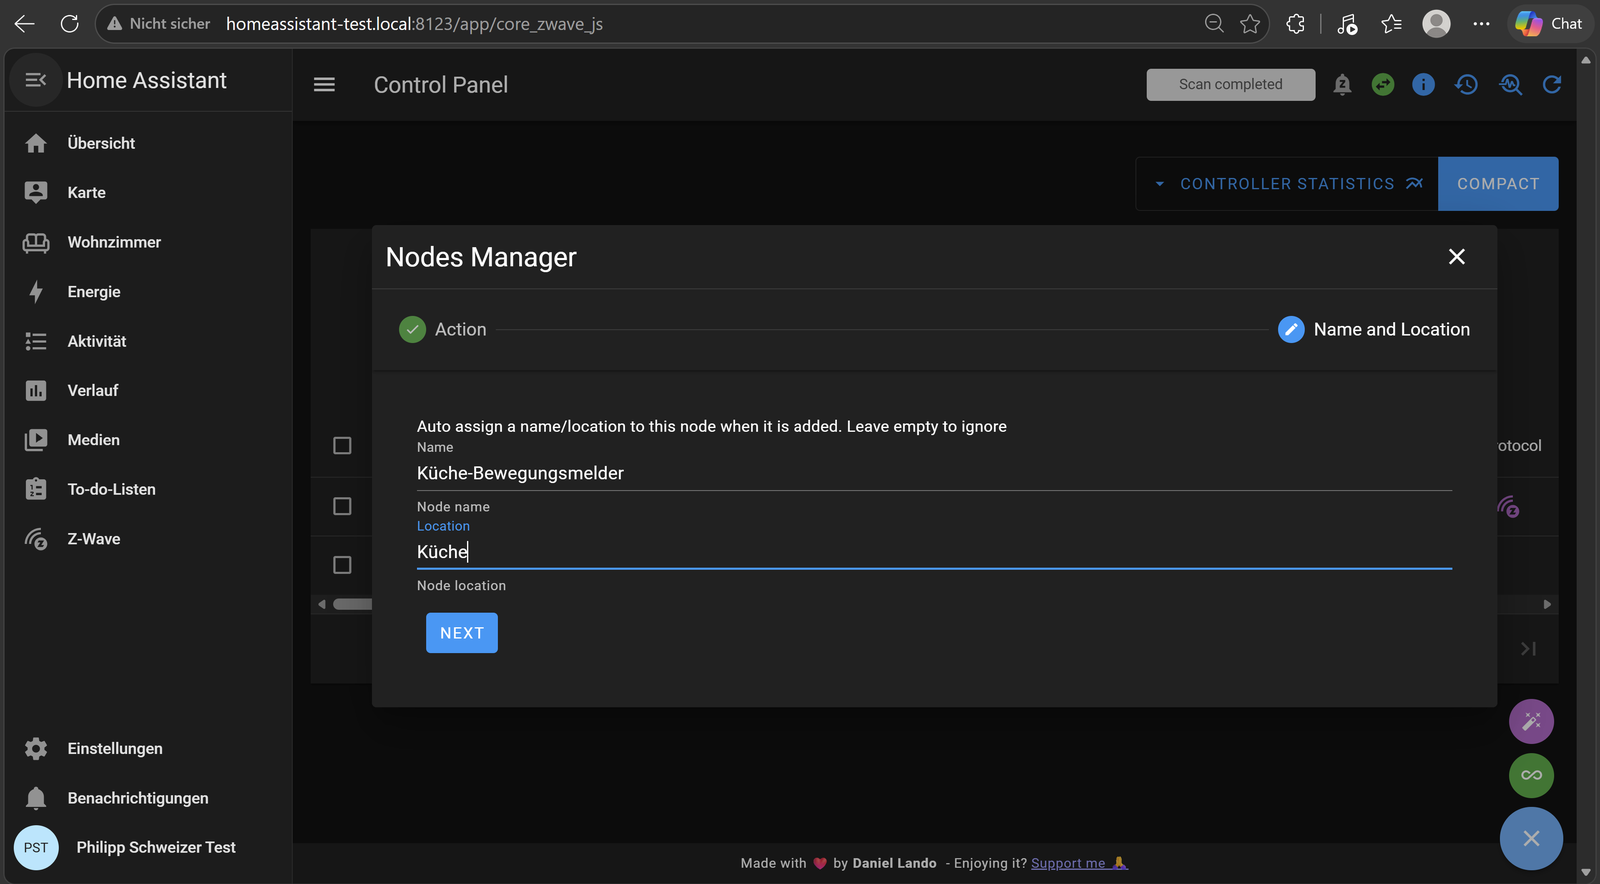
- In the “Name and Location” tab, you can assign the device a descriptive name and a location right away, which is automatically applied once pairing completes – in our case, “Kitchen Motion Sensor” in “Kitchen”.
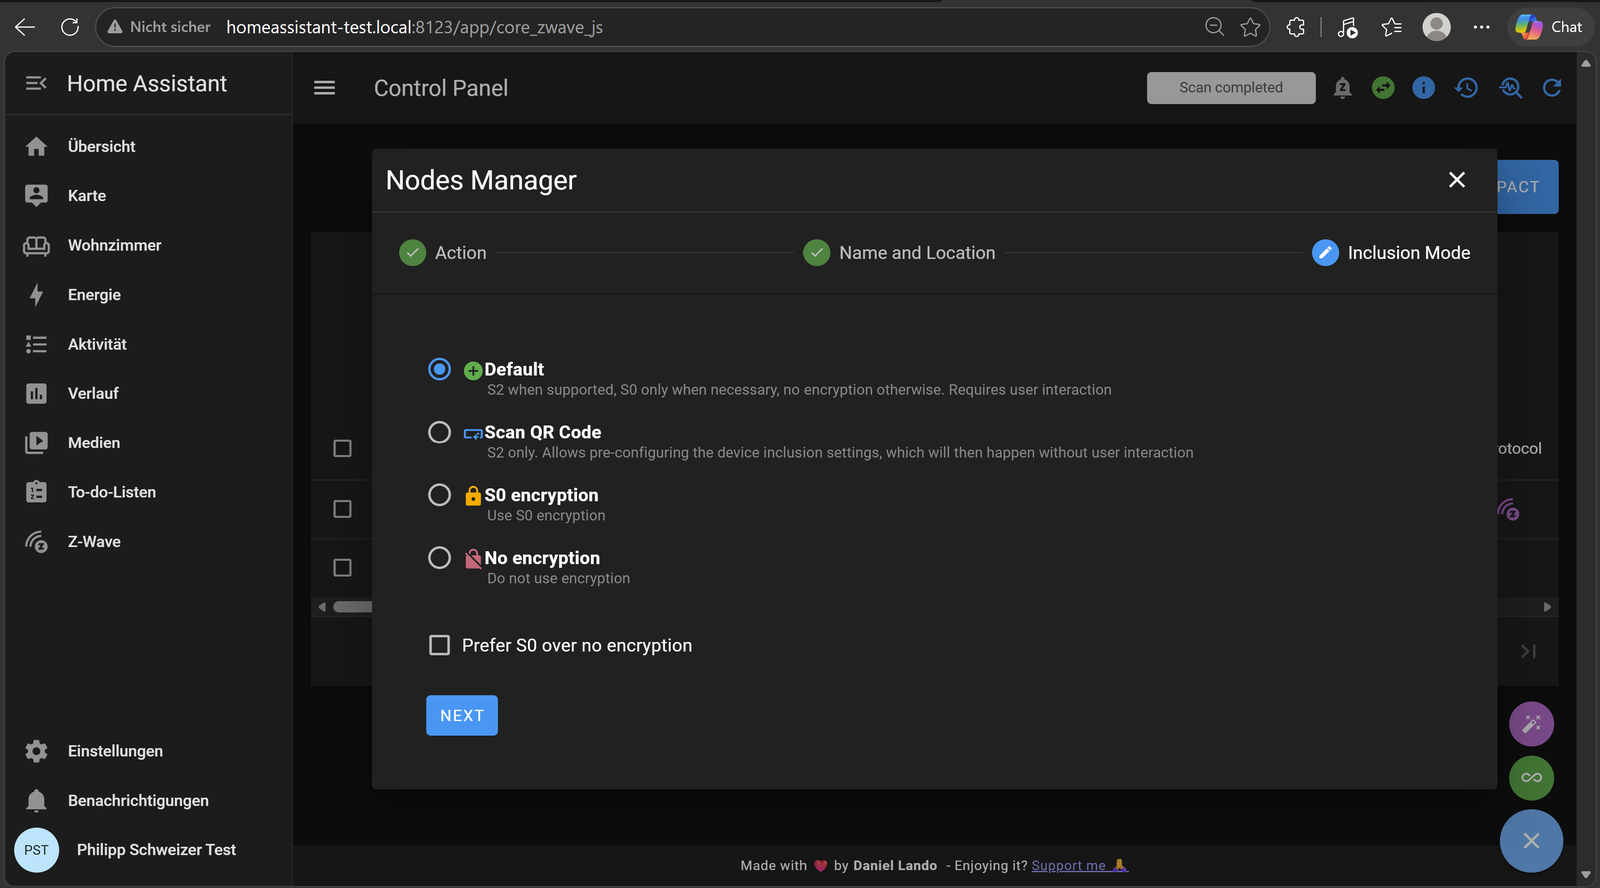
- In the “Inclusion Mode” tab, you set the security level. Default (S2 if supported by the device, otherwise S0 only if necessary) is the right choice for most devices – including the TriSensor 8. Alternatively, “Scan QR Code” (for SmartStart-capable devices), “S0 encryption”, and “No encryption” are also available.
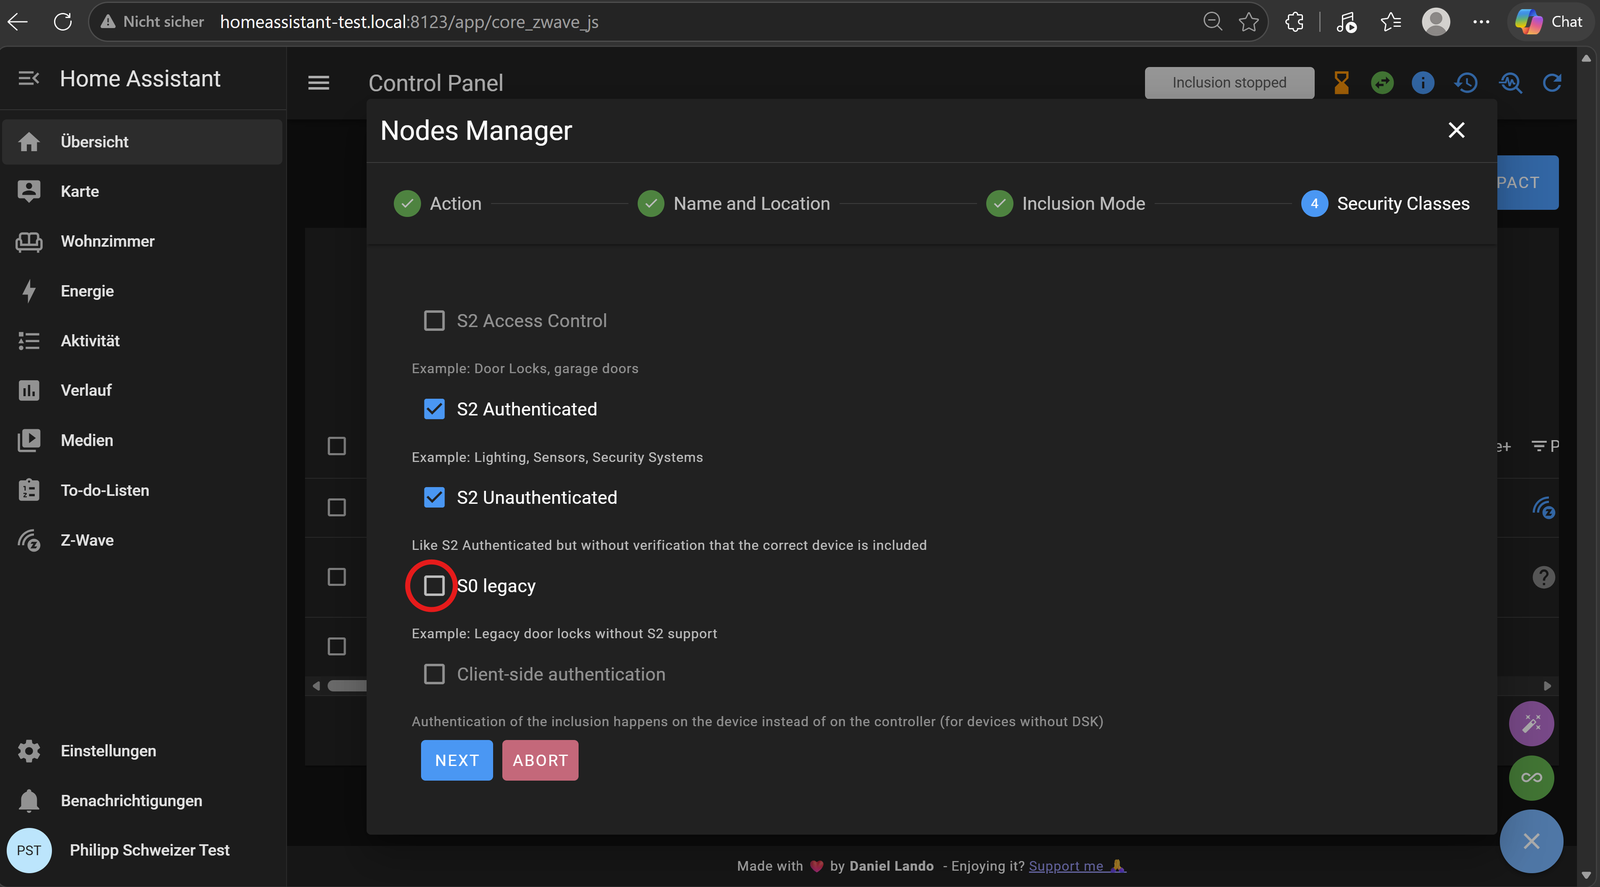
- In the “Security Classes” tab, you decide which S2 security classes the device is allowed to use. For a sensor like the TriSensor 8, S2 Authenticated and S2 Unauthenticated (both pre-selected) are enough – “S2 Access Control” is more aimed at door locks and garage doors. I deselected “S0 Legacy”: wherever possible, S2 – ideally S2 Authenticated – should always be used.
- Now actually put the TriSensor 8 into pairing mode (press the internal pairing button three times in quick succession). The sensor confirms with a brief blink; shortly after, the “DSK Validation” tab asks for the first 5 digits of the DSK PIN, which is usually printed on the packaging or the device itself. On the TriSensor 8, it’s on the inside of the housing lid.
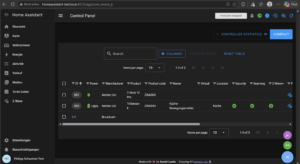
- Within a few seconds, the TriSensor 8 appears as a new node in the Control Panel’s node table – in our case, Node 002, with manufacturer “Aeotec Ltd.”, product “TriSensor 8”, product code “ZWA045”, the assigned name and location, and two green security checkmarks. The corresponding entities for motion, illuminance, and temperature also show up in Home Assistant shortly after, and the sensor is ready to use.
What Entities Does the TriSensor 8 Provide?
After pairing, Home Assistant automatically creates all of the TriSensor 8’s entities. On the device page, four of them are enabled and directly usable by default:
- Motion (Motion detection) – binary sensor, “detected” / “clear”
- Illuminance – light level in lux
- Temperature (Air temperature) – in °C
- Battery – charge level in %
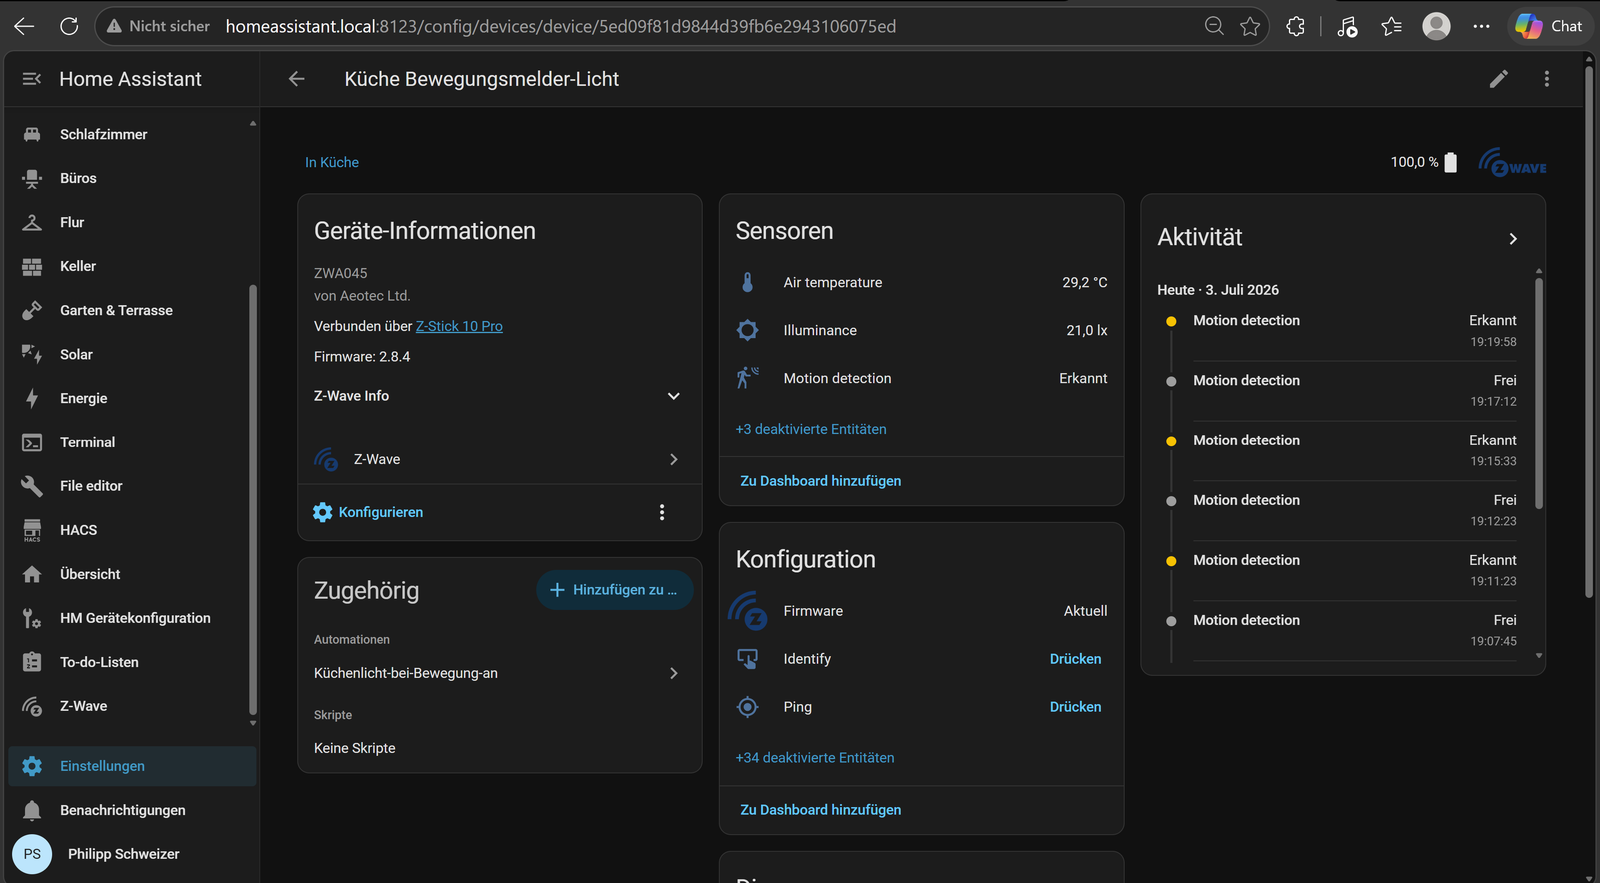
Home Assistant also lists well over 30 additional entities that are disabled by default (diagnostic and configuration values like firmware status or link quality) – but for everyday use, the four above are entirely sufficient.
Step 3: Building an Automation – TriSensor 8 Triggers a Homematic Light
Once the TriSensor 8 exists as a completely normal Home Assistant device with its own entities, it no longer matters which radio protocol it’s connected through – it can be used in automations just like any other device. As a practical example, we’ll build an automation that automatically turns on a kitchen light on motion – controlled via a Homematic IP switch actuator paired with our CCU3. To connect Homematic IP to Home Assistant through the Access Point 2, see our Homematic IP guide. The Z-Wave sensor and the Homematic actuator don’t need to know about each other – Home Assistant, as the shared hub, handles the mediation.
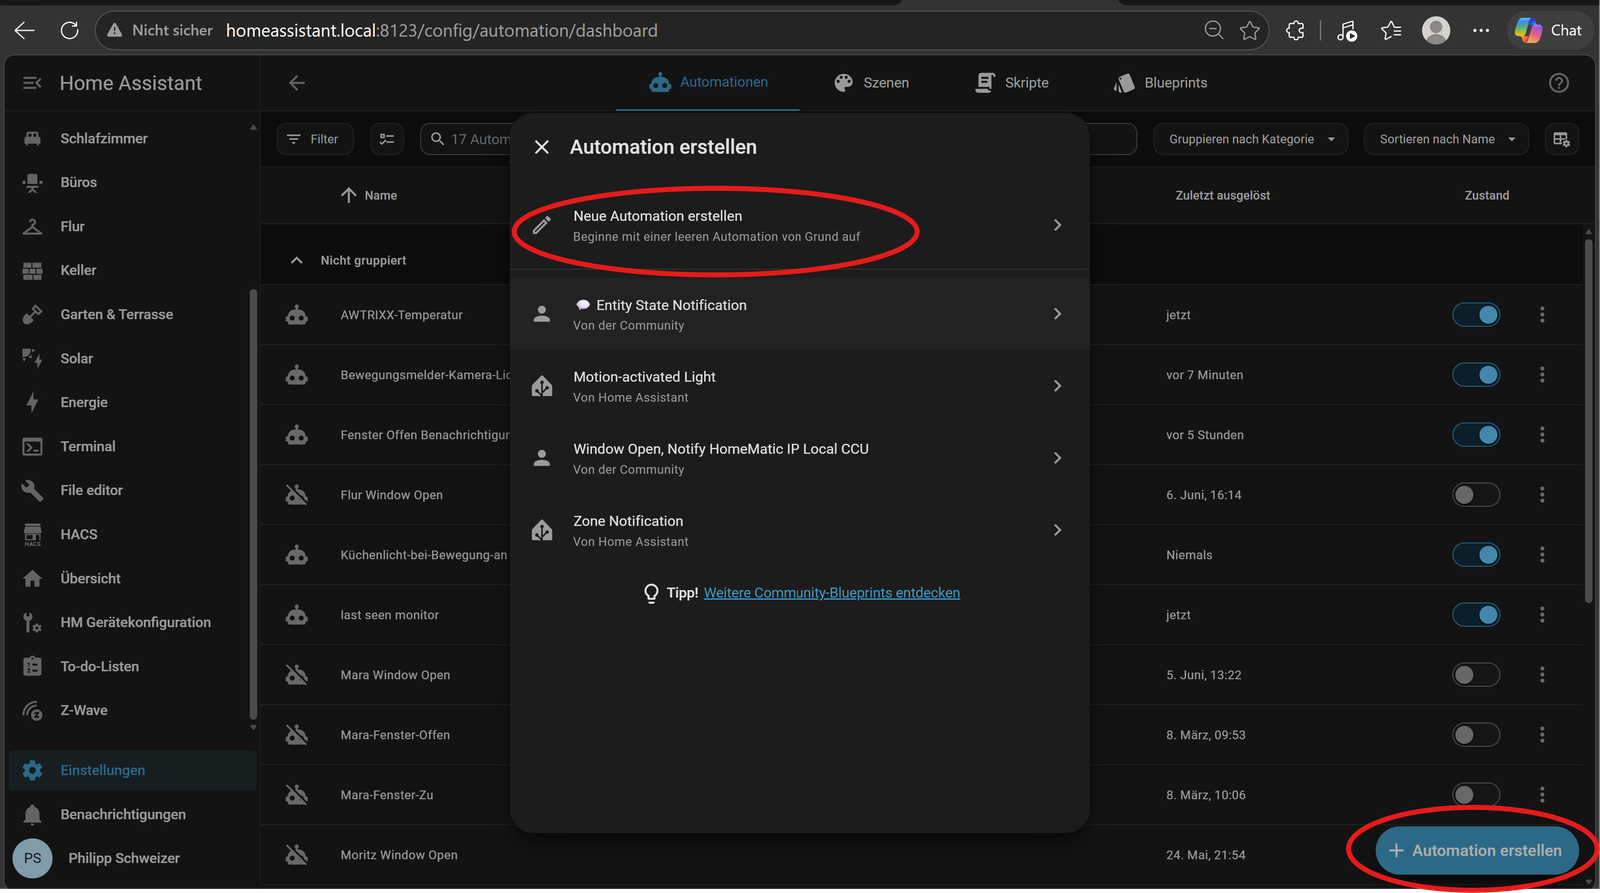
- In Home Assistant, go to Settings → Automations & Scenes and start a blank automation via Create Automation → Create new automation.
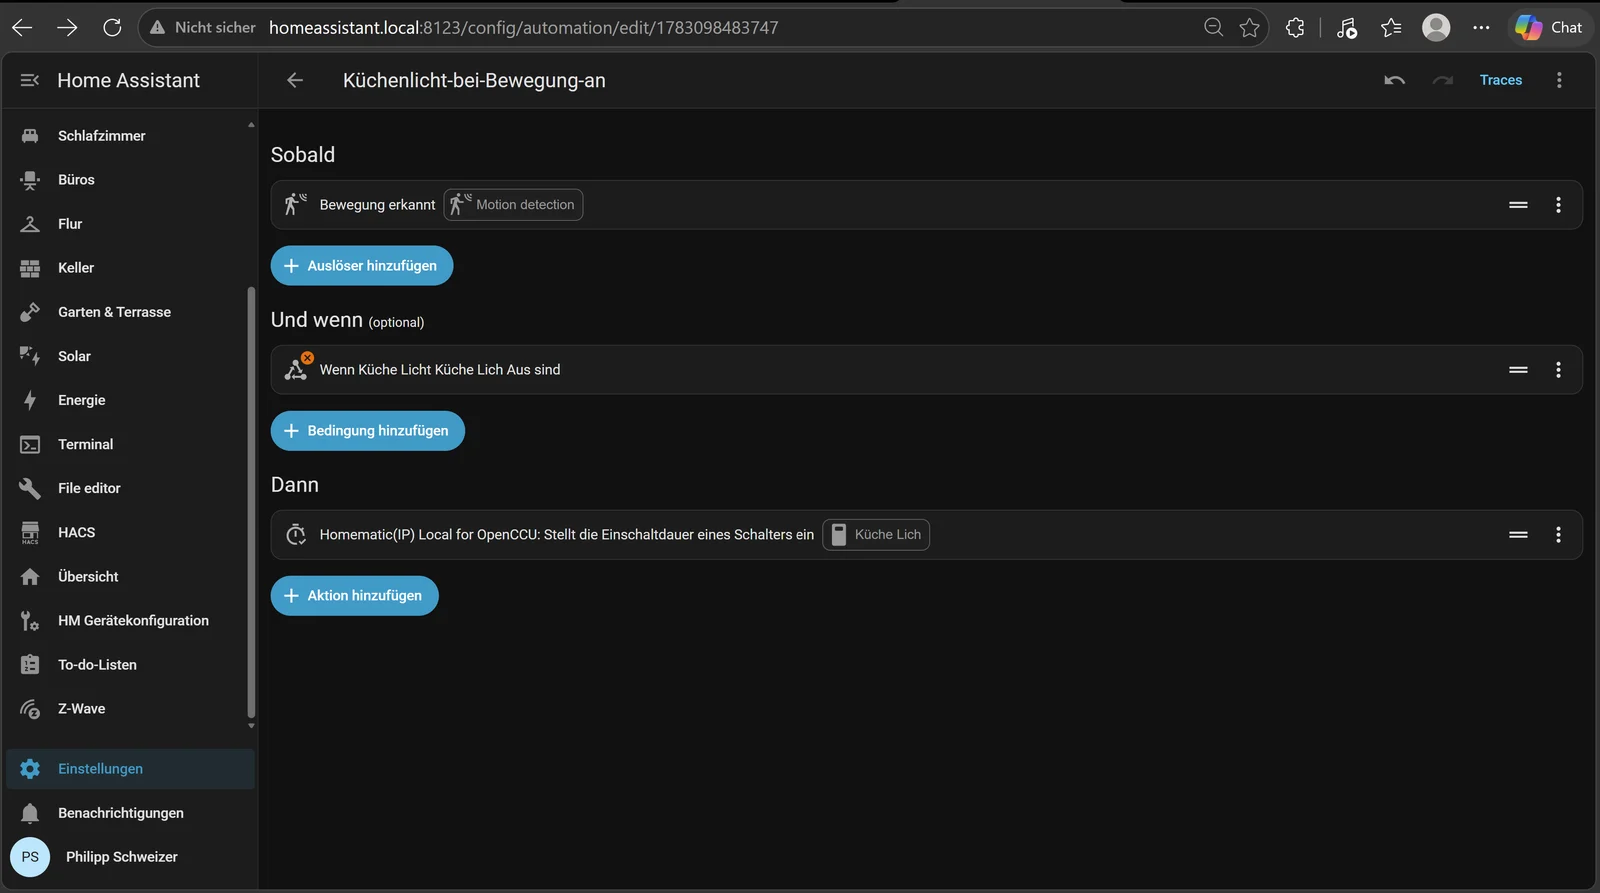
- As the trigger (“When”), choose the TriSensor 8’s motion entity (in our case, “Kitchen Motion Sensor – Motion detection”) and react to the “detected” state.
- Optionally add a condition (“And if”) that only proceeds if the kitchen light is still off – this prevents unnecessary switching commands if the light is already on.
- As the action (“Then”), trigger the Homematic actuator – in our case via the Homematic(IP) Local for OpenCCU integration (despite the name, it works with the CCU3 too), which sets the on-time of the kitchen light switch.
More Automation Ideas with the TriSensor 8
With illuminance and temperature as additional entities, you can easily extend the motion automation above, and a few other automations are worth considering independently:
- Light only when dark: Extend the condition from Step 3 with “illuminance below, say, 10 lux” – that way the automation no longer turns on unnecessary lights during the day despite motion.
- Overtemperature warning: Use the temperature entity as a trigger (e.g., above 28°C) and send a notification or trigger a fan/ventilation automation.
- Vacation presence simulation: If no motion is detected for an extended period, switch lights randomly on a schedule – the motion entity acts as an exclusion criterion here, so the simulation doesn’t kick in while someone is actually home.
- Ventilation reminder: Combine temperature and illuminance readings from multiple rooms in a statistics card on your dashboard to track temperature trends over the day.
For Pi Purists: Z-Pi 7 Instead of a USB Stick
If you don’t want to give up a USB port for the Z-Wave controller, you can use the Z-Pi 7 instead – it plugs directly onto the Raspberry Pi’s 40-pin GPIO header (compatible with Pi 3, 4, and 5) and doesn’t use a USB port at all. The catch: the Z-Pi 7 uses the same serial port (/dev/ttyAMA0) as the Raspberry Pi’s built-in Bluetooth module. Without adjusting config.txt – disabling Bluetooth and enabling UART – Home Assistant won’t find the controller.
- Plug the Z-Pi board onto the Raspberry Pi, making sure to align the pins correctly – the included manual provides very good guidance here.

- Enable UART and disable Bluetooth: put the SD card into a computer and edit Home Assistant OS’s
config.txt. Add the appropriate line for your Pi generation (dtoverlay=disable-btfor Pi 3/4, ordtoverlay=disable-bt-pi5on the Pi 5, each together withenable_uart=1).

- Since the Z-Pi 7 isn’t a USB device, the automatic “Recommended installation” dialog won’t appear. Instead, set it up manually via Settings → Devices & Services → Add Integration → “Z-Wave” and enter the serial path
/dev/ttyAMA0(see the manual installation section). - From here, setup continues exactly like the USB path.
Practical Tips
Set the Region/Frequency Correctly
Home Assistant usually sets the radio region automatically based on your configured location – manually adjusting it usually isn’t necessary. If you do need to set the region manually (e.g., because you’re using Long Range devices), you’ll find the option under Settings → Apps → Z-Wave JS → Configuration → Radio Frequency Region.
Two Ports on the Z-Stick 10 Pro
Don’t be surprised if two serial devices show up during setup – one is for Z-Wave, one for Zigbee. For the Z-Wave JS integration, you need the Z-Wave port.
No Cloud Requirement
Unlike Homematic IP with an Access Point, whose Home Assistant integration goes through eQ-3’s cloud servers, Z-Wave JS runs entirely locally in Home Assistant – no Aeotec account is required for operation.
USB Detection Can Be Finicky
If the stick isn’t detected automatically: first check the hardware (a cable with data lines, not just power), then add it manually via Settings → Devices & Services → Add Integration → “Z-Wave”. If the problem persists, the USB extension cable mentioned above to reduce interference usually helps, according to the official troubleshooting docs.
No. Z-Wave JS in Home Assistant runs entirely locally; no Aeotec or Z-Wave Alliance account is required for operation.
The Z-Pi 7 plugs directly onto the Raspberry Pi’s GPIO header and doesn’t use a USB port, but requires manual UART configuration including disabling Bluetooth. The Z-Stick 7 is a regular USB stick with simpler plug-and-play setup.
Yes, the stick contains two separate radio chips, each with its own serial port – one for Z-Wave (Z-Wave JS) and one for Zigbee (ZHA or Zigbee2MQTT).
With the included CR123A battery, Aeotec states a runtime of around 1.5 years, depending on how often it’s triggered.
The hardware from this test
The controller and the sensor at a glance. Prices come live from your local Amazon store; stale prices are not shown at all.
Conclusion
As Z-Wave newcomers, getting started was initially a bit more complex than expected for us – not because of the hardware itself, but because it’s not obvious at first glance that the Z-Wave JS app and the Z-Wave integration in Home Assistant are two separate building blocks that only together make up a complete setup (see “Adding the Z-Wave Integration in Home Assistant” above). Once you understand how they work together, though, setup runs just as smoothly as with other smart home systems: our automation with the TriSensor 8 as a Z-Wave sensor and a Homematic IP actuator as the action shows that Z-Wave fits in seamlessly alongside existing systems, without either one slowing the other down.
The hardware also makes a good impression in person: the TriSensor 8 is pleasantly small and unobtrusive, and thanks to the included adhesive strip, it can be mounted reliably almost anywhere without drilling.