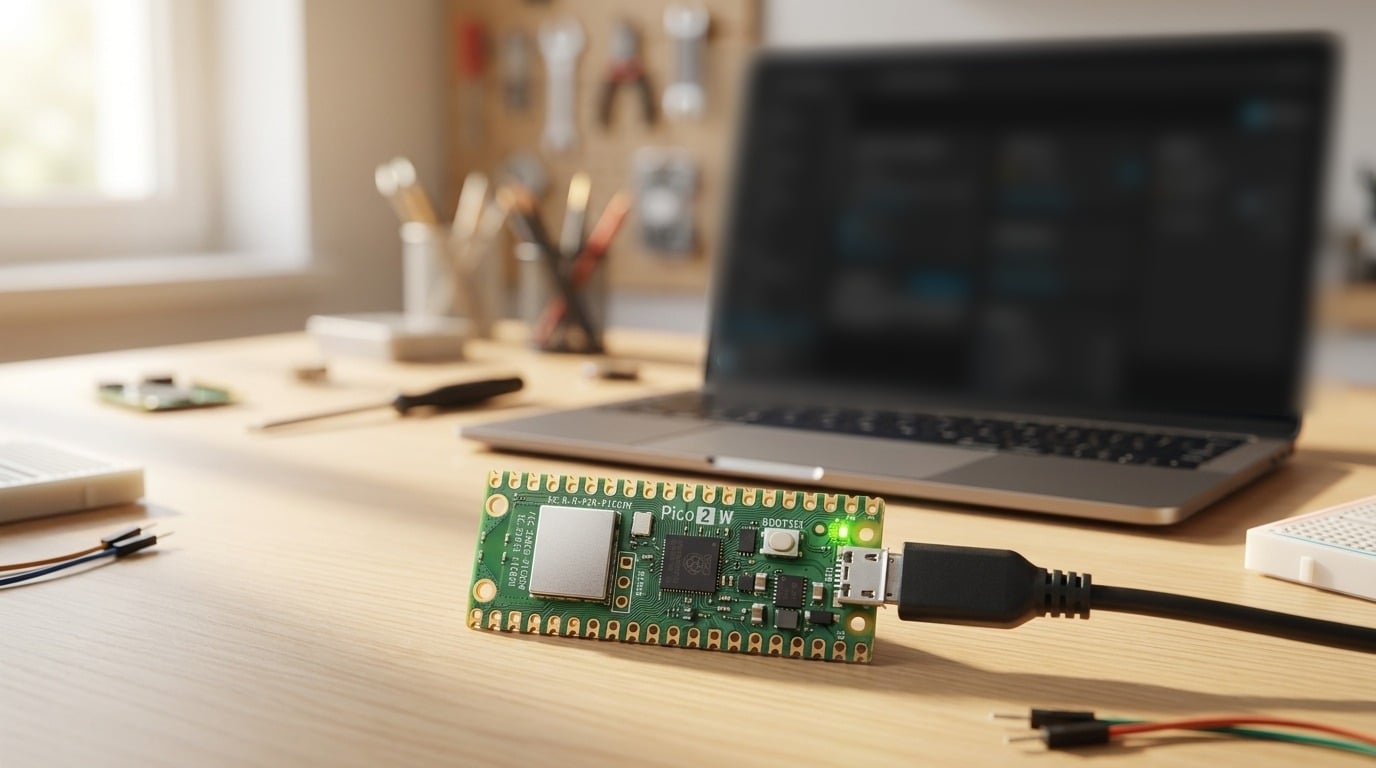
Raspberry Pi Pico with ESPHome: Pico 2 W in Home Assistant
A Raspberry Pi Pico with ESPHome becomes a Home Assistant sensor without a single line of Python or C. A short YAML file describes what the Pico should measure and switch, ESPHome builds the firmware from it, and Home Assistant picks up the values automatically. In this guide we set up the Pico in the ESPHome Device Builder, read its internal temperature sensor and Wi-Fi signal strength, and switch the onboard LED from Home Assistant.
We tested everything on 3 October 2026 with a Pico 2 W, ESPHome 2026.9.1 and the ESPHome Device Builder running as an app in Home Assistant. If you have never used a Pico before, our Raspberry Pi Pico getting started guide covers the models, BOOTSEL mode and MicroPython.
ESPHome is an open-source project that turns a YAML configuration into ready-to-flash microcontroller firmware and connects the device directly to Home Assistant. Originally built for the ESP8266 and ESP32, ESPHome now also supports the Raspberry Pi chips RP2040 and RP2350 through the
rp2 platform. For Home Assistant you need a model with Wi-Fi, i.e. the Pico W or the Pico 2 W.
1. Install the “ESPHome Device Builder” app in Home Assistant and create a new device with the “Raspberry Pi Pico 2W” board.
2. Add sensors and the LED to the YAML, download the firmware as a
.uf2 file and drag it onto the Pico while holding the BOOTSEL button.3. Add the Pico to Home Assistant as an ESPHome device. All further updates are installed wirelessly.
Why ESPHome instead of MicroPython?
You can connect a Pico to Home Assistant with MicroPython too, but then you have to write it all yourself: the Wi-Fi connection, an MQTT client, reconnecting after drop-outs and the discovery messages Home Assistant needs to recognise the sensors. ESPHome handles all of that. You only describe what is connected and get a device that talks to Home Assistant through the native API, communicates encrypted and accepts updates over the air. Our guide ESPHome + Raspberry Pi: Build Your Own Smart Home Sensors covers the basics.
MicroPython remains the better choice if the Pico should run its own logic unrelated to Home Assistant, or if you want to learn programming. You cannot have both at once: ESPHome replaces the MicroPython firmware completely. You can always go back by flashing the MicroPython file in BOOTSEL mode again.
What you need
- A Raspberry Pi Pico 2 W* or a Pico W. If you plan to plug sensors into a breadboard later, get the Pico 2 WH with headers* right away. The Pico and Pico 2 without “W” cannot work as Wi-Fi devices with ESPHome.
- A micro-USB cable that carries data, such as the deleyCON micro-USB cable*. You only need it for the first installation.
- Home Assistant with the ESPHome Device Builder app from the ESPHome project, found under Settings → Apps. After installing, enable “Show in sidebar”.
- A 2.4 GHz Wi-Fi network in which Home Assistant can reach the Pico.
Step 1: Create the Pico in the ESPHome Device Builder
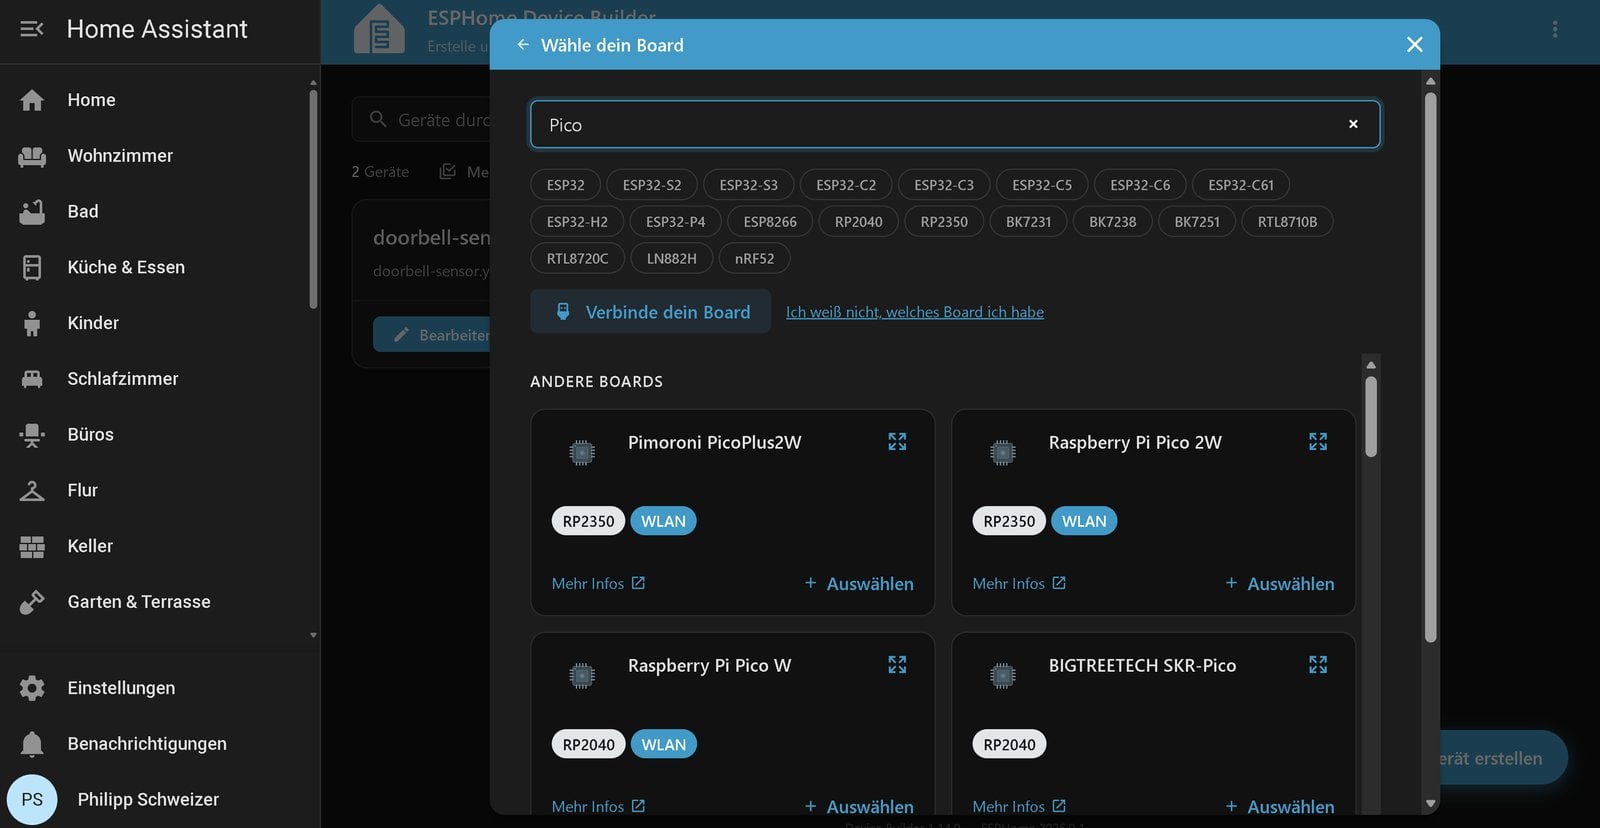
Open the ESPHome Device Builder from the sidebar and click the button for a new device in the bottom right corner. In the board selection dialog, search for “Pico”. ESPHome lists the Raspberry Pi Pico 2W with the tags RP2350 and Wi-Fi directly, next to the Pico W with the RP2040 and a few boards from other makers. Our screenshots show the German interface; the steps are identical in English.
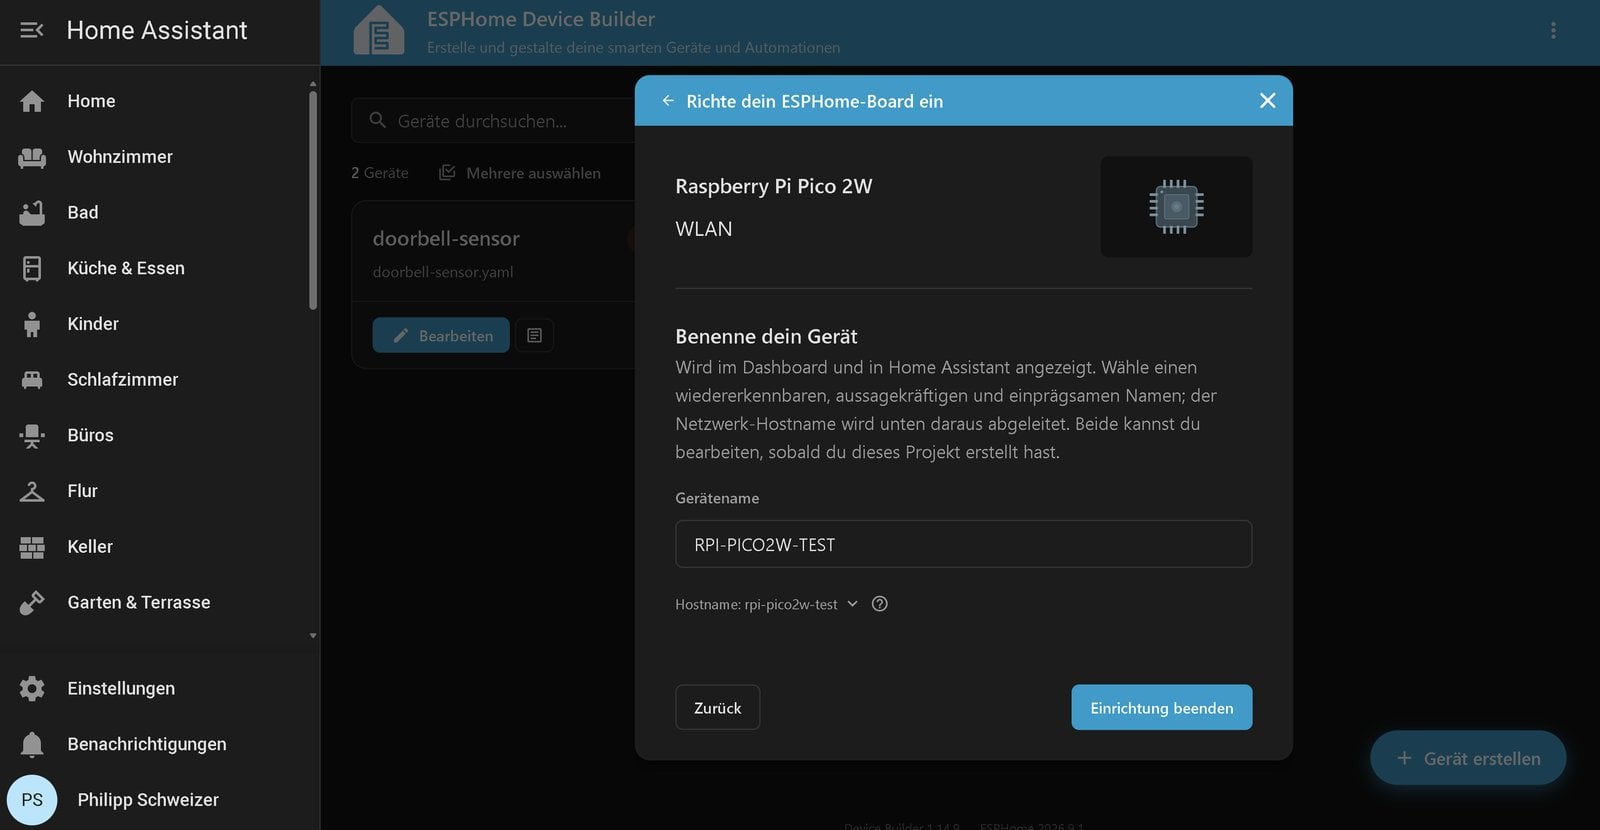
After selecting the board you give the device a name. It appears in Home Assistant later, and ESPHome derives the network hostname from it. Our test device is called RPI-PICO2W-TEST, which becomes the hostname rpi-pico2w-test. The Device Builder creates the configuration when you finish the setup and takes the Wi-Fi credentials you stored in ESPHome as wifi_ssid and wifi_password.
Step 2: Add sensors and the LED to the YAML
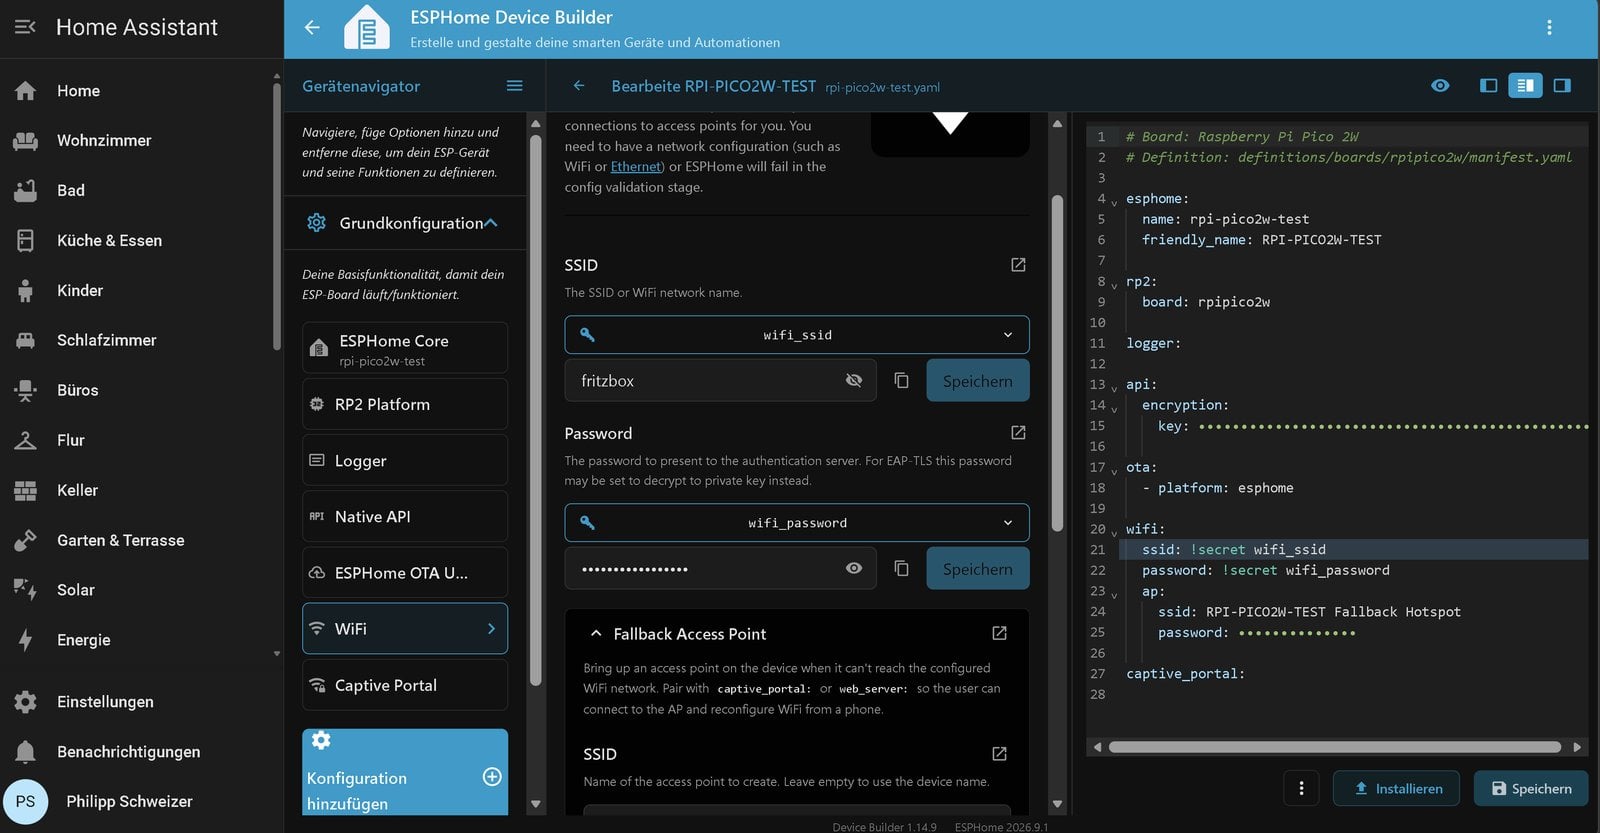
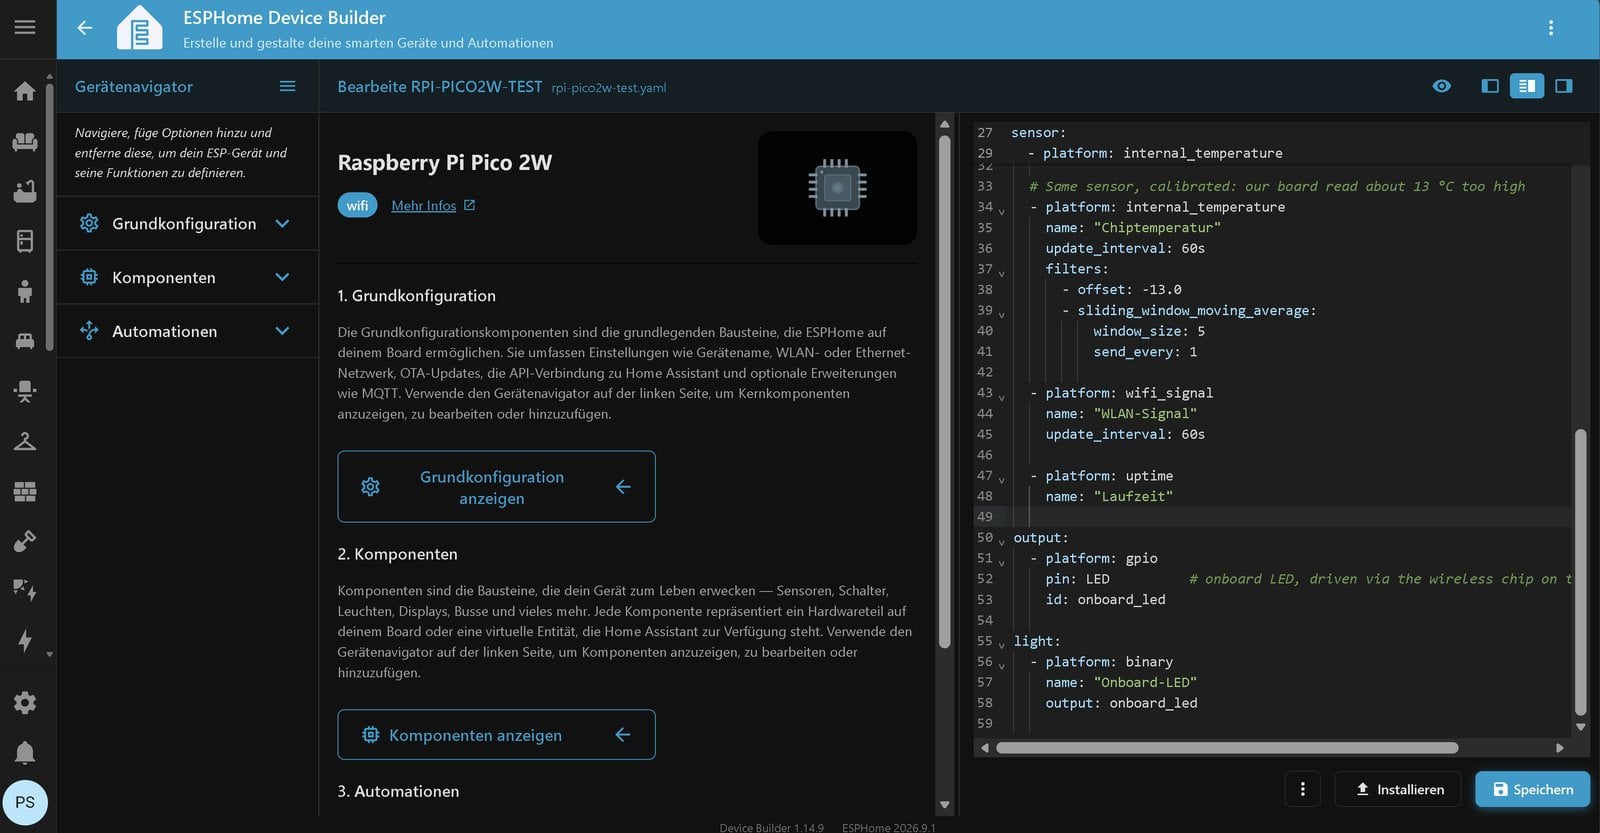
The edit button opens the editor with the device navigator on the left and the YAML file on the right. The Device Builder has already written the base configuration with board, API key, OTA and Wi-Fi. The important part is the rp2: block with board: rpipico2w. Older guides still use rp2040: here. Since ESPHome 2026.7 the platform is called rp2 because it covers both chips; the old key still works but is scheduled for removal in 2027.
Add the sensors and the LED below the existing entries. Leave the API key and passwords in your file unchanged:
sensor:
  # Chip temperature (RP2350 internal sensor), raw value
  - platform: internal_temperature
    name: "Chip temperature raw"
    update_interval: 60s

  # Same sensor, calibrated against a thermometer
  - platform: internal_temperature
    name: "Chip temperature"
    update_interval: 60s
    filters:
      - offset: -20.0
      - sliding_window_moving_average:
          window_size: 5
          send_every: 1

  - platform: wifi_signal
    name: "Wi-Fi signal"
    update_interval: 60s

  - platform: uptime
    name: "Uptime"

output:
  - platform: gpio
    pin: LED          # onboard LED, driven via the wireless chip on the W models
    id: onboard_led

light:
  - platform: binary
    name: "Onboard LED"
output: onboard_ledinternal_temperaturereads the temperature sensor inside the chip; according to the documentation ESPHome supports it on the RP2040 and RP2350. We add it twice: once as a raw value and once corrected. Why the correction is needed is explained further down.wifi_signalreports the signal strength in dBm, so you can tell whether a mounting spot still has good Wi-Fi.uptimecounts the seconds since the last start. If it jumps back, the Pico has rebooted.pin: LEDis a named pin. On the Pico W and Pico 2 W the LED is not wired to a normal GPIO but to the wireless chip; ESPHome addresses it internally as pin 64, and it only works as an output.
Step 3: Flash the first firmware over USB
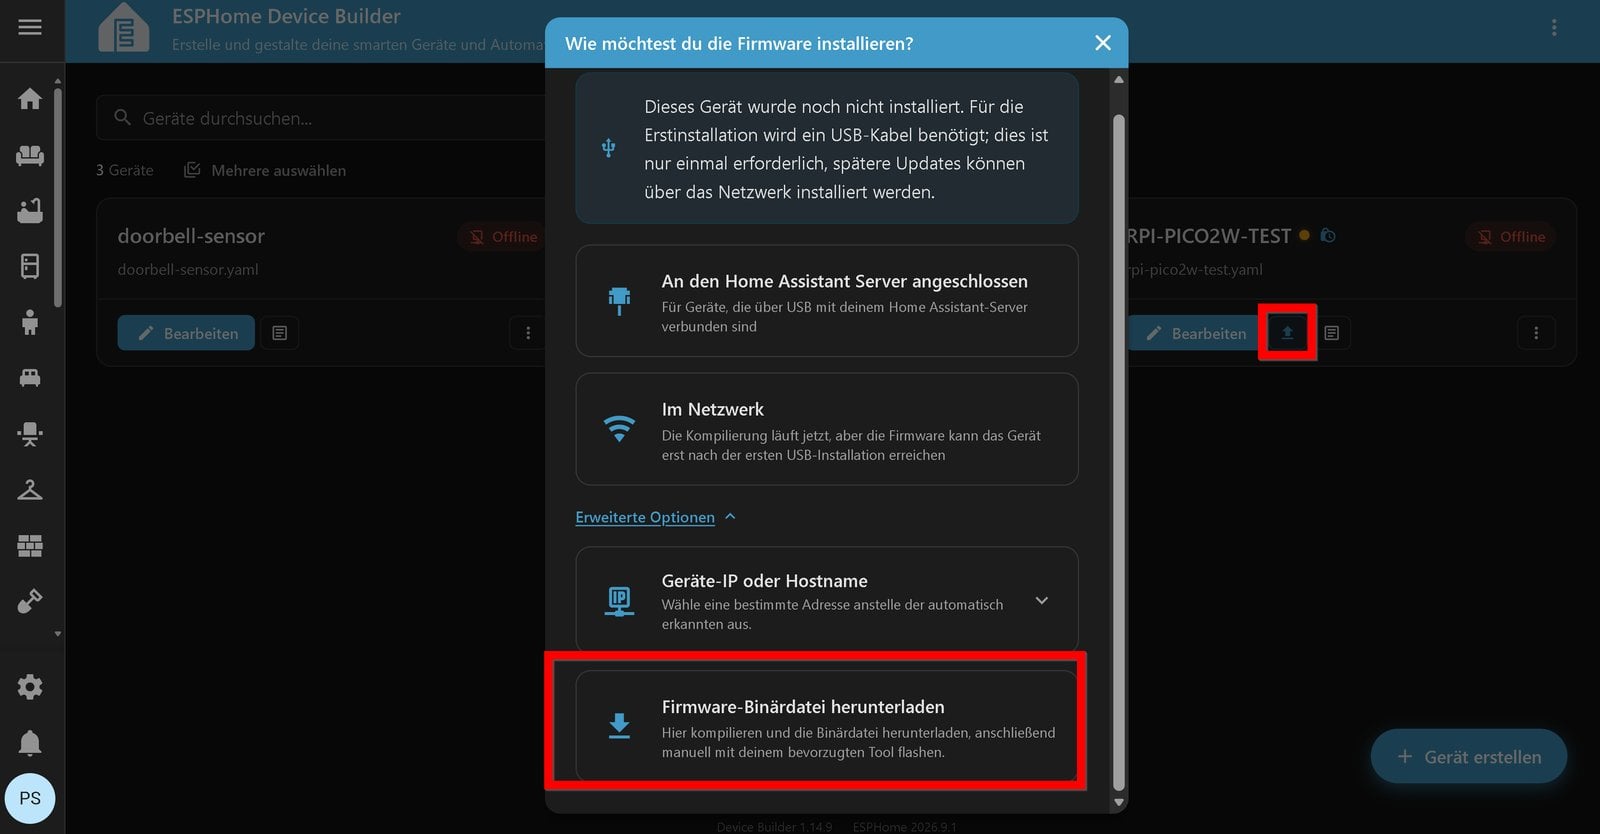
The first installation needs the USB cable once; every later update is wireless. In the dashboard, click the install icon of the device and pick the option to download the firmware binary under the advanced options. ESPHome compiles the firmware and offers a .uf2 file for the Pico.
- Hold the BOOTSEL button and plug the Pico into your computer. After releasing it, the drive RP2350 appears (RPI-RP2 on the Pico W).
- Drag the downloaded
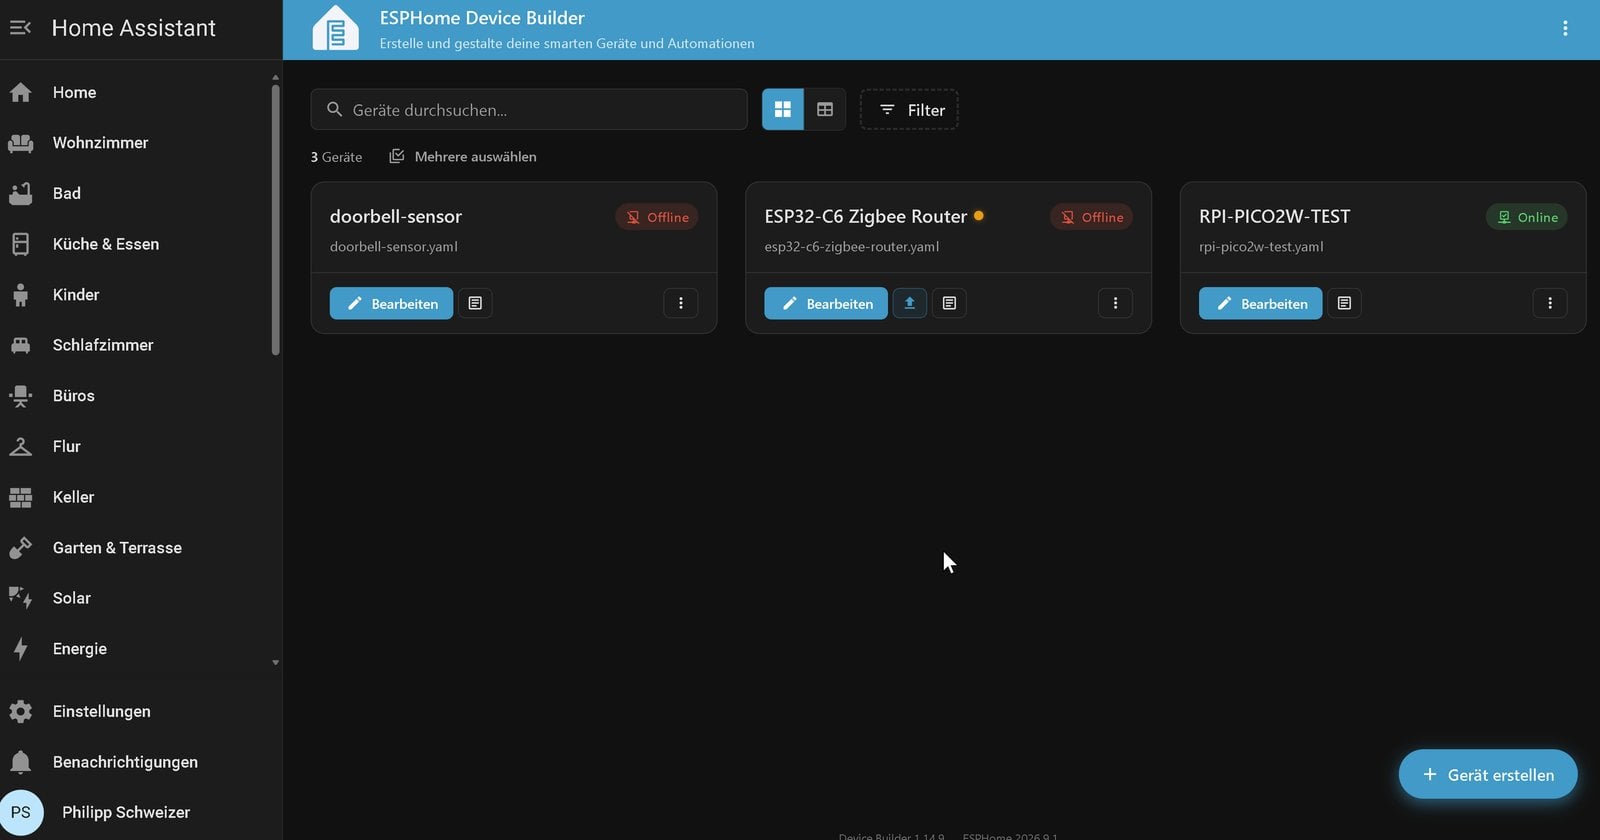
.uf2file onto the drive. It disappears after a few seconds, the Pico restarts with ESPHome and joins your Wi-Fi. - Shortly afterwards the device shows as Online in the Device Builder.
If the Pico was running MicroPython before, it gets replaced. You can no longer get at your main.py and other files afterwards, so back them up in Thonny first.
Step 4: Add the Pico to Home Assistant
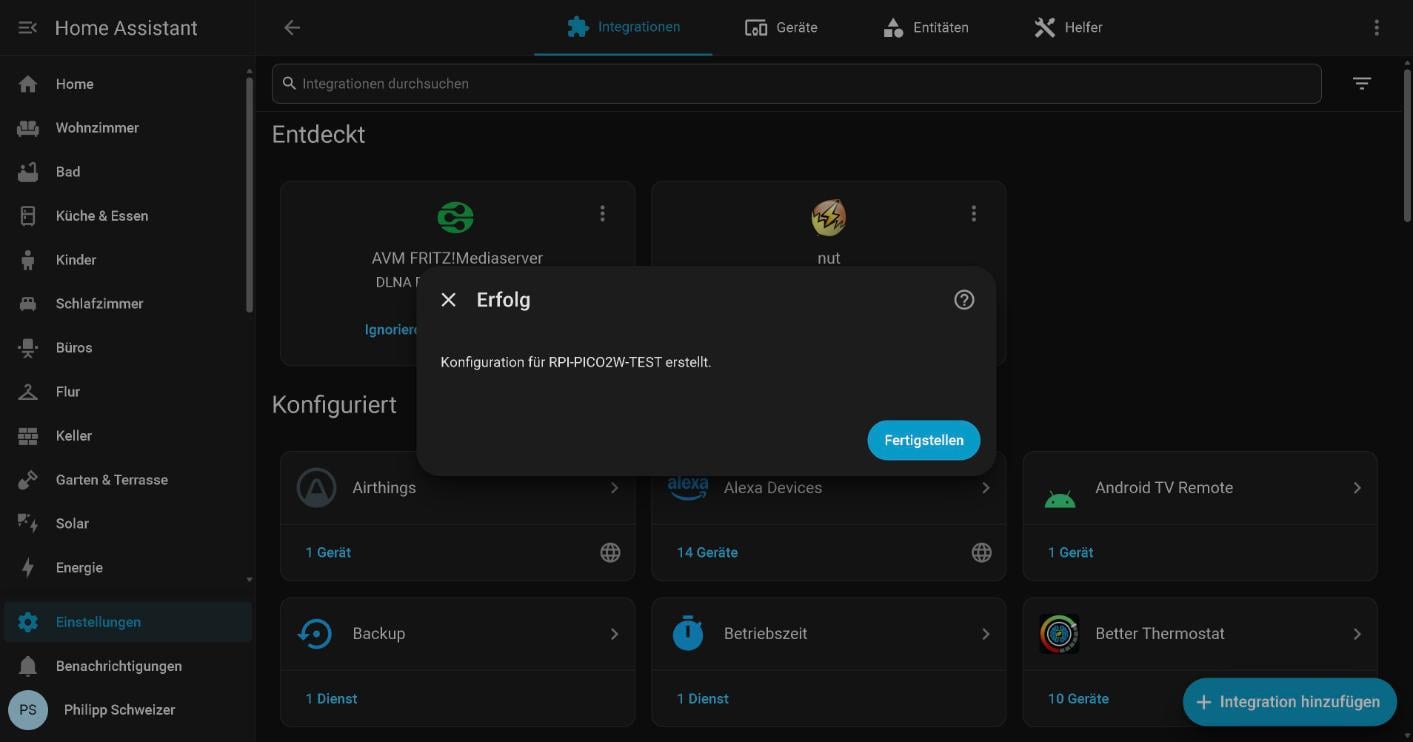
As soon as the Pico is on the network, Home Assistant normally lists it under Settings → Devices & services as a newly discovered ESPHome device, and one click on Add is enough. If it does not show up, add it manually: Add integration → ESPHome, enter the Pico’s IP address as the host and keep port 6053.
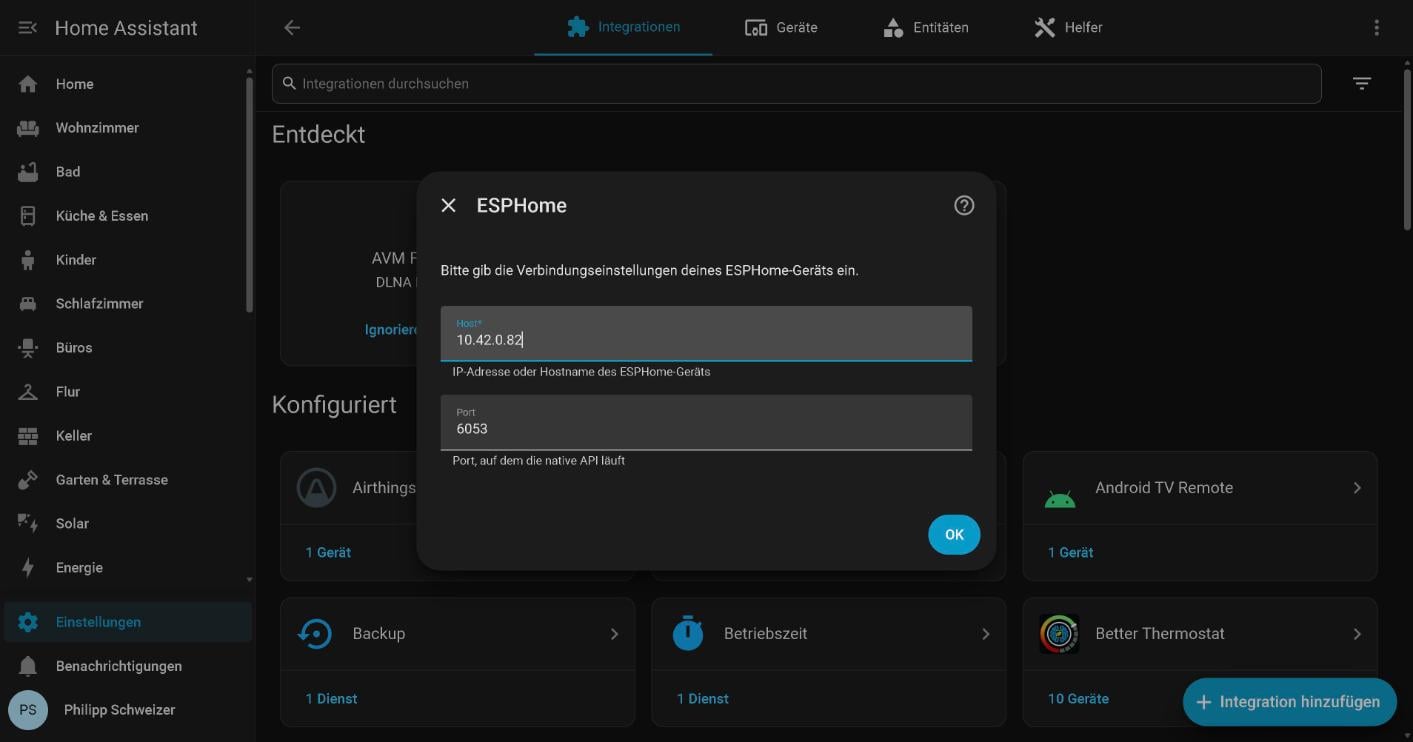
We did not have to enter the API key from the YAML. If the ESPHome Device Builder runs as an app on the same Home Assistant instance, Home Assistant fetches the key itself. If you run ESPHome separately, for example in Docker on another machine, the dialog asks for it.
Step 5: Check the values and switch the LED
Under Settings → Devices & services → ESPHome you find the device and its entities. Home Assistant identifies it as rpipico2w by Raspberry Pi and shows the ESPHome version of the firmware. After eleven minutes of uptime our Pico reported these values:
| Entity | Value |
|---|---|
| Chip temperature raw | 41.7 °C (107.1 °F) |
| Chip temperature (corrected, still with −13) | 28.6 °C |
| Wi-Fi signal | −38 dBm |
| Uptime | 661 s |
| Onboard LED | switchable (on/off) |
We measured the corrected value with the −13 offset from our MicroPython test; under ESPHome −20 fits better, see below. The Onboard LED switch under “Controls” turns the green LED next to the USB port on and off, which is the quickest way to check that the connection works in both directions.
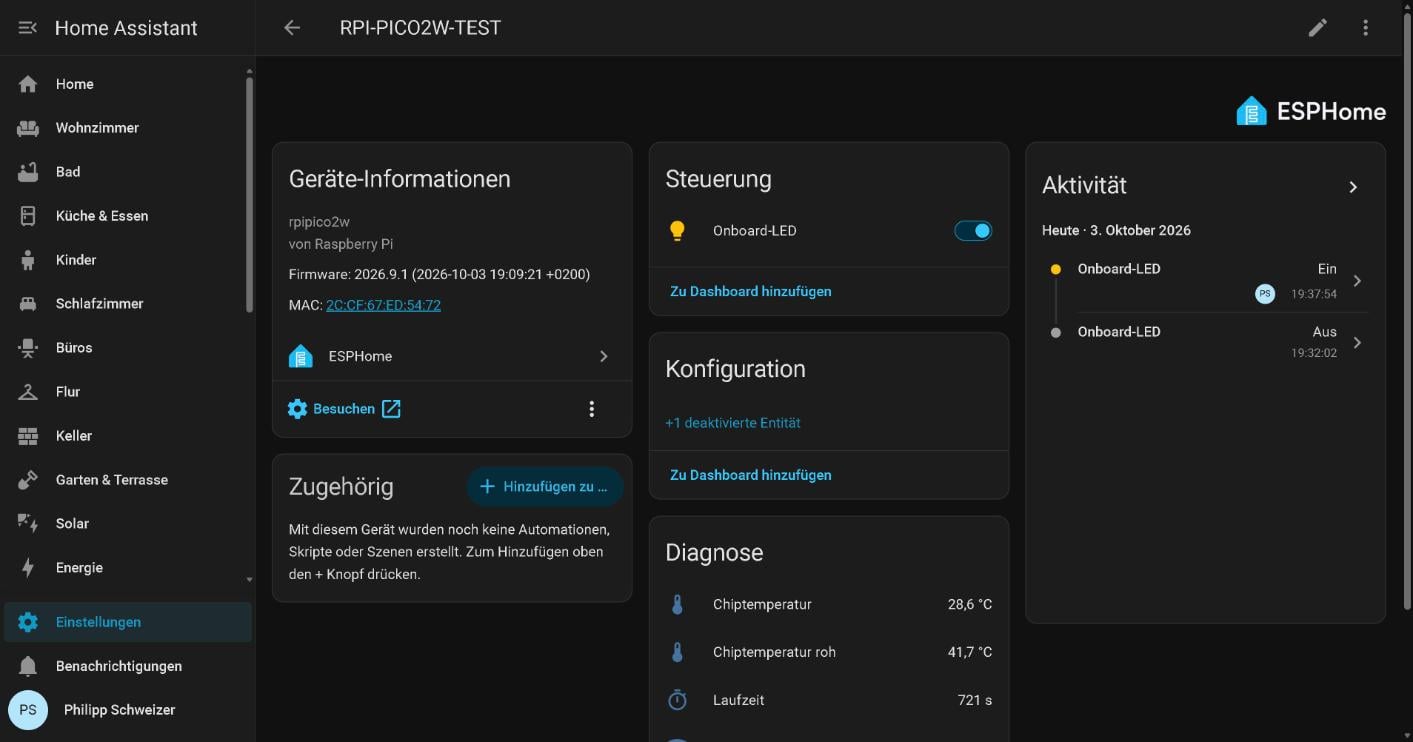
Notice that all sensors end up under Diagnostic. ESPHome assigns chip temperature, Wi-Fi signal and uptime to this category by default because they describe the device itself. If you want to use one of them like a normal sensor on a dashboard or in automations, add the line entity_category: "" to that sensor; according to the ESPHome documentation this removes the default category.
Installing updates over the air
Every further change to the YAML is installed through the install dialog with the wireless (network) option. On our Pico 2 W compiling took about 19 seconds and the transfer was encrypted. Unlike the ESP32, which uses port 3232 for OTA updates, ESPHome connects to the Pico on port 2040, as the OTA documentation confirms. That matters if there is a firewall between Home Assistant and the Pico.
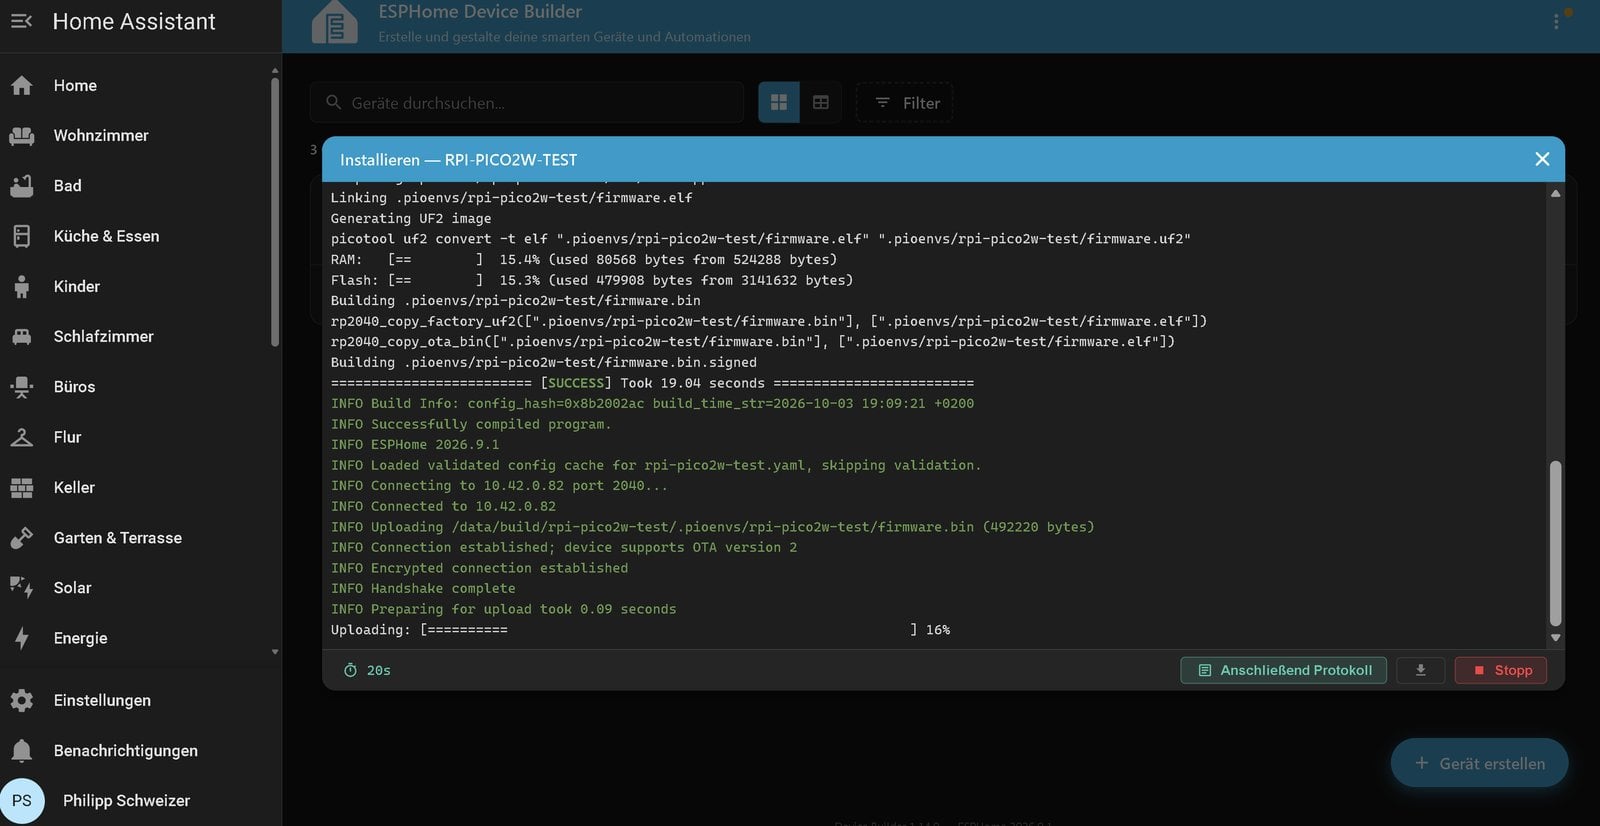
There is plenty of headroom: our firmware with four sensors and the LED used 15.4 percent of the RAM and 15.3 percent of the flash, leaving enough space for more sensors, a display or automations running on the Pico itself.
Why the internal temperature sensor reads too high
At a room temperature of about 22 °C (72 °F), our Pico’s raw value under ESPHome was almost 20 °C too high. Under MicroPython, the same Pico had shown 35.5 °C at 22.5 °C a day earlier, a 13 °C offset. The sensor sits inside the chip and measures its temperature, not that of the room. Under ESPHome the Wi-Fi is permanently active, so the chip runs warmer. On top of that, the Pico’s analog-to-digital converter has no reference voltage of its own, so small deviations in the supply directly affect the result.
The offset correction is therefore a value for exactly your board and your firmware: let the Pico run for half an hour, compare the raw value with a thermometer and enter the difference. For a reliable room temperature, connect an external sensor such as the BME280. We show how that works with ESPHome on an ESP32 in ESPHome + Raspberry Pi: build your own smart home sensors; on the Pico only the rp2: block changes, and our Pico pinout shows the I²C pins.
Troubleshooting
- Validation fails on Wi-Fi: check the board.
rpipicoandrpipico2are the models without a wireless chip; for Wi-Fi you needrpipicoworrpipico2w. ESPHome does not support clones labelled “Pico W” that use an ESP radio instead of the Infineon CYW43439. - The Pico does not come online after flashing: connect it via USB and open web.esphome.io in Chrome or Edge. Under “Logs” you see the Pico’s output, including whether it connects to Wi-Fi. The most common causes are a 5 GHz-only network or a typo in the Wi-Fi secrets.
- The Pico is running but stays offline in the Device Builder: the Device Builder finds devices via mDNS as
name.local. If the Pico sits in a different network than Home Assistant, such as a guest Wi-Fi, a VLAN or behind a VPN, mDNS does not get through. In that case adduse_address: 192.168.x.ywith the Pico’s fixed IP underwifi:and add it to Home Assistant by IP. Home Assistant must of course be allowed to reach the Pico in that network. We ran into exactly this because our test setup was behind a travel router with a VPN. - The drive does not appear: usually the cable is charge-only. And when flashing via the drive, BOOTSEL must be held while plugging in as long as firmware is already running on the Pico.
Where to go from here
With the Pico connected, you have the foundation for your own sensors. A real room sensor such as the BME280* for temperature, humidity and pressure is a good next step, or a button that triggers an automation in Home Assistant. On Pico 2 boards with chip revision A2, mind erratum E9 and wire buttons to GND with the internal pull-up, as described in our Pico getting started guide.
Have fun experimenting!
FAQ: ESPHome on the Raspberry Pi Pico
Yes. ESPHome supports the RP2040 and RP2350 chips through the rp2 platform, i.e. the Pico, Pico W, Pico 2 and Pico 2 W. To connect to Home Assistant over Wi-Fi you need a W model, the Pico W or the Pico 2 W.
Not if the ESPHome Device Builder runs as an app on the same Home Assistant instance; Home Assistant then fetches the key itself. With a separate ESPHome installation the dialog asks for it, and the key is in the YAML under api and encryption.
On the Pico, ESPHome connects for wireless updates on port 2040, on the ESP32 on port 3232. The native API for Home Assistant runs on port 6053 on both.
It measures the temperature inside the chip, not the room. Under ESPHome the Wi-Fi is permanently active and the chip runs warm; on our Pico 2 W the raw value was almost 20 °C above room temperature. For room readings use an external sensor such as the BME280.
No. The ESPHome firmware replaces MicroPython completely, and you can no longer access files like main.py afterwards. To go back, drag the MicroPython file onto the Pico in BOOTSEL mode again.