Set Up a WireGuard VPN Server on the Raspberry Pi
Run your own WireGuard VPN server on a Raspberry Pi and you can reach your home network from anywhere, just as if you were sitting on your couch. WireGuard is VPN software that builds an encrypted connection, called a tunnel, between your phone or laptop and the Pi. It’s leaner, faster and easier to set up than the older OpenVPN.
Once it’s running, you can open Pi-hole, Home Assistant, your NAS or your router’s admin page from wherever you are, and on hotel Wi-Fi your traffic travels encrypted through your own connection at home. It works on any Raspberry Pi running a current Raspberry Pi OS. First you’ll find out whether you need the Pi at all, then you’ll prepare your router, and then you choose between two setups: PiVPN with its install wizard, or a manual setup.
In short
If your router already has WireGuard built in, as a FRITZ!Box does from FRITZ!OS 7.50 (except the 6490 and 6590 Cable), you don’t need the Pi for this. With any other router, older router firmware, or if you want full control, set up WireGuard on the Pi, either with PiVPN or by hand.
- For the Pi route, you need: a Raspberry Pi with a current Raspberry Pi OS, access to your router’s admin page and the free WireGuard app on your phone or laptop.
- Check first: to reach the Pi, your internet connection needs a public IPv4 address. Behind CGNAT or DS-Lite, port forwarding goes nowhere. Your options then are a FRITZ!Box’s built-in WireGuard, which works over IPv6 on DS-Lite, or Tailscale, which needs no port forwarding.
- Setting it up by hand: install the
iptablespackage, which current Raspberry Pi OS no longer ships, and put IP forwarding under/etc/sysctl.d/. PiVPN takes care of both for you.
Do you need the Pi at all? Router, PiVPN or manual setup
There are three ways to get into your home network. All of them use WireGuard and work with the same apps on your phone and laptop.
| WireGuard on the router (e.g. FRITZ!Box) | PiVPN on the Pi | Manual setup on the Pi | |
|---|---|---|---|
| Effort | low, set up in the router’s admin page, phone added by QR code | low, one install command and a wizard | moderate, several steps in the terminal |
| Requirements | a router with WireGuard built in (FRITZ!Box: FRITZ!OS 7.50 or later, not the 6490 and 6590 Cable), a public IPv4 or IPv6 address | a router with port forwarding, a public IPv4 address | a router with port forwarding, a public IPv4 address |
| Independent of your router | no | yes | yes |
| Control over settings | whatever the router offers | wizard defaults, which you can change later | you write every line yourself |
| Maintenance | router firmware updates | keep Raspberry Pi OS and PiVPN up to date | keep Raspberry Pi OS up to date |
FRITZ!Box with FRITZ!OS 7.50 or later: set up VPN access under Internet > Permit Access > VPN (WireGuard) and scan the QR code with your phone. AVM walks you through it in its guide Setting up a WireGuard VPN to the FRITZ!Box on a smartphone or tablet. Other routers may have a VPN server built in as well, so check your router’s settings first. The Pi still makes sense if your router has no WireGuard, if you want the VPN to keep working when you switch routers or use one from your ISP, or if you want to decide every setting yourself. If you go with your router’s own WireGuard, you’re done once you’ve followed its instructions. To test it, follow Connect your devices and test: turn off Wi-Fi on your phone, switch on the tunnel in the app and open an address on your home network.
Any other router: the Pi takes over. PiVPN is an install script that sets up WireGuard through a wizard. The manual setup takes a little longer, but afterwards you know what every line does, which makes troubleshooting much easier. Both end up with the same WireGuard setup. Our advice: go with PiVPN if you want it done quickly, and set it up by hand if you want to understand and tweak every setting.
Check first: can your connection be reached from outside?
For your phone to reach the Pi while you’re out, your internet connection needs its own public IPv4 address. Many fiber, cable and mobile broadband connections don’t have one. Behind CGNAT (carrier-grade NAT), lots of customers share a single public IPv4 address. A variant common in Germany, DS-Lite, gives your connection a real IPv6 address only and tunnels IPv4 through your provider. Either way, incoming IPv4 connections never make it to your router, and port forwarding is useless.
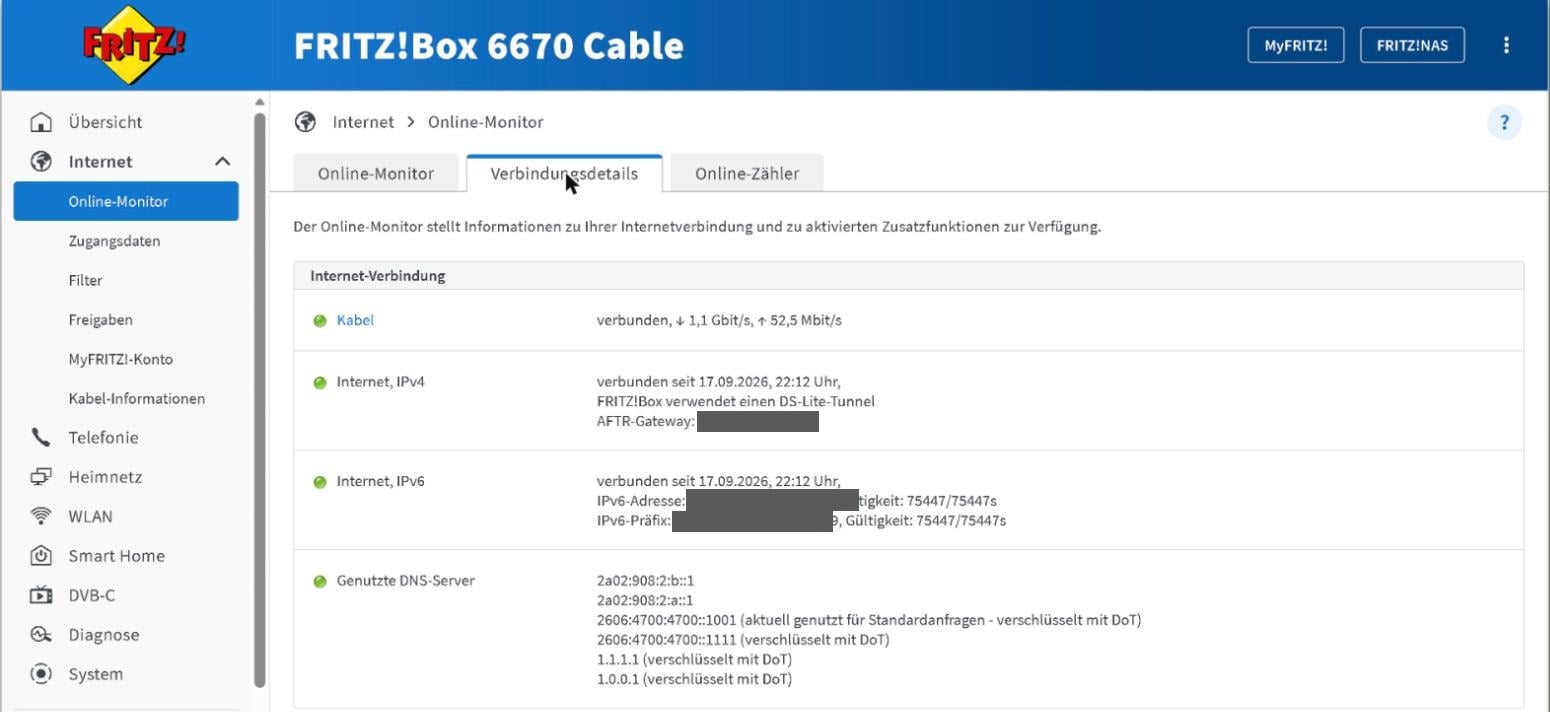
Look up the IPv4 address on your router’s status or internet page. On a FRITZ!Box, check the “Internet, IPv4” line in the connection details under Internet > Online Monitor:
- If it says the box is using a DS-Lite tunnel (on a German-language box: “FRITZ!Box verwendet einen DS-Lite-Tunnel”), your connection runs on DS-Lite.
- According to AVM, an address between
100.64.0.0and100.127.255.255means CGNAT (the range is the same on any router), and no IPv4 line at all means your connection is IPv6-only. - Any other address is a public IPv4 address, and you’re good to go.
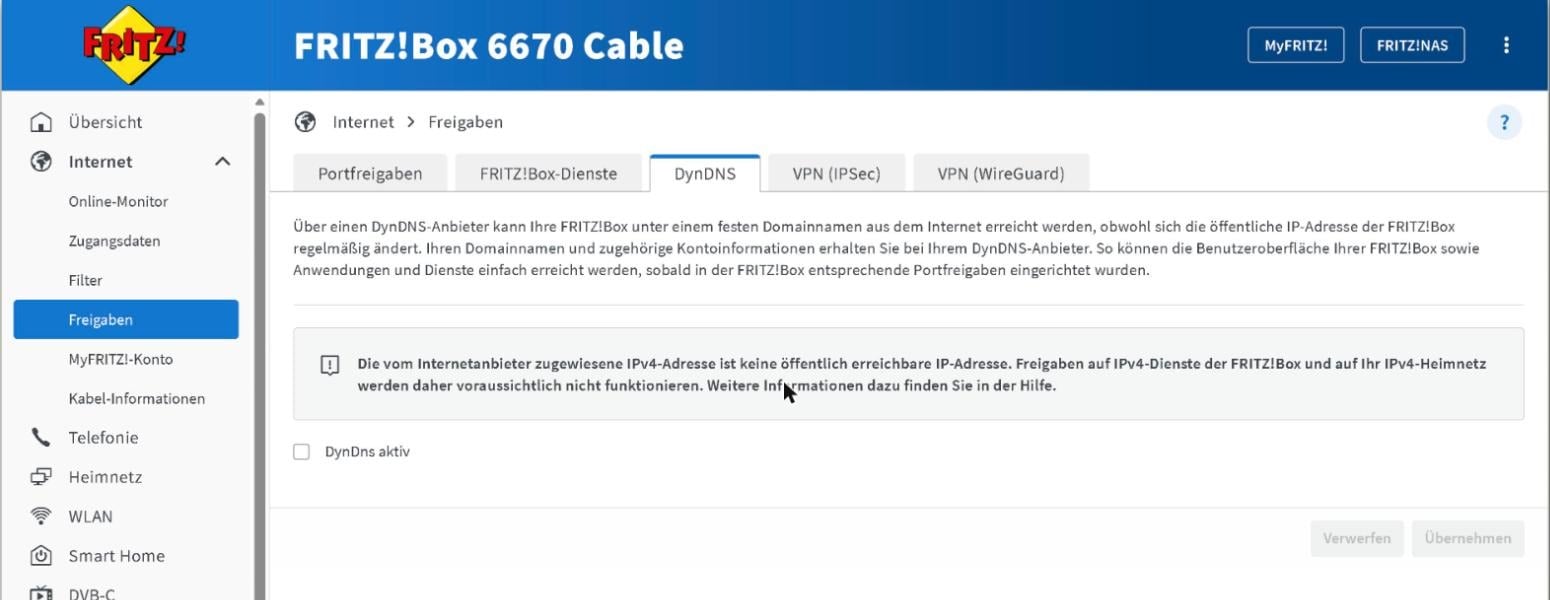
There’s a second giveaway under Internet > Permit Access > DynDNS: on a DS-Lite connection, the FRITZ!Box itself warns that the IPv4 address assigned by your provider isn’t publicly reachable and that sharing services on your IPv4 home network probably won’t work.
What to do behind CGNAT or DS-Lite: According to AVM, the FRITZ!Box’s own WireGuard also works with DS-Lite because it’s reachable over IPv6. Your phone then needs IPv6 on the road as well, which is usually the case on mobile data but often not on hotel Wi-Fi. You can also ask your ISP for a public IPv4 address or a dual-stack connection. According to AVM, providers mostly offer this to business customers, but it doesn’t hurt to ask. Reaching the Pi directly over IPv6 is possible too, but that’s beyond this guide. Without any port forwarding, Tailscale gets you in, a Cloudflare Tunnel works for individual web services, and Raspberry Pi Connect covers remote access to the Pi itself.
What you need
- A Raspberry Pi with a current Raspberry Pi OS. Any model will do, including a Pi 3 you already own, and Raspberry Pi OS Lite without a desktop is enough. If you’re buying one, a Raspberry Pi 4 with 2 GB* is plenty.
- An Ethernet cable to your router, such as the Amazon Basics Cat 6 cable (3 m)*. Wi-Fi works as well, but a cable is more reliable for a server that runs around the clock.
- Access to your router’s admin page to set up port forwarding. On a FRITZ!Box, that’s
http://fritz.box. - The WireGuard app on your phone or laptop. It’s free for Android, iOS, Windows and macOS, and you’ll find the links on the WireGuard download page.
- A fixed hostname for your connection, ideally from a free DuckDNS account. The next section explains why you need one.
You’ll type the commands into the Pi’s terminal, either directly on the Pi or over SSH from your computer.
Prepare your router: fixed IP, port forwarding, dynamic DNS
You need this part for both Pi setups, PiVPN and manual. Your router has to find the Pi at the same address every time, pass incoming connections on to it, and be reachable under a fixed name on the internet.
Give the Pi a fixed IP address
Your router normally hands out addresses automatically, so the Pi’s address can change. Port forwarding points at one address, so pin it down first. Most routers call this a DHCP reservation or static lease. On a FRITZ!Box, go to Home Network > Network, open the Network Connections tab and click the pencil icon next to the Pi. On the Home Network tab, tick the option to assign a permanent IPv4 address and click Apply.
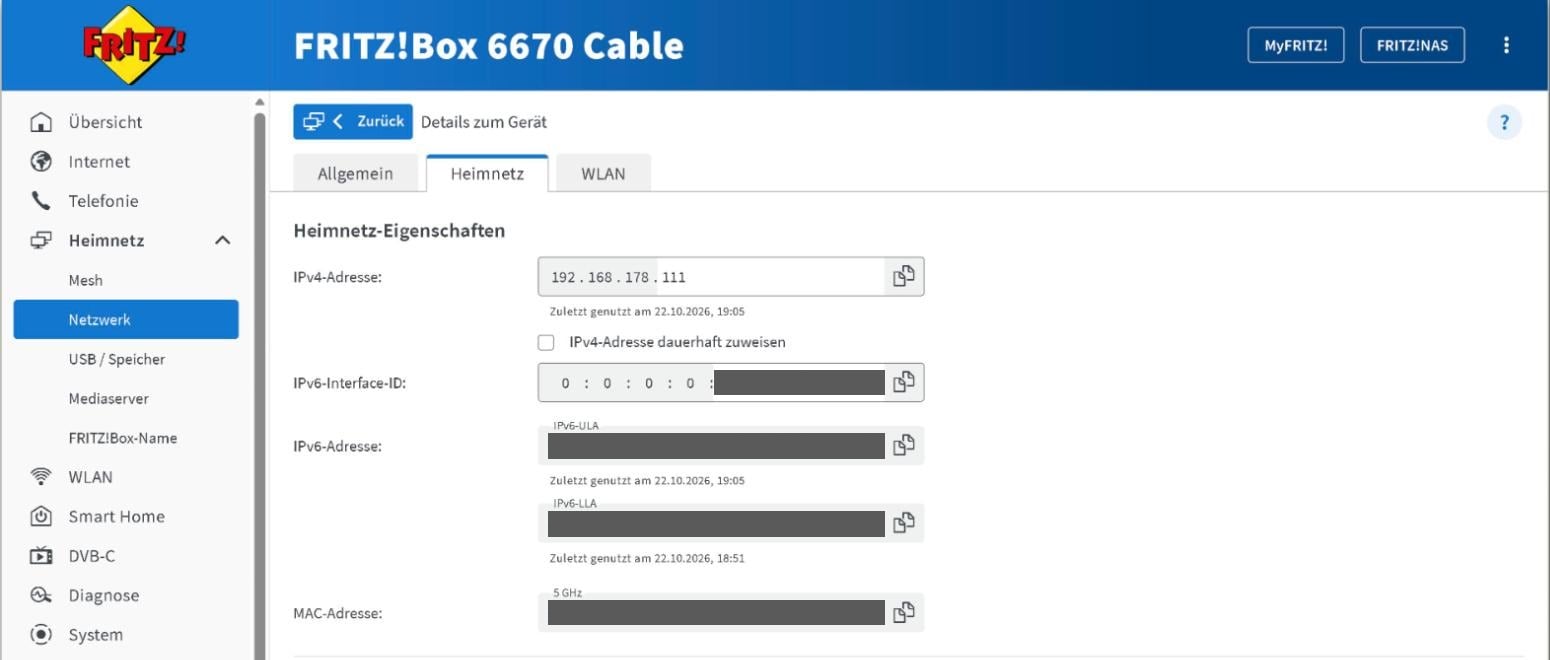
Make a note of the address, for example 192.168.178.50. You’ll need it for port forwarding in a minute.
Forward UDP port 51820
WireGuard on the Pi listens for connections on UDP port 51820. Think of a port as a door number for a service on a device. Your router has to pass incoming traffic for that port on to the Pi, otherwise it blocks it.
On most routers you’ll find this under port forwarding or virtual servers: forward UDP port 51820 to the Pi’s fixed IP. On a FRITZ!Box, go to Internet > Permit Access > Port Sharing > Add Device for Sharing, select the Pi, then New Sharing. In the dialog that opens, pick port sharing at the top, choose “Other application”, enter a name such as “WireGuard”, set the protocol to UDP and enter 51820 as the port to device, the through port and the desired external port (which only applies to IPv4). Leave sharing enabled and the preset internet access over IPv4 and IPv6 as it is. Close the dialog with OK, then save the page with Apply.
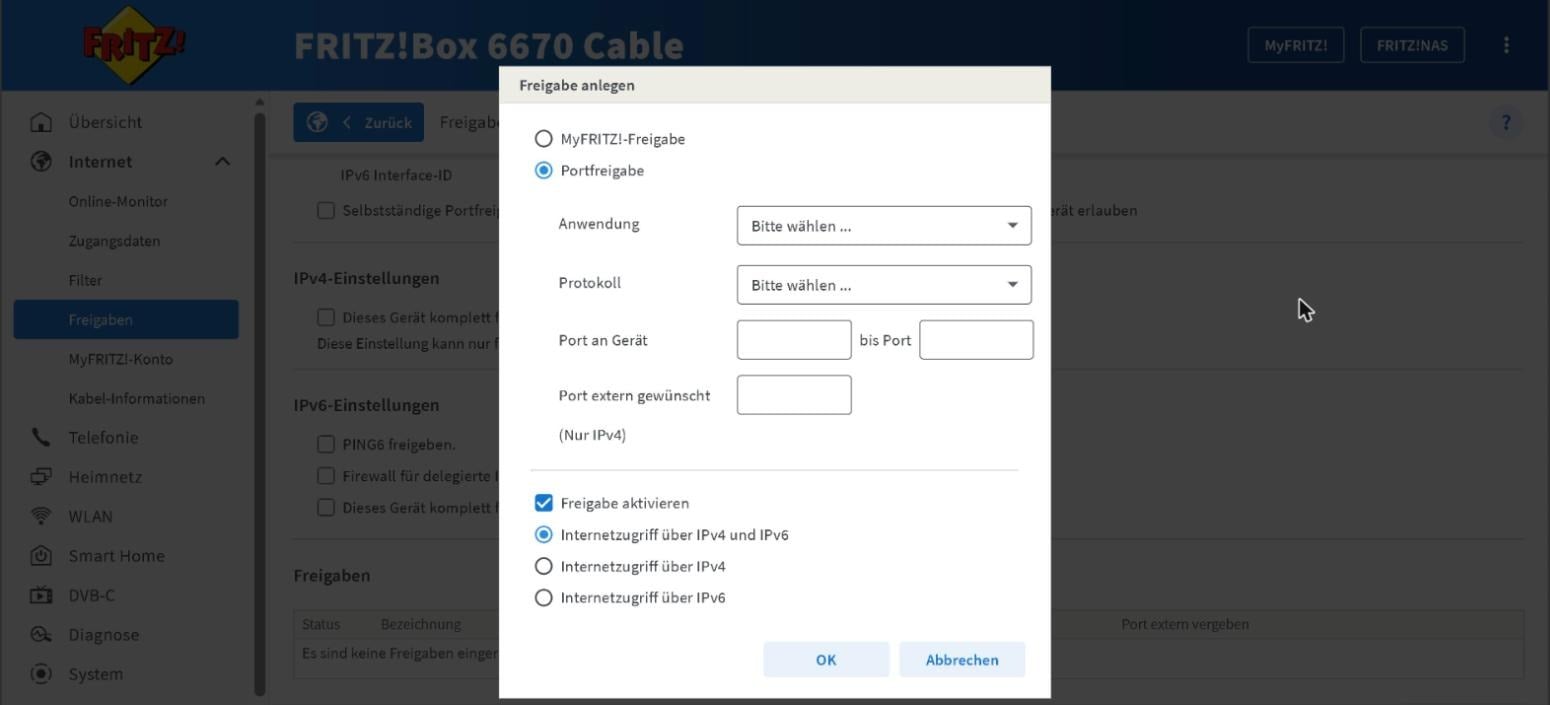
Forward only this one port and don’t use an “exposed host” or DMZ setting, which would put the whole Pi on the internet. Our beginner’s guide to port forwarding has more detail.
Dynamic DNS: a fixed name for your connection
On most connections, your public IP address changes from time to time. A dynamic DNS service gives your connection a fixed name such as yourname.duckdns.org and keeps it pointed at your current address. That’s the name you’ll enter in the WireGuard app later. Which of the three options suits you: with a FRITZ!Box, use option 1, and MyFRITZ! (option 2) only with the catch described below. If another router lets you add a custom dynamic DNS provider, enter the update URL from option 1 there. Otherwise, let the Pi handle updates with the script from option 3.
1. DuckDNS in your router: create a DuckDNS account, add a subdomain and copy the token from the dashboard. Many routers let you add a custom dynamic DNS provider. On a FRITZ!Box, go to Internet > Permit Access > DynDNS, turn DynDNS on, pick “Custom” as the provider and enter this update URL:
https://www.duckdns.org/update?domains=yourname&token=YOUR-TOKEN&ip=<ipaddr>Replace yourname with your subdomain and YOUR-TOKEN with your token. Leave <ipaddr> exactly as it is, that’s where the box fills in its current address. Enter yourname.duckdns.org as the domain name, none as the username and your token again as the password. DuckDNS’s own instructions also add &ipv6=<ip6addr>. Leave that part out for the Pi: it would publish the FRITZ!Box’s IPv6 address, and a device that prefers IPv6 would knock on the box’s door instead of the Pi’s.
2. MyFRITZ! (FRITZ!Box only, with a catch): under Internet > MyFRITZ! Account, register your box with your email address. The page then shows your MyFRITZ! address, which ends in .myfritz.net. The catch: that address belongs to the FRITZ!Box, not the Pi. On our box, it returns the FRITZ!Box’s own IPv6 address. A device that prefers IPv6 then knocks on the box’s door instead of the Pi’s, the IPv4 port forward never comes into play, and the connection fails. To see whether your address has an IPv6 entry, run nslookup -type=AAAA followed by your MyFRITZ! address. If it returns an address, go with option 1.
3. DuckDNS script on the Pi (any router): if your router can’t use a custom provider, the Pi reports your address to DuckDNS itself every five minutes. These commands create the script, make it readable only by you because it contains your token, and run it once as a test. Replace yourname and YOUR-TOKEN first:
mkdir -p ~/duckdns
cd ~/duckdns
cat > duck.sh << 'EOF'
#!/bin/sh
echo url="https://www.duckdns.org/update?domains=yourname&token=YOUR-TOKEN&ip=" | curl -o ~/duckdns/duck.log -K -
EOF
chmod 700 duck.sh
./duck.sh
cat duck.log
If duck.log says OK, the update worked. KO means the subdomain or token is wrong. To run the script on a schedule, open cron, the Linux task scheduler, with crontab -e. The first time, it asks which editor to use, pick nano. Add this line at the very bottom and save with Ctrl+O, Enter and Ctrl+X:
*/5 * * * * ~/duckdns/duck.sh >/dev/null 2>&1For other providers and alternatives, see our beginner’s guide to dynamic DNS.
Option A: set up WireGuard with PiVPN
PiVPN installs WireGuard, the firewall rules and IP forwarding in one go and creates the configuration for your devices. A word on its status: since 2024, the developer has only maintained PiVPN on a best-effort basis, so new releases are rare. According to its install script, it supports the current Raspberry Pi OS. If you want to use the UFW firewall, turn it on before installing (see Firewall with UFW), so PiVPN detects it and adds its own rules. Since you’re running a script from the internet with admin rights, download it and look through it first (press q to close the viewer):
curl -sSfL https://install.pivpn.io -o pivpn-install.sh
less pivpn-install.sh
bash pivpn-install.sh
Among other things, the wizard asks for the VPN type (choose WireGuard), the port (keep 51820), the DNS server for your devices (pick Pi-hole if you run it) and whether your devices should reach the Pi by public IP or by DNS name. Choose the DNS name and enter your dynamic DNS hostname. After that, a few commands handle your devices:
pivpn add
pivpn -qr phone
pivpn add
pivpn -c
pivpn -r phone
pivpn add creates a new device and asks for a name. Call the first one phone, and pivpn -qr phone shows its QR code. The second pivpn add is for your laptop, so call it laptop. PiVPN also saves each config as a file in a configs folder in the home directory of the user you picked during installation, in this case ~/configs/laptop.conf. pivpn -c lists connected devices and pivpn -r phone removes one again. Next, head to Connect your devices and test.
Option B: set up WireGuard manually
Every command runs with sudo or in a root shell, because only the administrator account, root, can access the /etc/wireguard folder.
Step 1: install the packages
sudo apt update
sudo apt install wireguard qrencode iptables
wireguard brings the wg and wg-quick tools, and the kernel module is already part of Raspberry Pi OS. qrencode creates the QR code for your phone later. You need iptables because Raspberry Pi OS only ships the newer nftables, while the rules in the WireGuard config call the iptables command. Without it, the tunnel fails to start with iptables: command not found.
Step 2: generate the keys
Like SSH, WireGuard uses key pairs. Each device has a private key that never leaves it and a public key that you hand to the other side. You need one pair for the Pi and one for each device, starting with your phone. Open a root shell:
sudo -iThe prompt now ends in # instead of $. Now generate the keys. umask 077 makes sure only root can read the new files, and the phone’s files go into a separate clients subfolder. exit takes you back out of the root shell:
cd /etc/wireguard
umask 077
wg genkey | tee server_private.key | wg pubkey > server_public.key
mkdir -p clients
wg genkey | tee clients/phone_private.key | wg pubkey > clients/phone_public.key
ls -l /etc/wireguard /etc/wireguard/clients
exit
ls should list server_private.key and server_public.key, plus the two phone keys in the clients folder. The root shell matters here: as a regular user, cd /etc/wireguard fails for lack of permissions, but the remaining commands still run and quietly drop the keys into your home folder, with no error message.
Step 3: find your network interface
The Pi needs to know which network interface to send tunnel traffic out of. This command tells you:
ip route get 1.1.1.1The name follows dev in the output, for example dev eth0 for Ethernet or dev wlan0 for Wi-Fi. The address after src is the Pi’s IP on your home network.
Step 4: create the server config wg0.conf
The config needs two keys. The easiest way is to open a second terminal or SSH window: show the keys in one and edit the file in the other. To copy a key, select it with your mouse and copy it (Ctrl+Shift+C in most terminals, while in PuTTY selecting it is enough). In nano, paste it with Ctrl+Shift+V or a right-click. These commands show the two keys:
sudo cat /etc/wireguard/server_private.key
sudo cat /etc/wireguard/clients/phone_public.key
Then open the new file in the nano editor:
sudo nano /etc/wireguard/wg0.confPaste in the following and replace SERVER_PRIVATE_KEY with the contents of server_private.key and PHONE_PUBLIC_KEY with the contents of phone_public.key. If your Pi is on Wi-Fi, also change both instances of eth0 to wlan0. Save with Ctrl+O, Enter and Ctrl+X.
[Interface]
Address = 10.0.0.1/24
ListenPort = 51820
PrivateKey = SERVER_PRIVATE_KEY
PostUp = iptables -A FORWARD -i %i -j ACCEPT; iptables -A FORWARD -o %i -j ACCEPT; iptables -t nat -A POSTROUTING -o eth0 -j MASQUERADE
PostDown = iptables -D FORWARD -i %i -j ACCEPT; iptables -D FORWARD -o %i -j ACCEPT; iptables -t nat -D POSTROUTING -o eth0 -j MASQUERADE

[Peer]
# phone
PublicKey = PHONE_PUBLIC_KEY
AllowedIPs = 10.0.0.2/32
Here’s what it does: the Pi gets the address 10.0.0.1 inside the tunnel and listens on port 51820. The [Peer] section (WireGuard calls every device on the other end of the tunnel a peer) lists your phone with its public key and its fixed tunnel address, 10.0.0.2. The PostUp and PostDown lines run when the tunnel starts and stops. They allow traffic to pass between the tunnel and your home network, and MASQUERADE makes the Pi swap the sender address 10.0.0.2 for its own. That’s necessary because your router and the devices on your network don’t know the tunnel network and wouldn’t send their replies back to the Pi otherwise.
If your home network already uses addresses starting with 10.0.0., pick a different tunnel network such as 10.8.0.1/24 and change the addresses in all configs to match. Finally, lock down the file, since it contains the private key:
sudo chmod 600 /etc/wireguard/wg0.confStep 5: turn on IP forwarding permanently
By default, the Pi doesn’t pass packets from one network to another. This setting turns forwarding on and survives a reboot:
echo "net.ipv4.ip_forward = 1" | sudo tee /etc/sysctl.d/99-wireguard.conf
sudo sysctl --system
sudo sysctl net.ipv4.ip_forward
The last line should print net.ipv4.ip_forward = 1. Older guides put this setting in /etc/sysctl.conf. Current Raspberry Pi OS no longer reads that file at boot, so forwarding would be off again after the next restart.
Step 6: start WireGuard
sudo systemctl enable --now wg-quick@wg0
sudo wg show
The first command starts the wg0 tunnel right away and on every boot. sudo wg show tells you how it’s doing: if you see listening port: 51820 and below it a peer with allowed ips: 10.0.0.2/32, the server is running. If you get an error instead, sudo systemctl status wg-quick@wg0 shows what went wrong.
Step 7: create the config for your phone
Your phone needs its own config file with its private key and the Pi’s public key. As in step 4, show both in your second window and copy them over into nano:
sudo cat /etc/wireguard/clients/phone_private.key
sudo cat /etc/wireguard/server_public.key
Create the file in the clients subfolder, where the Pi won’t accidentally start it as a tunnel of its own:
sudo nano /etc/wireguard/clients/phone.confReplace PHONE_PRIVATE_KEY, SERVER_PUBLIC_KEY and yourname.duckdns.org with your own values:
[Interface]
PrivateKey = PHONE_PRIVATE_KEY
Address = 10.0.0.2/32
DNS = 192.168.178.1

[Peer]
PublicKey = SERVER_PUBLIC_KEY
Endpoint = yourname.duckdns.org:51820
AllowedIPs = 0.0.0.0/0, ::/0
Line by line:
- Address is the phone’s tunnel address. It has to match the
AllowedIPsline in the phone’s[Peer]section inwg0.conf. - DNS is the server that turns names into addresses. Use your router’s IP,
192.168.178.1on most FRITZ!Boxes, and names from your home network such asfritz.boxwill work too. If you run Pi-hole, enter its IP instead, and it’ll block ads on the go as well. Cloudflare’s1.1.1.1works too, but then names from your home network won’t resolve. - Endpoint is your dynamic DNS hostname plus the port.
- AllowedIPs decides which traffic goes through the tunnel.
0.0.0.0/0, ::/0sends everything through it, including your browsing, which protects you on public Wi-Fi. Since the tunnel itself has no IPv6 address,::/0blocks IPv6 traffic so nothing slips past the tunnel, and apps fall back to IPv4. If you only want to reach devices at home and browse normally otherwise, useAllowedIPs = 10.0.0.0/24, 192.168.178.0/24with your own home network instead. This split tunnel saves battery and mobile data.
You can optionally add PersistentKeepalive = 25 to the [Peer] section. Your phone then sends a tiny packet every 25 seconds to keep the connection open even when nothing else is being sent. You usually don’t need it for reaching your home network from your phone, and it costs a bit of battery. It’s mainly useful if something at home needs to reach a device on the tunnel.
Step 8: show the QR code and scan it
sudo qrencode -t ansiutf8 -r /etc/wireguard/clients/phone.confA QR code appears in the terminal, ready to scan with the WireGuard app (see Connect your devices and test). The -r matters: if you pass the file with < instead, your own shell opens it rather than sudo, and the command fails with a permission error.
phone.conf and phone_private.key contain your phone’s private key. Only root can read them. If you’d rather not keep them on the Pi once you’ve scanned the code, delete them. For a new phone, you simply generate new keys:
sudo rm /etc/wireguard/clients/phone.conf /etc/wireguard/clients/phone_private.keyAdd more devices
Every device gets its own keys and its own tunnel address. For a laptop, generate the keys in a root shell again:
sudo -icd /etc/wireguard
umask 077
wg genkey | tee clients/laptop_private.key | wg pubkey > clients/laptop_public.key
exitShow the laptop’s public key and open the server config:
sudo cat /etc/wireguard/clients/laptop_public.key
sudo nano /etc/wireguard/wg0.conf
Add a second [Peer] section at the end of the file with that key and the next free address:
[Peer]
# laptop
PublicKey = LAPTOP_PUBLIC_KEY
AllowedIPs = 10.0.0.3/32
The laptop’s client file needs its private key and, once again, the Pi’s public key:
sudo cat /etc/wireguard/clients/laptop_private.key
sudo cat /etc/wireguard/server_public.key
sudo nano /etc/wireguard/clients/laptop.conf
It looks just like the phone’s, only with the laptop’s key and the address 10.0.0.3:
[Interface]
PrivateKey = LAPTOP_PRIVATE_KEY
Address = 10.0.0.3/32
DNS = 192.168.178.1

[Peer]
PublicKey = SERVER_PUBLIC_KEY
Endpoint = yourname.duckdns.org:51820
AllowedIPs = 0.0.0.0/0, ::/0
Restart the tunnel so the Pi picks up the new peer:
sudo systemctl restart wg-quick@wg0That’s the server done. Next, head to Connect your devices and test.
Connect your devices and test
This part applies to both options. The only difference is where the client files live.
Phone (Android, iOS): open the WireGuard app, tap the plus button, choose to scan a QR code and point the camera at the code in your terminal. With PiVPN, pivpn -qr phone displays it. If you set things up by hand, use the command from step 8.
Laptop: here you need the client file’s contents as text. PiVPN puts a copy in a configs folder in the home directory of the user you picked during installation. With the manual setup, it’s in /etc/wireguard/clients/. Display the file with the matching command and copy the output:
- PiVPN:
cat ~/configs/laptop.conf - Manual setup:
sudo cat /etc/wireguard/clients/laptop.conf
On Windows and macOS, paste the text into a new text file called laptop.conf and import it in the WireGuard app with “Import tunnel(s) from file”. On Linux, create the file on your laptop as /etc/wireguard/wg0.conf, paste the text into nano and start the tunnel with wg-quick. For the DNS = line, wg-quick needs the resolvconf program, otherwise it stops with resolvconf: command not found. On Debian and Raspberry Pi OS, the openresolv package provides it. On the laptop, run:
sudo apt install wireguard openresolv
sudo nano /etc/wireguard/wg0.conf
sudo chmod 600 /etc/wireguard/wg0.conf
sudo wg-quick up wg0
sudo wg-quick down wg0 disconnects again. The same approach turns a second Raspberry Pi into a WireGuard client.
How to test properly: turn off Wi-Fi on your phone so it connects from the outside over mobile data. Testing from your own Wi-Fi tells you little, because many routers don’t loop connections to their own public address back into the home network. Then switch on the tunnel in the app and check on the Pi:
sudo wg showYour phone’s peer now shows a latest handshake from a few seconds ago, and the transfer counters go up. Finally, open an address from your home network in your phone’s browser, such as http://192.168.178.1 for a FRITZ!Box or your Home Assistant dashboard. If it loads, your tunnel works. With PiVPN, pivpn -c shows the same information.
If you use the full tunnel with AllowedIPs = 0.0.0.0/0, ::/0, also check that your browsing goes through it: on your phone, open a site that shows your IP address, for example by searching for “what is my IP”. It should show the same public IPv4 address as your router’s status page at home.
Optional: firewall with UFW
UFW is a simple front end for the Pi’s firewall and doesn’t come preinstalled on Raspberry Pi OS. You only need this section if you use UFW or want to. The commands are for the manual setup. With PiVPN: if UFW was already active during installation, PiVPN added the rules itself. If you turn UFW on afterwards, add the same rules PiVPN would otherwise create, which are the commands below. The order matters: allow SSH first, then turn the firewall on. Otherwise you’ll lock yourself out the moment you enable it over SSH.
sudo apt install ufw
sudo ufw allow 22/tcp
sudo ufw allow 51820/udp
sudo ufw route allow in on wg0 out on eth0
sudo ufw enable
If you’re connected over SSH, UFW warns when you enable it that the command may disrupt existing SSH connections. Since you’ve already allowed SSH, answer y. The route allow line only permits forwarding from the tunnel into your home network and on to the internet. That’s more targeted than allowing forwarding across the board in /etc/default/ufw, which would open it for every interface, Docker included. If your Pi is on Wi-Fi, use wlan0 instead of eth0 here too. Afterwards, run the test from “Connect your devices and test” again.
Troubleshooting
| Problem | Cause | Fix |
|---|---|---|
Start fails with iptables: command not found | The iptables package is missing, Raspberry Pi OS only ships nftables | sudo apt install iptables, then sudo systemctl restart wg-quick@wg0 |
No latest handshake in sudo wg show | Port forwarding missing or pointing at the wrong IP, connection behind CGNAT or DS-Lite, dynamic DNS out of date, testing from your own Wi-Fi | Check the UDP 51820 forward to the Pi’s fixed IP, check your connection as described above, look at cat ~/duckdns/duck.log, test over mobile data |
| Connected, but no internet and no home network | Forwarding is off, often after a reboot, or the MASQUERADE rule names the wrong interface. A wrong name doesn’t throw an error, traffic just doesn’t flow. | sudo sysctl net.ipv4.ip_forward must show 1, otherwise repeat step 5. Check the interface with ip route get 1.1.1.1 and fix it in wg0.conf. |
| Home devices unreachable only in some places, e.g. on a friend’s Wi-Fi | That network uses the same address range as yours, for example both on 192.168.178.x | Move your home network to a less common range in your router, such as 192.168.42.x |
Home network names like fritz.box don’t resolve | The client uses an external DNS server such as 1.1.1.1 | Set DNS = to your router’s or Pi-hole’s IP |
wg0 already exists | The tunnel is already running | sudo wg-quick down wg0, or just sudo systemctl restart wg-quick@wg0 |
Linux client: resolvconf: command not found | wg-quick needs resolvconf for the DNS line | sudo apt install openresolv |
Wrap-up
If your router has WireGuard built in, like a FRITZ!Box from FRITZ!OS 7.50, that’s the shortest way into your home network. With any other router, the Pi takes over, either with PiVPN or set up by hand. Once it’s running, the server needs little care: keep Raspberry Pi OS up to date with sudo apt update and sudo apt full-upgrade, forward only the one UDP port and keep each private key on the device it belongs to.
You’ll also find the templates for wg0.conf and the client config in the raspberry.tips repository on GitHub.
WireGuard on the Raspberry Pi: FAQ
For a new VPN server on the Pi, go with WireGuard. It’s more modern and leaner, its developers describe it as considerably faster than OpenVPN, and the whole configuration fits in a few lines. The apps for Android, iOS, Windows and macOS are free.
Yes, for a WireGuard server on the Pi you forward UDP port 51820 on your router. That only works if your connection has a public IPv4 address. Behind CGNAT or DS-Lite, Tailscale gets you in without port forwarding. With DS-Lite, a FRITZ!Box with built-in WireGuard is also reachable over IPv6.
Some can. FRITZ!Box routers with FRITZ!OS 7.50 or later have WireGuard built in, except the 6490 and 6590 Cable models. You set it up under Internet, Permit Access, VPN (WireGuard) and add your phone by QR code. The Pi makes sense if your router has no WireGuard or if you want the VPN to be independent of your router.
Both give you the same WireGuard. PiVPN sets everything up through a wizard and manages devices with simple commands, but it only gets occasional fixes these days. The manual setup takes longer, but you understand every line and can troubleshoot faster.
WireGuard has no fixed limit. Each device gets its own key pair and tunnel address, for example 10.0.0.2 for your phone and 10.0.0.3 for your laptop. For every device, you add its own Peer section to wg0.conf.
Most likely IP forwarding is off. Older guides put it in /etc/sysctl.conf, which current Raspberry Pi OS no longer reads at boot. Put the setting net.ipv4.ip_forward = 1 in a file in the /etc/sysctl.d/ folder instead, and it stays on for good.
Further reading
- Set up Pi-hole: network-wide ad blocking, on the go too through your tunnel
- Secure your Raspberry Pi: SSH, firewall and Tailscale for remote access without port forwarding
- Set up dynamic DNS and set up port forwarding from our beginner’s guide
- Raspberry Pi Connect: control the Pi itself from your browser
- Cloudflare Tunnel: publish individual web services without port forwarding
- All our Home Assistant guides, for everything you’ll control through the tunnel while you’re away