Raspberry Pi Connect – Remote Access via Browser
Setting up remote access to the Raspberry Pi used to be a bit of a headache: configure port forwarding on the router, set up a dynamic DNS service, keep a VNC server running — and in the end it often only worked on the home network anyway. With Raspberry Pi Connect, Raspberry Pi Ltd integrated an elegant solution directly into the operating system in 2024. You can now control your Pi from anywhere in the world via a regular browser, without a single port forward or external app. In this article I’ll show you how to set up Raspberry Pi Connect, what it can do — from screen sharing and the remote shell to remote updates — and where its current limitations lie.
In short
Raspberry Pi Connect is Raspberry Pi Ltd’s official, free remote access service: link your Pi to your account once, then control it from anywhere in a browser — no port forwarding needed.
- You need: a free Raspberry Pi account and Raspberry Pi OS from the October 2023 release onwards.
- Good to know: screen sharing needs Raspberry Pi OS with desktop running Wayland (the default); the remote shell also works on Raspberry Pi OS Lite. To stay reachable after a reboot, the remote shell needs
loginctl enable-lingerand screen sharing needs desktop autologin. - Remote Updates: you build update packages yourself and send them to the Pi through Connect. It has to come online within two hours, or the deployment expires.
Quick Start – Raspberry Pi Connect in 6 Steps:
- Install:
sudo apt install rpi-connect(Raspberry Pi OS Lite:rpi-connect-lite) - Enable the service:
rpi-connect on - Link your Pi:
rpi-connect signinand open the displayed URL in a browser - Stay reachable after reboots:
loginctl enable-lingerfor the remote shell, desktop autologin for screen sharing (see “Setting Up Autostart After Reboot”) - Sign in at connect.raspberrypi.com with your Raspberry Pi account
- Click Connect via next to the device and pick Screen sharing (desktop) or Remote shell (terminal) – done
What is Raspberry Pi Connect?
Raspberry Pi Connect is the official remote access service from Raspberry Pi Ltd. It lets you control your Pi either via screen sharing or a remote shell (terminal) directly in the browser — from anywhere, without changing anything on your router or firewall. On top of that, Remote Updates let you send update packages that Connect runs on the Pi without you opening a session.
Technically, Connect uses an encrypted peer-to-peer connection brokered through Raspberry Pi Ltd servers. Your Pi establishes an outgoing connection, which means no incoming port needs to be opened. This makes the service work perfectly in typical home networks or behind NAT.
For personal use, Connect is free and only requires a free Raspberry Pi account at raspberrypi.com. After launching in beta in May 2024, Connect has been officially stable since May 2025 (version 2.5).
Connect, SSH, VNC or a VPN?
Connect isn’t the only way to reach your Pi. To see whether it’s the right fit, here’s how it compares with the classic alternatives:
| Feature | Pi Connect | SSH | VNC (wayvnc) | VPN (WireGuard) |
|---|---|---|---|---|
| Setup | Minimal | Easy | Easy (raspi-config) | Moderate |
| Port forwarding for access from outside | No | Yes | Yes (a VPN is the safer route) | Yes (one UDP port) |
| Desktop access | Yes (desktop on Wayland) | No | Yes | Only with VNC |
| Terminal | Yes | Yes | No | Only with SSH |
| In the browser | Yes | No | No | No |
| Remote updates | Yes | No | No | No |
| Whole home network reachable | No (just the Pi) | No | No | Yes |
| Cost | Free (personal account) | Free | Free | Free |
SSH is still the best choice for purely terminal-based work on your home network, or if you can configure your router accordingly. VNC is the direct route to the desktop at home: the wayvnc server is already built into Raspberry Pi OS, but you need a VNC client such as TigerVNC, and a VPN when you’re away (see how to set up VNC on the Raspberry Pi). Pi Connect shines through its simplicity — ideal for beginners or situations where you have no control over the router.
Connect doesn’t replace a VPN in every case. It connects you to exactly one Pi — its desktop or its terminal. If you want to reach your whole home network on the go, including your NAS, printer or smart home hub, or use Pi-hole as an ad blocker on your phone, you still need a VPN. The guide Set Up a WireGuard VPN Server on the Raspberry Pi shows you how. For most everyday tasks, though, Connect is all you need: checking in quickly, tweaking a script or installing an update — no DynDNS, no VPN profile on your phone.
Limitations
A few limitations are worth knowing before you set Connect up:
- Cloud account required: Connections are brokered through Raspberry Pi Ltd’s servers – nothing works without a Raspberry Pi account. If you want to stay fully local, use SSH or VNC on your home network.
- No file transfer: Files can’t be transferred directly via Connect. As a workaround, use SFTP on your home network (e.g. with FileZilla or WinSCP) alongside SSH access.
- Remote updates take some groundwork: you build the update packages yourself.
- Latency: Depending on your internet connection, screen sharing latency can be noticeable. It’s fine for operating graphical applications, but not intended for smooth video streaming.
Screen Sharing or Remote Shell?
Connect offers two ways in. Which one you need decides the package and what you have to set up so it survives a reboot.
Screen Sharing
With screen sharing you see your Pi’s complete desktop in the browser, including mouse and keyboard control and clipboard synchronisation. This is ideal when you want to use graphical applications, open configuration dialogs, or simply work as if you were sitting right in front of the Pi.
Screen sharing needs Raspberry Pi OS with desktop and the Wayland display server (the default in current installs). It doesn’t work on X11 or on Raspberry Pi OS Lite. The Raspberry Pi documentation doesn’t list any model restriction, and the Pi doesn’t need a monitor either: with no display connected, Raspberry Pi OS creates a virtual display for the desktop. You need the rpi-connect package, plus desktop autologin to keep it working after a reboot (see “Setting Up Autostart After Reboot”).
Remote Shell
The remote shell gives you a fully functional terminal directly in the browser. You can run commands, start scripts, read logs and do everything you’d do over SSH — just without port forwarding or an SSH client.
The remote shell works on all Pi models, including the Pi Zero 2 W, Pi 3 and older devices, as well as Raspberry Pi OS Lite without a desktop. The lightweight rpi-connect-lite package is all you need, though rpi-connect includes it too. After a reboot, it needs either user lingering or desktop autologin (see “Setting Up Autostart After Reboot”).
What You Need
- A Raspberry Pi; for screen sharing, running Raspberry Pi OS with desktop (see above).
- Raspberry Pi OS from the October 2023 release onwards.
- A free Raspberry Pi account at raspberrypi.com.
- An internet connection on the Pi (Wi-Fi or Ethernet).
- A terminal on the Pi for the setup: either with a monitor and keyboard or, for a Pi without a screen, over SSH.
For screen sharing I recommend the Raspberry Pi 5* — it’s significantly faster than its predecessor, which makes the remote session smoother. As a cheaper alternative, the Raspberry Pi 4* works perfectly well with Connect too.
Installing rpi-connect or rpi-connect-lite
Pick the package that matches your system: rpi-connect for Pis with a desktop, rpi-connect-lite for Pis without one. Raspberry Pi OS with desktop already ships with rpi-connect, and Raspberry Pi OS Lite with rpi-connect-lite — they just aren’t switched on yet.
On a Pi with a desktop, stick with rpi-connect even if you only need the terminal — the remote shell is already part of it. The two packages can’t be installed side by side: install rpi-connect-lite and apt removes rpi-connect, and vice versa.
Open a terminal on your Pi and update the system first:
sudo apt update && sudo apt upgrade -yWith a desktop:
sudo apt install rpi-connectWithout a desktop (Raspberry Pi OS Lite):
sudo apt install rpi-connect-liteIf apt says the package is already the newest version, it was installed already. rpi-connect-lite has a much lower resource footprint and runs fine on older and less powerful Pi models.
Setup: Linking Your Pi to Your Account
After installation, you need to activate the service once and link your Pi to your Raspberry Pi account. Run all rpi-connect commands as your normal user, without sudo. If you don’t have a Raspberry Pi account yet, create one for free at raspberrypi.com first. While you’re at it, turn on two-factor authentication for the account : after signing in at id.raspberrypi.com, you’ll find it under Two-factor authentication, and you’ll need an authenticator app on your phone. “Security” below explains why it matters so much here.
Enable the service:
rpi-connect onCheck status (shows whether the service is running and whether the Pi is linked):
rpi-connect statusFinally, sign the Pi in once:
rpi-connect signinThe command outputs a URL that you open in any browser — either on the Pi itself or on another device. There you sign in with your Raspberry Pi account and confirm the link. Your Pi then appears in your Connect dashboard.
Setting Up Autostart After Reboot
Connect runs as a service of your user account, not as a system service. After a reboot, the Pi is only reachable while that user is logged in. What you need to set up depends on how you connect.
Remote shell and remote updates: turn on “user lingering” once, and Connect keeps running even when nobody is logged in — as your normal user, without sudo:
loginctl enable-lingerRaspberry Pi explicitly recommends this for headless Pis running Raspberry Pi OS Lite — otherwise a remote reboot can lock you out. Remote updates reach the Pi through the same user service, so this applies to them as well.
Screen sharing: Connect can only share a desktop that’s already running; it doesn’t start one itself. So the Pi has to boot to the desktop and log your user in automatically. You don’t need lingering for this: Connect starts when you log in, and the remote shell and remote updates come along with it. Here’s how:
- Open the configuration tool with
sudo raspi-config. - Choose System Options → Boot → Desktop.
- Choose System Options → Auto Login. You can say no to console autologin, but say yes to desktop autologin.
- Exit raspi-config and restart the Pi.
Older versions of raspi-config combine both in System Options → Boot / Auto Login → Desktop Autologin. From then on, the Pi logs in automatically after every reboot and Connect can offer a desktop session straight away. This also means anyone who sits down at the Pi gets straight into your desktop without a password.
Connecting from Outside: Open a Browser
Once your Pi is set up and online, you can access it from any device with a modern browser:
- Open connect.raspberrypi.com in your browser.
- Sign in with your Raspberry Pi account.
- You’ll see all your linked Pis. Click Connect via next to the one you want and pick Screen sharing for full desktop access or Remote shell for a terminal.
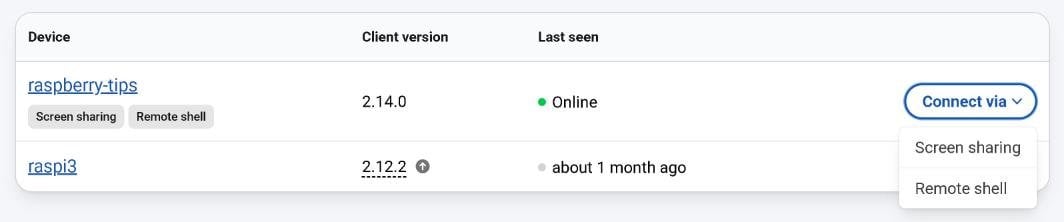
The connection works without a VPN or any client software, from any network — including your office or a public Wi-Fi — because the Pi only needs outgoing connections.
Remote Updates (OTA) – Update Software Remotely
Since March 2026, Raspberry Pi Connect offers a brand-new feature: Remote Updates, also known as over-the-air (OTA) updates, which you trigger from the browser. You upload an update package and Connect runs it on your Pi without you opening a Connect session. This is especially useful for headless Pis that are hard to reach — in the basement, at a relative’s house, or running as a permanent appliance behind the TV.
What Connect delivers is called an artefact: a packaged file (.tar.zst) that you build yourself and upload each time you deploy. Only Connect for Organisations, the paid version for businesses with multiple users, keeps a library of saved artefacts. There are two kinds:
- Script artefacts: a shell script that runs as root on the Pi — for an
apt upgrade, say, or a config change. They work on any standard Raspberry Pi OS install. If the script goes wrong, nothing rolls it back, so test it first on a Pi you can physically get to (step 3 in the guide below). - A/B boot updates: replace the entire system (built with rpi-image-gen) and fall back to the previous version automatically if something fails. The Pi has to be set up with an A/B partition layout from the start — overkill for most Pis at home, so the guide below sticks to script artefacts.
Requirements and Setup
On the target Pi — the one that’s going to receive the update:
- A standard Raspberry Pi OS install — that’s all script updates need; only A/B boot updates require a special partition layout.
- The Pi is linked to your account with
rpi-connect signinand stays reachable after a reboot (user lingering or desktop autologin, see “Setting Up Autostart After Reboot”). - An up-to-date
rpi-connectorrpi-connect-lite, plus therpi-connect-otapackage, switched on withrpi-connect ota on(commands below).
To build the artefact, you need the otamaker tool. It also comes with the rpi-connect-ota package, and you run it on any Pi you can get to — that can be the target Pi itself. There’s also a version of otamaker for PC and Mac in the utils repository on GitHub.
Install the package alongside your existing Connect package — on the target Pi and, if it’s a different one, on the Pi you build on:
# With rpi-connect (Desktop)
sudo apt update
sudo apt install rpi-connect rpi-connect-ota

# With rpi-connect-lite (Raspberry Pi OS Lite)
sudo apt update
sudo apt install rpi-connect-lite rpi-connect-ota
Then opt the target Pi in to remote updates. You run the command without sudo, but it asks for your password itself, since remote updates will be allowed to run scripts as root. Raspberry Pi still labels the feature as experimental:
rpi-connect ota onOnly then does a Deploy button show up next to the device under Devices on connect.raspberrypi.com.
Building and Deploying a Script Update
This example comes from the official documentation and upgrades every installed package. You build the artefact once and can then send it to any Pi that has rpi-connect-ota installed and rpi-connect ota on enabled — one device at a time, using that device’s Deploy button. Do steps 1 to 5 in a terminal on the Pi you build on — on a headless Pi, over SSH or the remote shell, though step 3 is better done over SSH.
1. Create a folder and switch to it:
mkdir ~/ota-aptupgrade
cd ~/ota-aptupgrade
2. Write the script: create a file called aptupgradescript (with nano aptupgradescript, for example) and paste in the script. Its exit code tells Connect how things went: 0 = success, 1 = failure, 2 = success, but the Pi needs a reboot — Connect then reboots it for you.
#!/bin/sh
export DEBIAN_FRONTEND=noninteractive
if ! apt update; then
    echo Package index update failed
    exit 1 # EXIT_FAILURE
fi
if apt -y -o DPKG::Options::="--force-confnew" upgrade > output.txt 2>&1; then
    if [ -r /var/run/reboot-required ]; then
        echo Rebooting to finish the upgrade
        exit 2 # EXIT_REBOOT
    fi
else
    echo Upgrade failed:
    echo
    cat output.txt
    exit 1 # EXIT_FAILURE
fi
echo Upgrade complete
exit 0 # EXIT_SUCCESS
Make the file executable:
chmod +x aptupgradescript3. Test the script: run it once by hand. Be aware that this really does upgrade this Pi. Do this step over SSH or directly on the Pi, not in the remote shell: if the upgrade pulls in a new version of rpi-connect, it closes every remote shell session, according to the Raspberry Pi docs, and gets cut off along the way. If the remote shell is all you have, install tmux (sudo apt install tmux), start tmux and run the script inside it, so it keeps going after you’re disconnected:
sudo ./aptupgradescriptIf it ends with “Upgrade complete” or “Rebooting to finish the upgrade”, it works. The script doesn’t reboot the Pi itself.
4. Create the manifest: aptupgrade.yaml, in the same folder, describes the package. The name under payloads has to match the script’s file name exactly.
# Run apt upgrade on a remote device
artefact:
  name: aptupgrade
  version: 1.0
  device_type: rpi

payloads:
- name: aptupgradescript
  type: script
5. Build the artefact: the otamaker tool ships with the rpi-connect-ota package.
otamaker aptupgrade.yamlIt creates a .tar.zst file and prints its SHA-256 checksum. There’s no need to copy the checksum anywhere — Connect calculates it during the upload and shows it so you can compare.
6. Get the file to your browser: if the Pi has a desktop, upload the file straight from its browser. Otherwise, copy it to your PC — on your home network, use WinSCP or run this in a terminal on the PC (adjust the username and hostname):
scp "pi@raspberrypi.local:~/ota-aptupgrade/*.tar.zst" .7. Upload and deploy: on connect.raspberrypi.com, go to Devices, click Deploy next to your Pi, give the deployment a name and upload the .tar.zst file (2 GB max). Once Checksum and Upload both say “Complete”, click Next to review it, then Deploy.
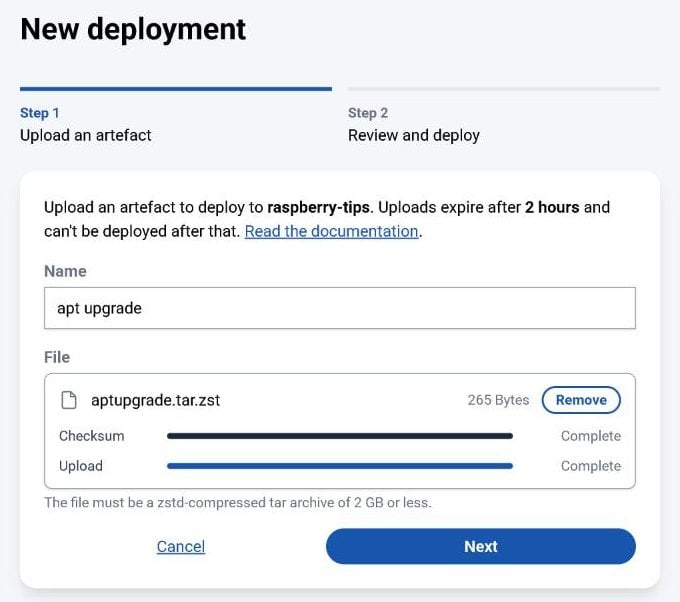
You can follow progress in the device’s Deployments list: Queued (waiting for the Pi) → In Progress → Succeeded or Failed. Cancelled means it was called off — a queued deployment is also cancelled automatically when you send another update to the same Pi. Afterwards, you can read the script’s output on the Pi:
journalctl -t rpi-ota-connectorImportant: Connect only keeps the uploaded artefact for two hours. The Pi doesn’t have to be online when you deploy, but if it hasn’t started the update by then — because it’s switched off, for example — the deployment is marked Invalidated and you’ll have to upload the file again. So a Pi that’s been off for days won’t catch up on its own.
Security
Raspberry Pi Connect is built with security in mind:
- End-to-end encryption: All connections are encrypted. Raspberry Pi Ltd cannot read your traffic.
- Peer-to-peer preferred: Whenever possible, a direct connection is established between your controlling device and the Pi. If that doesn’t work, Raspberry Pi Ltd servers (so-called TURN relays) simply pass the encrypted traffic along without being able to read it.
- No open port: Your Pi opens no incoming ports. This eliminates one of the most common attack surfaces in remote access.
- New-device alerts: Whenever a new device is linked to your account, you get an email. If you don’t recognise it, change your password straight away and remove the device: click it in the dashboard, open Settings and delete it. Personal accounts don’t keep a record of who connected to your Pi and when — the 90-day audit log is only part of Connect for Organisations.
My recommendation: make sure to enable two-factor authentication (2FA) on your Raspberry Pi account. Since this account is the only gateway to your connected Pis, you should secure it as well as possible. That goes double once remote updates are on: with rpi-connect ota on enabled, anyone who takes over your account can run scripts as root on your Pi. You’ll find the option under Two-factor authentication once you’re signed in at id.raspberrypi.com; you’ll need an authenticator app on your phone. Keep the recovery code you get afterwards somewhere safe — without it, you can’t get back into your account if you lose your phone.
Troubleshooting
If something doesn’t work as expected, these diagnostic commands will help:
Check the current Connect status:
rpi-connect statusConnect has a built-in self-test that checks Wayland, its services and the connection to the servers:
rpi-connect doctorCheck the systemd service (shows logs and whether the service is running). Connect runs as a user service, so use --user and no sudo:
systemctl --user status rpi-connectPi appears in the dashboard but isn’t reachable? Check that the service is actually running. If the Pi vanished after a reboot, user lingering is usually missing — or, for screen sharing, desktop autologin (see “Setting Up Autostart After Reboot”). Restart the service if needed:
systemctl --user restart rpi-connectOnly remote shell available, no screen sharing? Then the Pi is almost always missing a desktop running Wayland: Raspberry Pi OS Lite has no desktop, and screen sharing doesn’t work on X11. Check with this command:
echo $XDG_SESSION_TYPERun this one in a terminal on the Pi’s desktop — on the monitor or in a screen sharing session. In the remote shell or over SSH it shows something else (such as tty or nothing at all), because there’s no desktop session there. The output should be wayland. If it shows x11, open sudo raspi-config, go to Advanced Options → Wayland, switch to Labwc (Raspberry Pi OS’s Wayland desktop) and restart the Pi. Without a monitor, run rpi-connect doctor from the remote shell instead: the line “Wayland compositor available” tells you the same thing.
Connection keeps dropping? Check the quality of your Pi’s internet connection. With a weak Wi-Fi signal, a powerline adapter or Ethernet cable often helps.
No Deploy button, or a remote update fails? The button only shows up once rpi-connect-ota is installed on the Pi and you’ve run rpi-connect ota on. If an update shows Failed, the journal has the script’s output:
journalctl -t rpi-ota-connectorIf it says Invalidated with “File expired”, the Pi was offline for more than two hours — upload the file again. “update file rejected” means you didn’t upload the .tar.zst file.
Conclusion
Raspberry Pi Connect is exactly what many Pi users have needed for a long time: a simple, secure and free way to reach the Pi from anywhere — without router tinkering or extra software. For beginners it’s by far the easiest way to get remote access. Experienced users will appreciate it most when they have no access to their router or need to quickly reach their Pi from an unfamiliar device.
Remote updates are most useful for Pis that are hard to get to — but they take some groundwork, since you build the update packages yourself. I’m curious what features Raspberry Pi Ltd will add next, especially around file transfer.
Connect runs on any Pi with a current version of Raspberry Pi OS, and if it has a desktop, screen sharing works too. Give it a try — setup only takes a few minutes.
Raspberry Pi Connect is the official remote access service from Raspberry Pi Ltd. It lets you control a Raspberry Pi via the browser — via desktop screen sharing or a terminal (remote shell) — without port forwarding or additional software.
Yes. Raspberry Pi Connect establishes an outgoing encrypted connection to Raspberry Pi Ltd servers, so no incoming port needs to be opened on the router. It works behind NAT, firewalls and in typical home networks.
Unlike when Connect launched in 2024, the current Raspberry Pi documentation no longer lists any model restriction. What screen sharing needs is Raspberry Pi OS with desktop and the Wayland display server, the default on current installs. On X11 or Raspberry Pi OS Lite you only get the remote shell.
rpi-connect includes both screen sharing and remote shell and is intended for Pis running a desktop OS. rpi-connect-lite offers terminal access only (remote shell), uses fewer resources and is suitable for headless installations with Raspberry Pi OS Lite. The two packages can’t be installed side by side: on a Pi with a desktop, keep rpi-connect even if you only need the terminal.
For personal use, yes: personal accounts are free, and all you need is a Raspberry Pi account at raspberrypi.com. Connect for Organisations, where several users share one account, is a paid plan billed monthly.
Remote Updates let you send an update package you’ve built yourself (a script that runs apt upgrade, for example) to your Pi via connect.raspberrypi.com, without opening a Connect session. If the Pi is offline, Connect waits up to two hours for it before the deployment expires. You need a standard Raspberry Pi OS install, the rpi-connect-ota package and the command rpi-connect ota on.