How to Set Up the Ulanzi TC002 with AWTRIX NG and Home Assistant
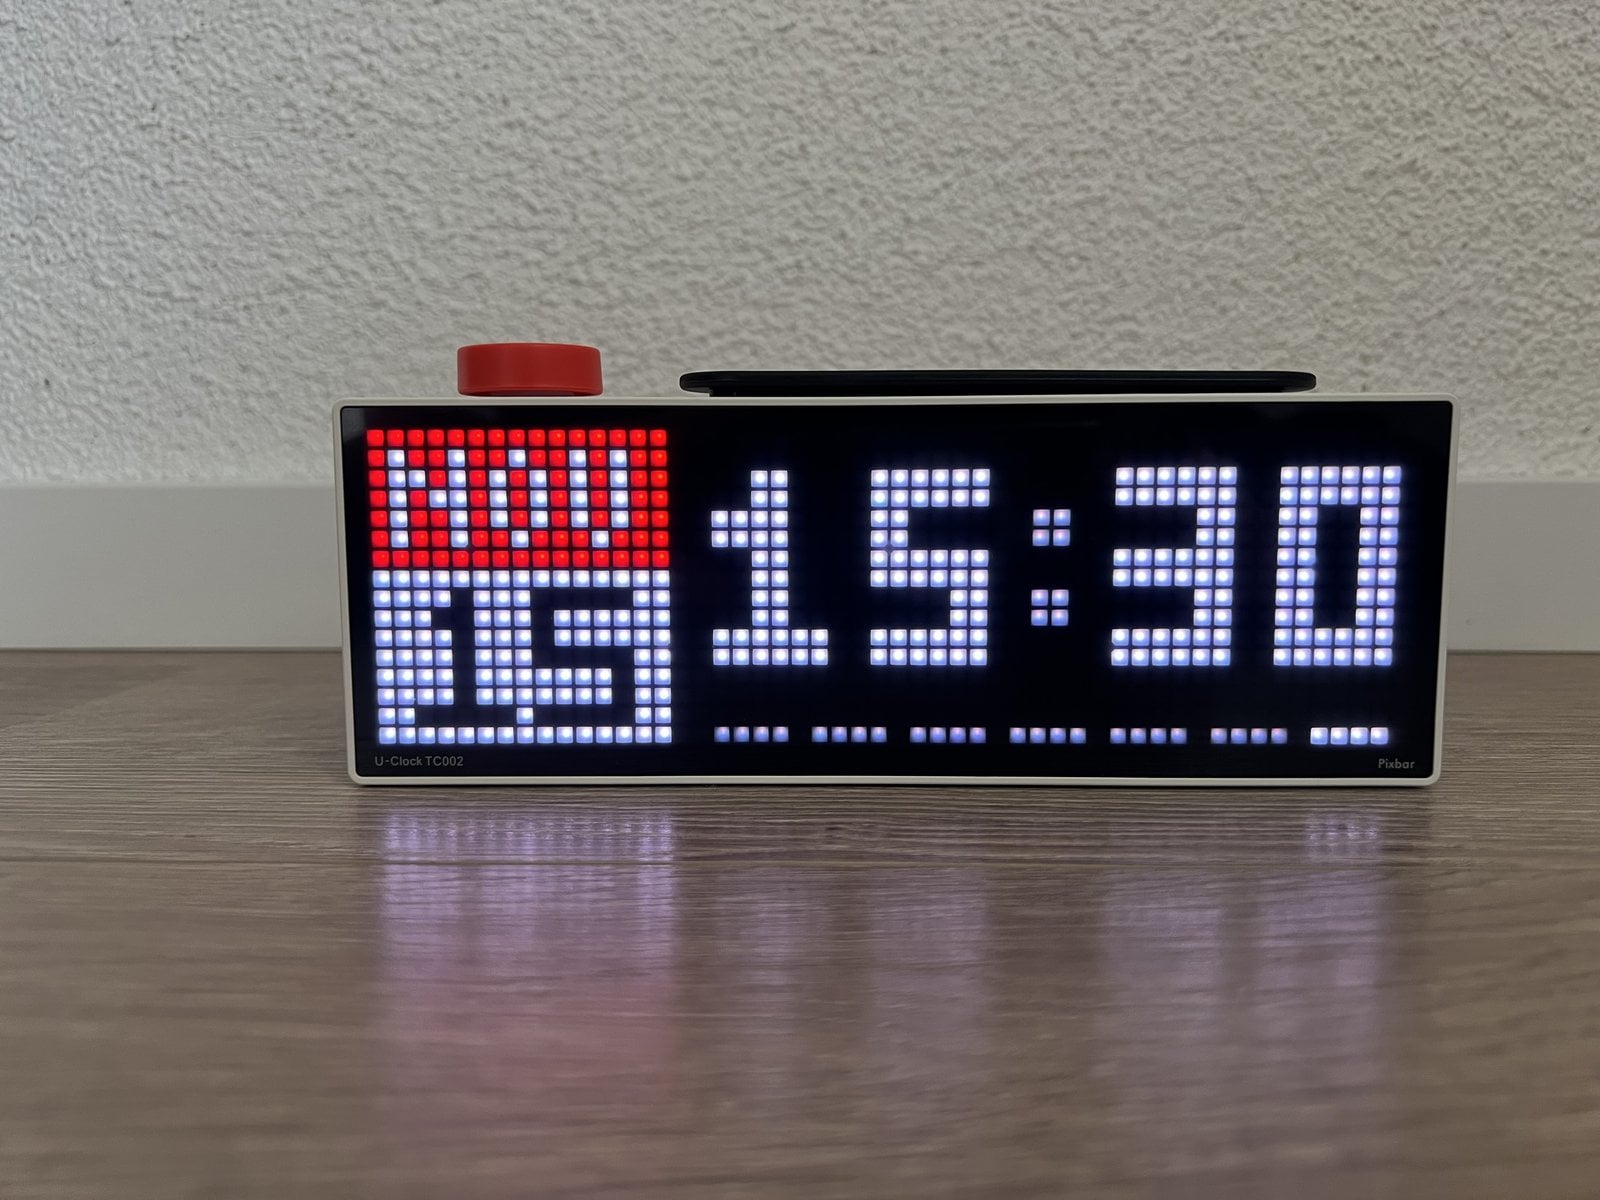
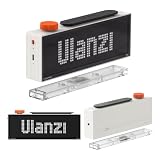
The Ulanzi TC002 is the bigger successor to the TC001 pixel clock: more pixels, a rotary knob, a speaker and a microphone. With the free AWTRIX NG firmware it shows your Home Assistant values with animated icons, turns the knob into a thermostat dial and doubles as a voice assistant.
In short
If you want a knob and voice control, get the TC002 with AWTRIX NG. It shows up in Home Assistant via MQTT, displays your values, controls your thermostat and works as a local voice assistant with Whisper and Piper. If all you need is a display with built-in room sensors, the TC001 does the job.
- What you need: a Ulanzi TC002, a USB-C data cable, a computer for the installer, and Home Assistant 2024.11 or later with the Mosquitto broker (OS or Supervised for the voice assistant apps).
- Time and skill level: about 20 minutes for installation and setup, one to two hours for the displays, the thermostat control and voice control. You should be comfortable pasting automations as YAML.
- Before you start: installing wipes the Wi-Fi settings and the Ulanzi app’s cloud login. Guides and YAML written for AWTRIX 3 on the TC001 won’t work on AWTRIX NG without changes.
Ulanzi sent us the TC002 for testing. The manufacturer had no say in the content or our verdict. Tested with AWTRIX NG 1.2.3 and Home Assistant 2026.11.
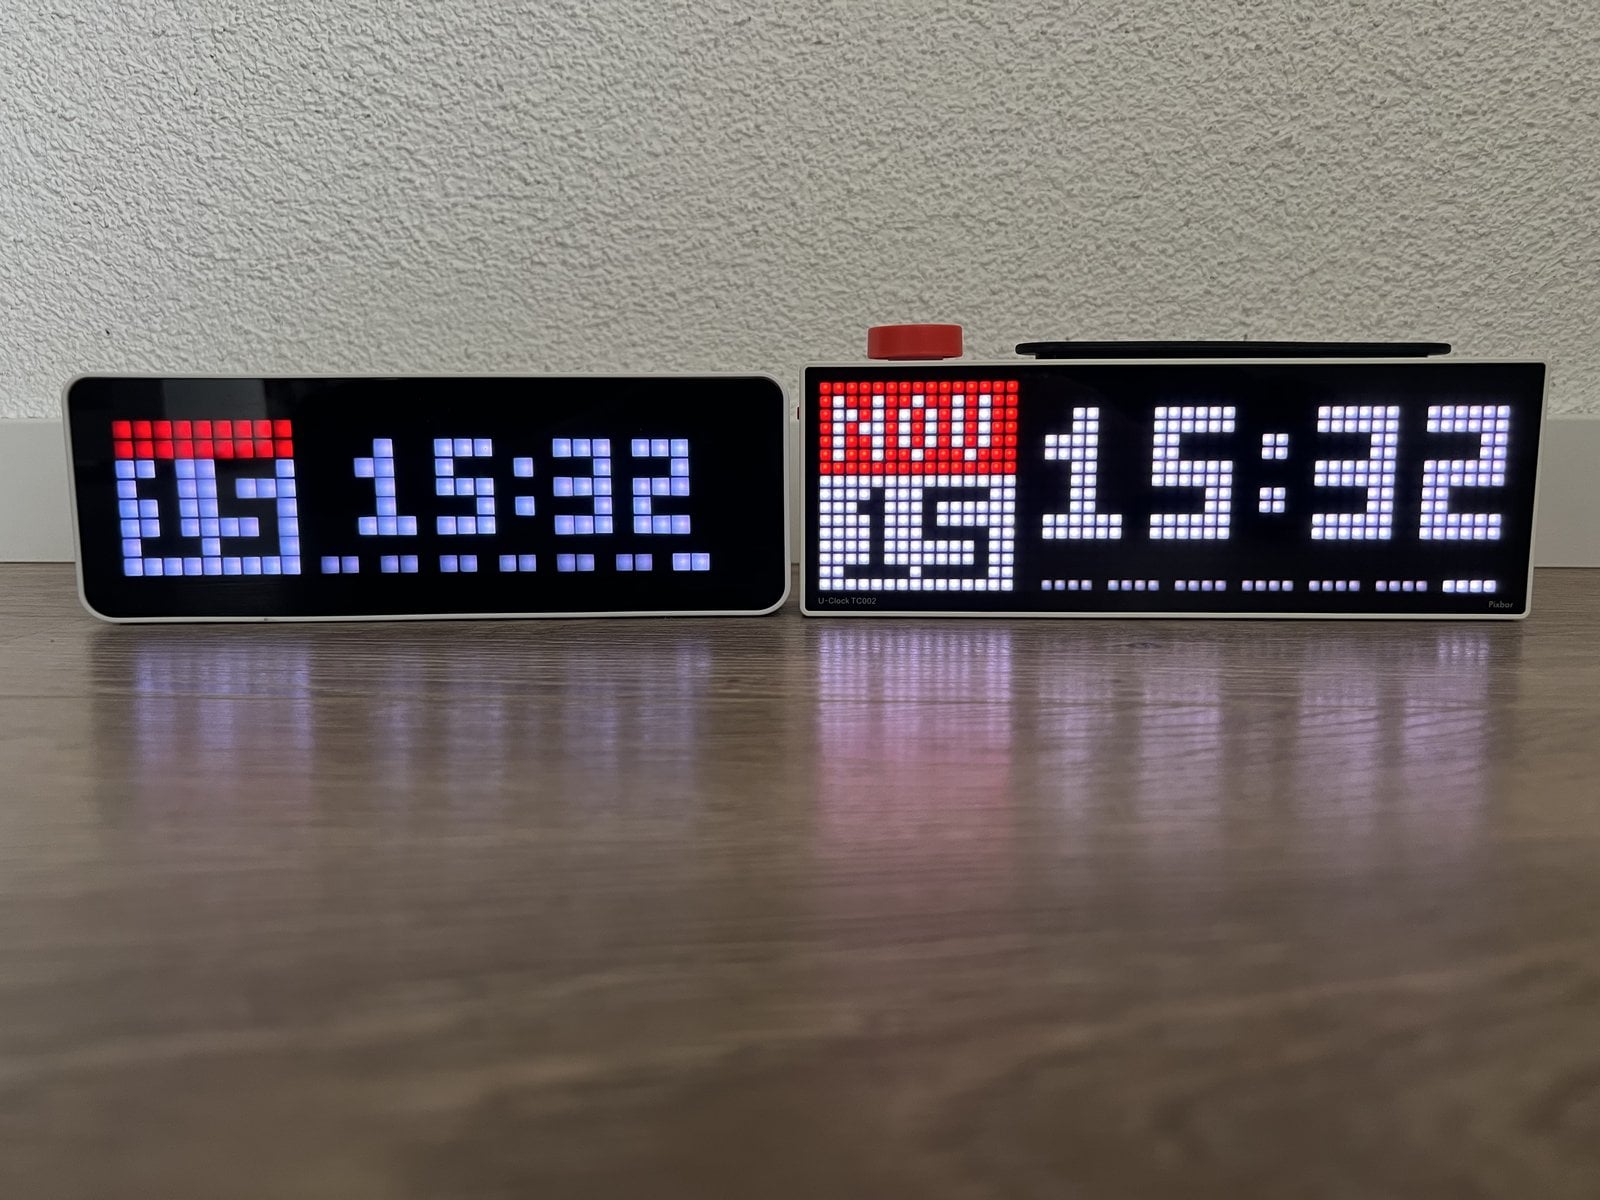
TC001 vs TC002: the differences
| Ulanzi TC001 | Ulanzi TC002 | |
|---|---|---|
| Display | 32 × 8 pixels | 52 × 16 pixels (832 LEDs) |
| Controls | three buttons | “+” and “−” buttons, pressable rotary knob |
| Microphone and speaker | buzzer only | yes (voice assistant, spoken replies, web radio) |
| Built-in sensors | temperature, humidity, light | none |
| Free firmware | AWTRIX 3 or AWTRIX NG | AWTRIX NG |
| Firmware installation | web flasher in the browser | USB installer app on your computer |
If you want a knob, voice control and more room for displays, go for the TC002. If you’d rather have temperature and humidity from the clock itself or stick with the tried-and-tested AWTRIX 3, the cheaper TC001 is the better pick. We also have a guide for it: Ulanzi TC001 with AWTRIX and Home Assistant. Switching from the TC001? Coming from the TC001 explains what changes in your automations.
What you need
- Ulanzi TC002 Pixbar Smart Pixel Clock* (also sold as “U-Clock II” or “Pixbar II”)
- a USB-C cable that carries data
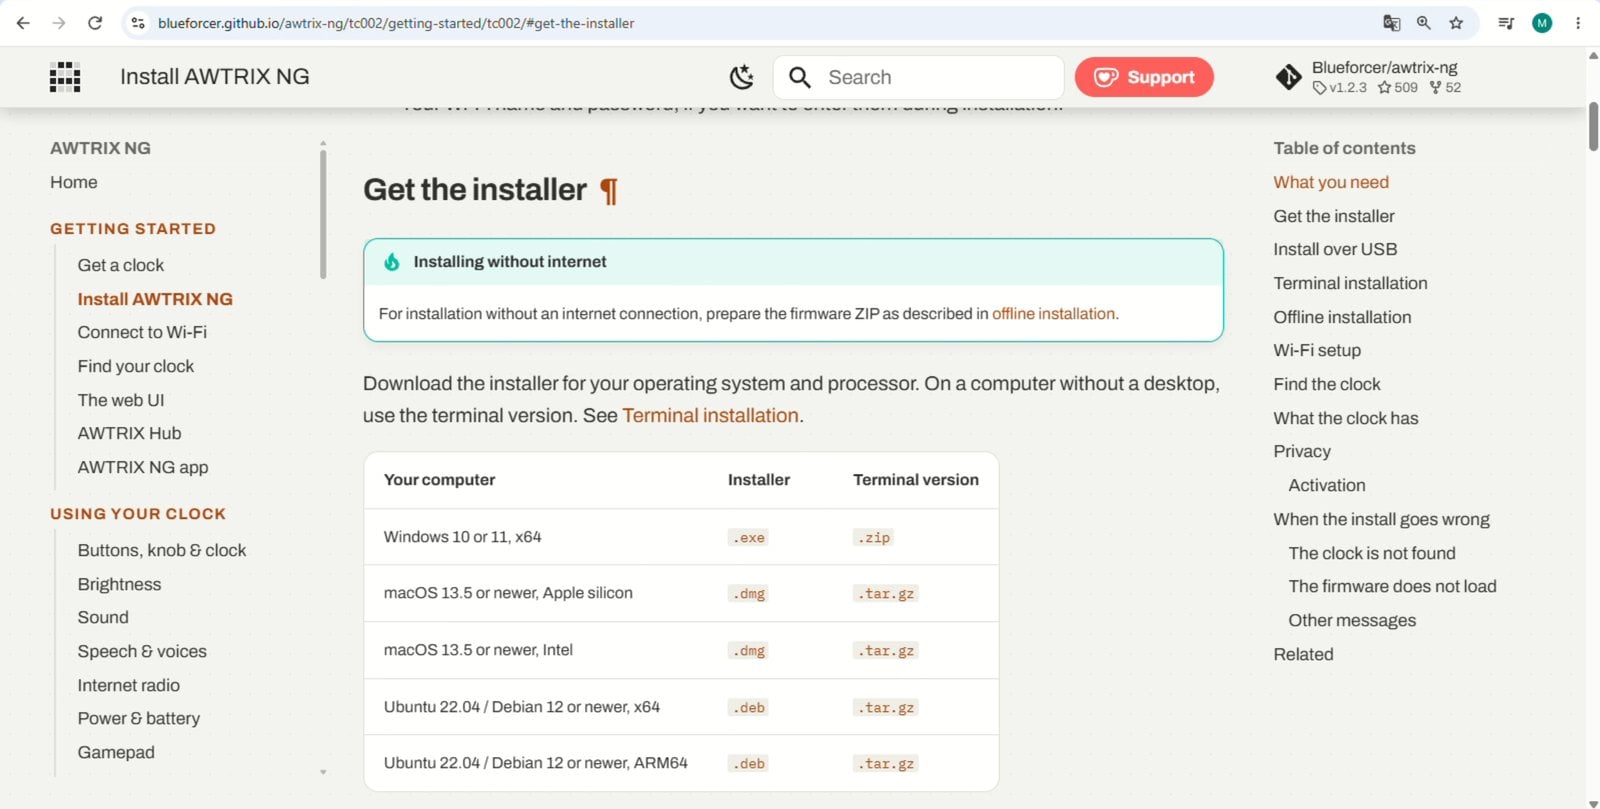
- a computer running Windows 10/11 (x64), macOS 13.5 or later, or Linux (Ubuntu 22.04/Debian 12 or newer)
- Home Assistant OS or Supervised, the only installation types with the app store (for example on a Raspberry Pi). Home Assistant now calls its add-ons “apps”. Other installation types such as Container work for the displays and the thermostat control too, as long as MQTT is set up.
- the Mosquitto app as MQTT broker, an MQTT user and the MQTT integration. Our guide MQTT on the Raspberry Pi covers the setup.
- For the displays: temperature and humidity sensors in Home Assistant, plus sensors for your solar panels and home battery if you want the energy pages.
- For the thermostat control: a thermostat set up in Home Assistant as a
climateentity with the modesauto,heatandoff. - For the voice assistant: the Whisper and Piper apps in Home Assistant. Together they need a little over 400 MB of RAM (about 360 MB for Whisper and 60 MB for Piper in our setup).
Installing AWTRIX NG on the TC002
There’s no web flasher for the TC002 like there is for the TC001. AWTRIX NG comes with its own installer that writes the firmware to the clock over USB. You don’t need to set up the clock in the Ulanzi app first. Installing wipes the Wi-Fi settings and the Ulanzi app’s cloud login.
- Open the AWTRIX NG installation page for the TC002 and download the installer for your operating system:
.exefor Windows,.dmgfor macOS,.debfor Ubuntu and Debian. There’s also a terminal version for machines without a desktop.
- Start the installer. On Windows, just run the
.exe; there’s nothing to install. Wait until the installer has downloaded and verified the firmware. - Connect the TC002 with the USB-C data cable and switch it on with the slide switch on the side next to the USB-C port. If it’s already on, switch it off and on again. The installer detects the clock.
Most often the culprit is a charge-only cable. Also close other programs that access USB devices, and connect only one clock. On Linux the
.deb package installs a udev rule, so unplug the clock and plug it back in afterwards.
- In the installer window, enter your Wi-Fi name and password under Home Wi-Fi. The clock only supports 2.4 GHz.
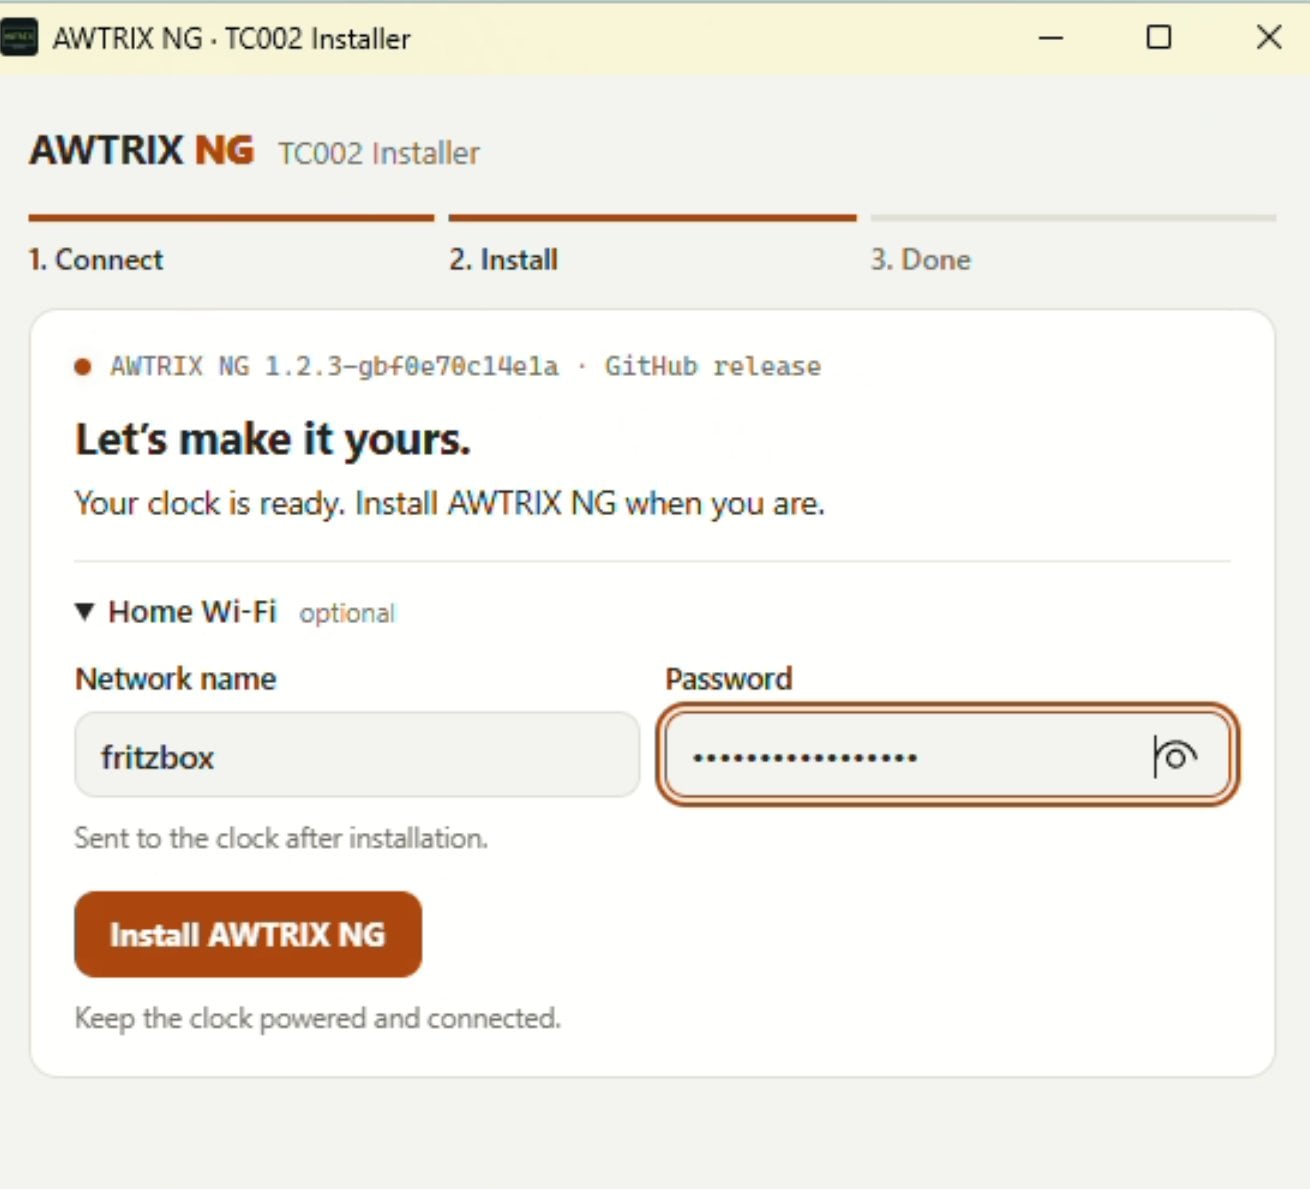
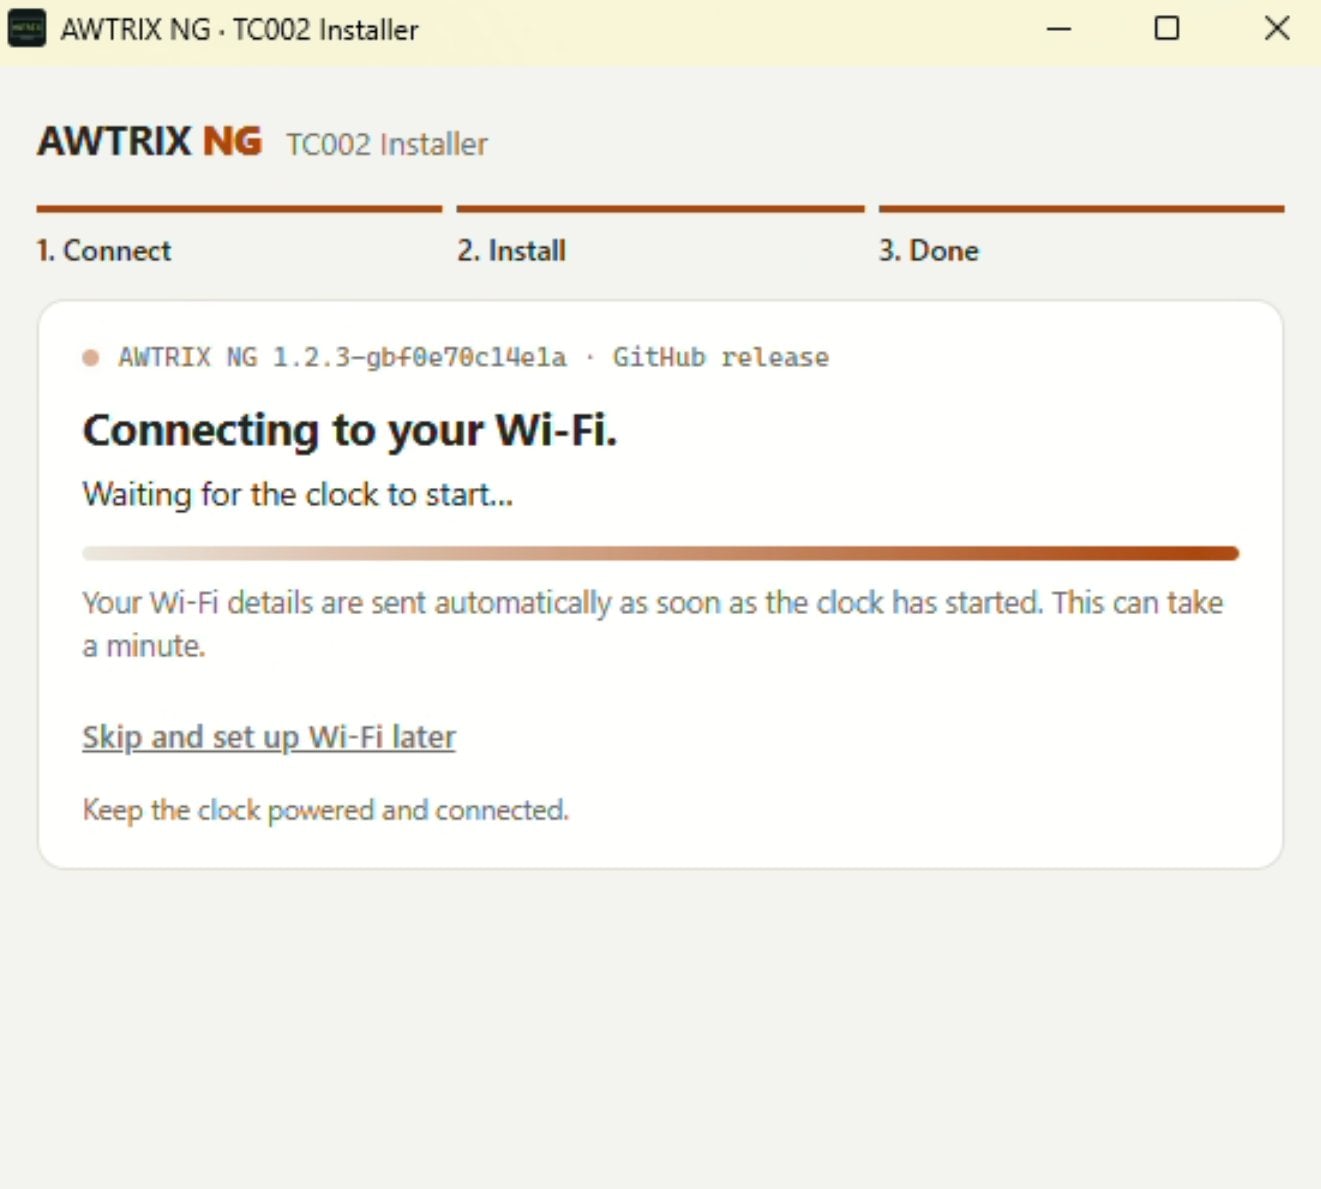
- Click Install AWTRIX NG. Don’t unplug the cable or close the installer while it runs. The clock then restarts and the installer sends it your Wi-Fi details, which can take a minute. You’ll know it worked when the clock shows its IP address. If it shows the time, press “+” to switch to the status app.
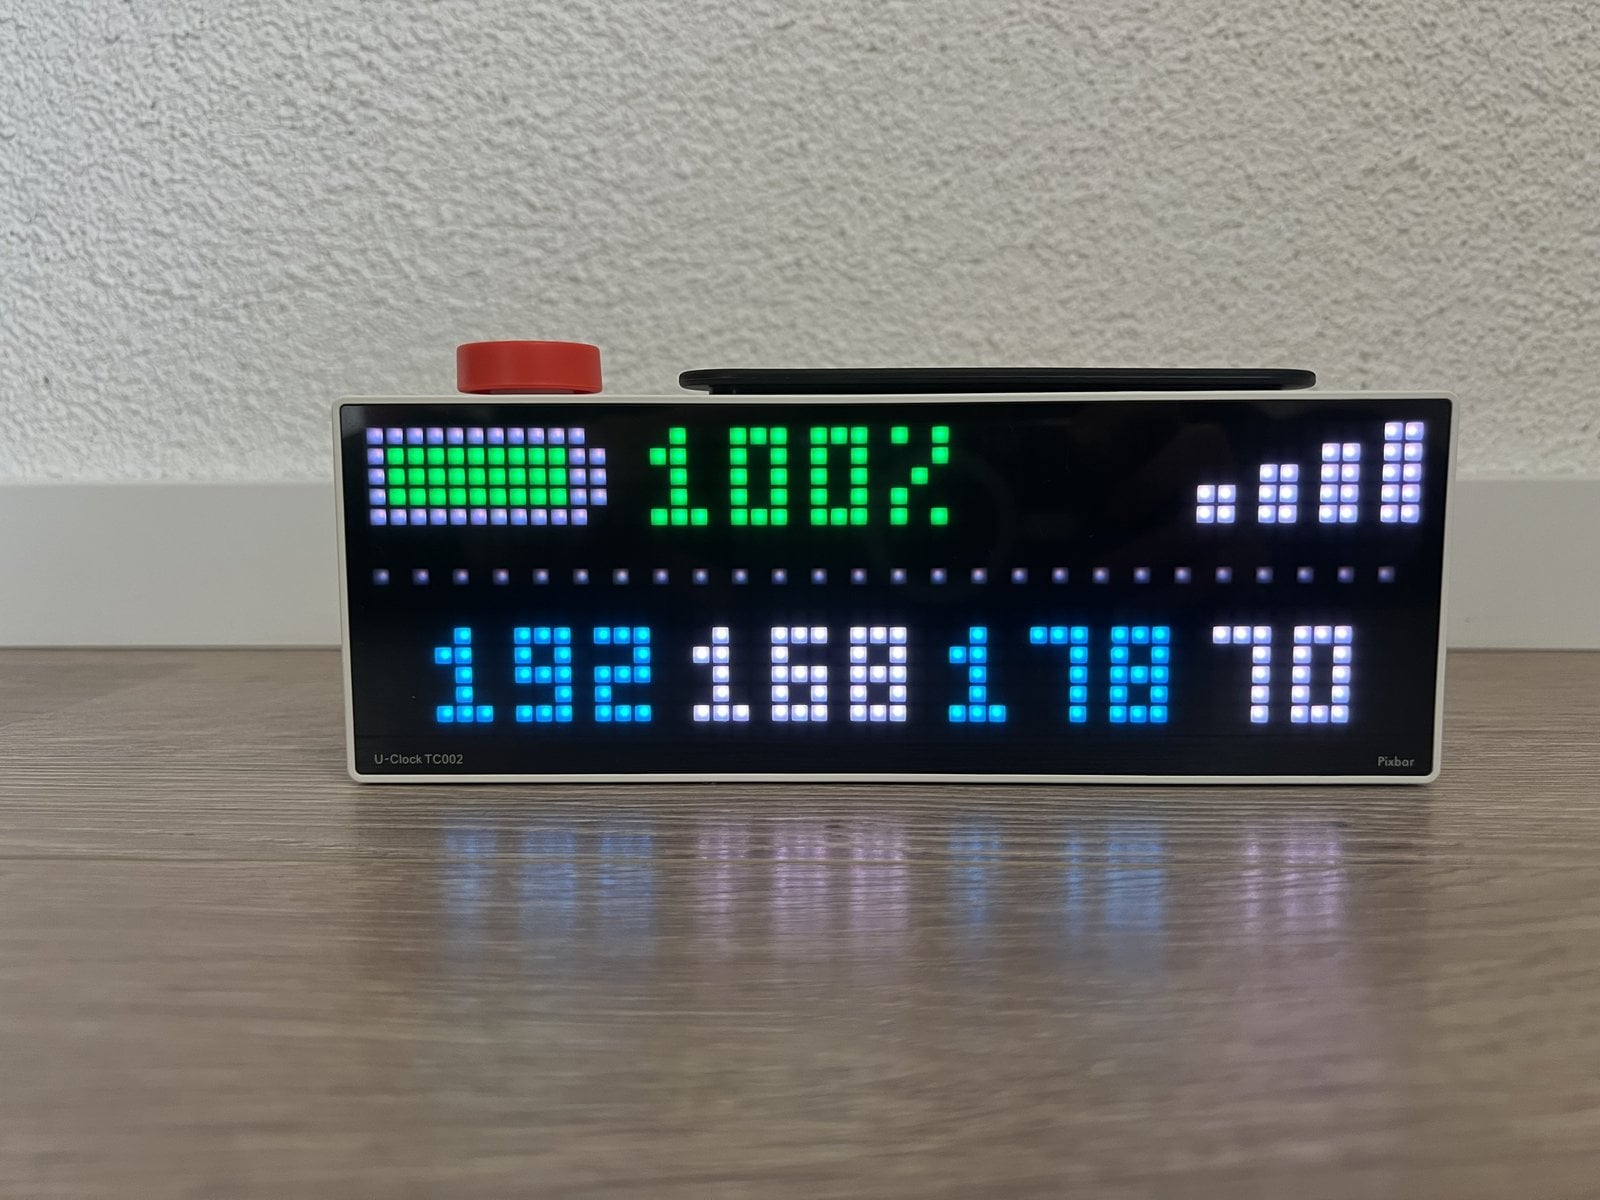
AWTRIX NG calls each screen the clock cycles through an app. Don’t confuse these with the Ulanzi phone app or Home Assistant’s apps. Out of the box the clock has two apps, the time and a status app. The “+” and “−” buttons on top of the case switch between them. The status app shows the IP address with colors in place of the dots. For example, a cyan 192, a white 168, a cyan 178 and a white 70 give you 192.168.178.70. You can also find the clock in your router’s device list, where its name starts with awtrixng-.
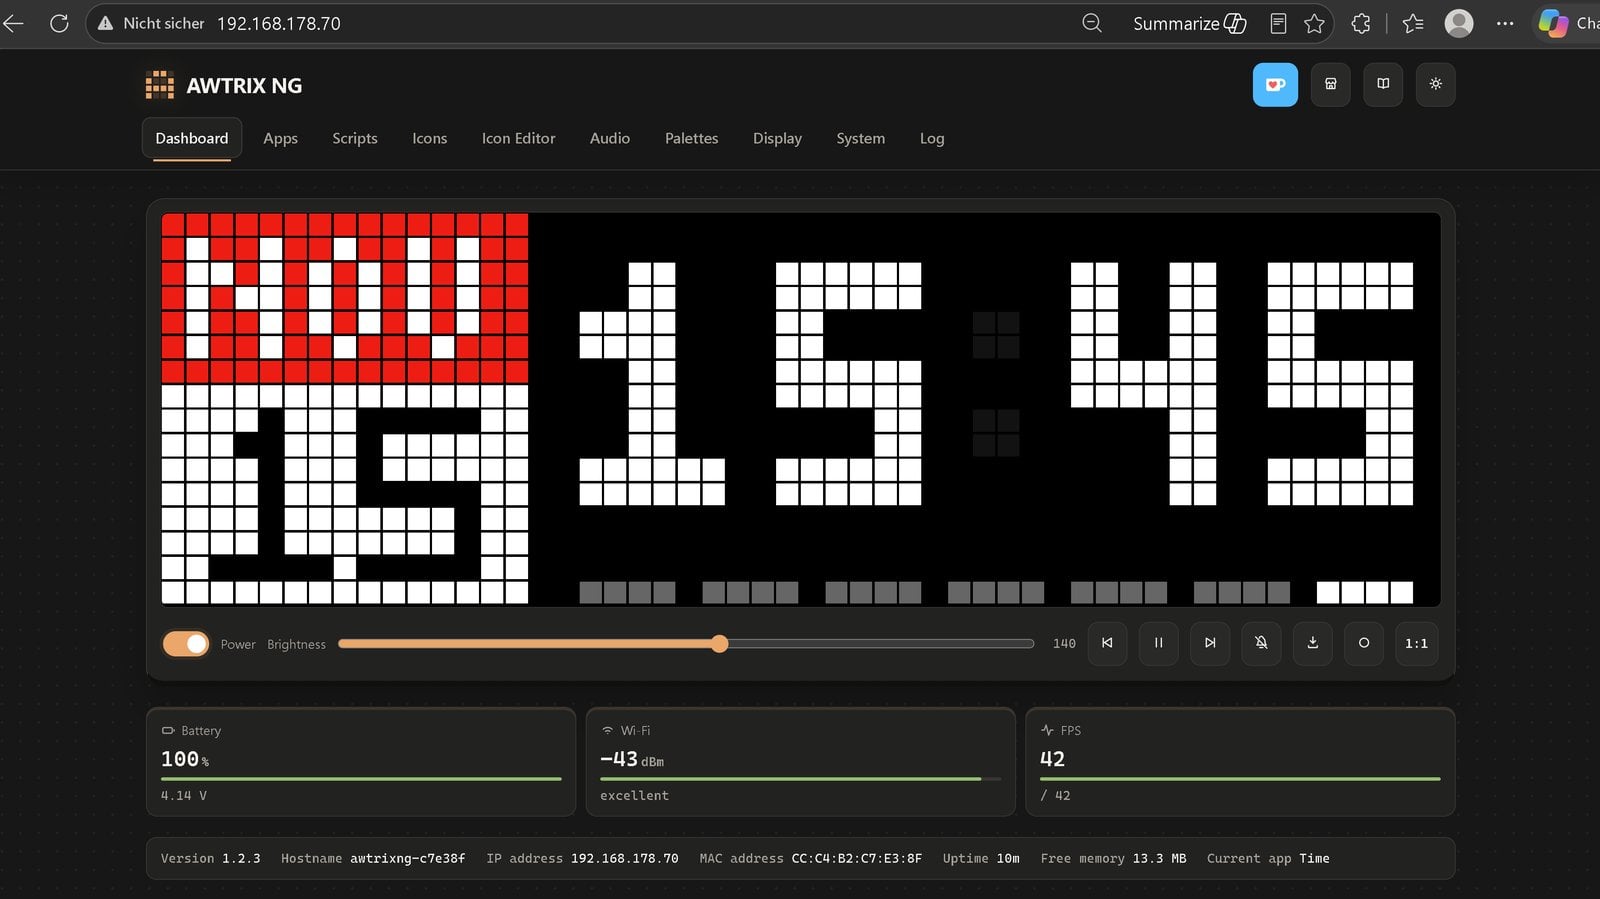
The web interface and the clock’s controls
Type the IP address into your browser. The web interface dashboard shows a live preview of the display, brightness, battery and Wi-Fi. Under Apps, Scripts and Icons you manage what the clock shows, and under System you set up MQTT and the voice assistant.
On the clock itself, the knob controls brightness and volume, and a short press switches between the two. Once you’ve set it up, a long press starts the voice assistant.
Connecting the TC002 to Home Assistant
AWTRIX NG talks to Home Assistant through your MQTT broker, not directly. With discovery turned on, the clock adds itself as a device, so you don’t have to write any YAML.
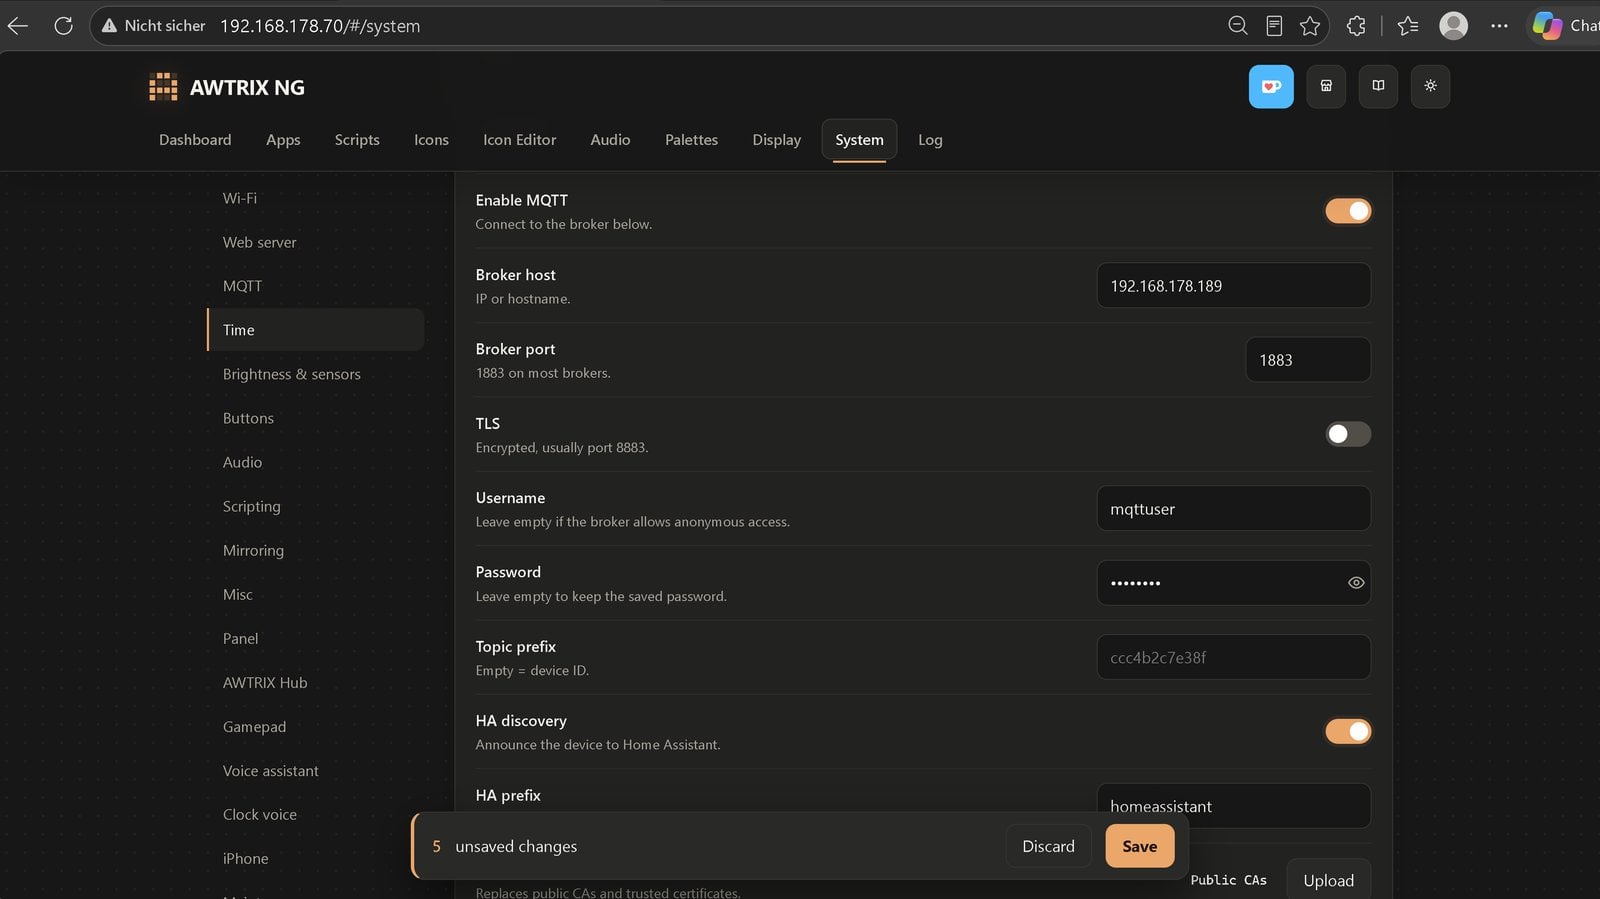
- In the web interface, open System → MQTT.
- Turn on Enable MQTT and enter your Home Assistant’s IP address as Broker host, port
1883. - Enter the username and password of your MQTT user.
- Leave Topic prefix empty. The clock then uses its device ID as the prefix. It’s a twelve-character code derived from the MAC address, shown in gray in the field (ours is
ccc4b2c7e38f). Write it down, because you’ll need it for the automation. - Turn on HA discovery and leave HA prefix at the default
homeassistant. - Click Save and then Reboot now. The clock only reads the broker settings at startup.
A few seconds after the restart, the device AWTRIX NG shows up under Settings → Devices & services → MQTT. If it doesn’t, the broker address or MQTT user is usually the culprit. These are the most useful entities:
| Entity | What it does |
|---|---|
light.awtrix_ng_matrix | display on/off, brightness |
number.awtrix_ng_volume and other volume entities | overall, radio, app and notification volume |
button.awtrix_ng_next_app / previous_app | go to the next/previous app |
button.awtrix_ng_assist | start the voice assistant without touching the clock |
event.awtrix_ng_knob_turn | every click of the knob (clockwise and counterclockwise) |
sensor.awtrix_ng_mqtt_prefix | the clock’s device ID, which is also its topic prefix |
sensor.awtrix_ng_battery | the clock’s own battery level |
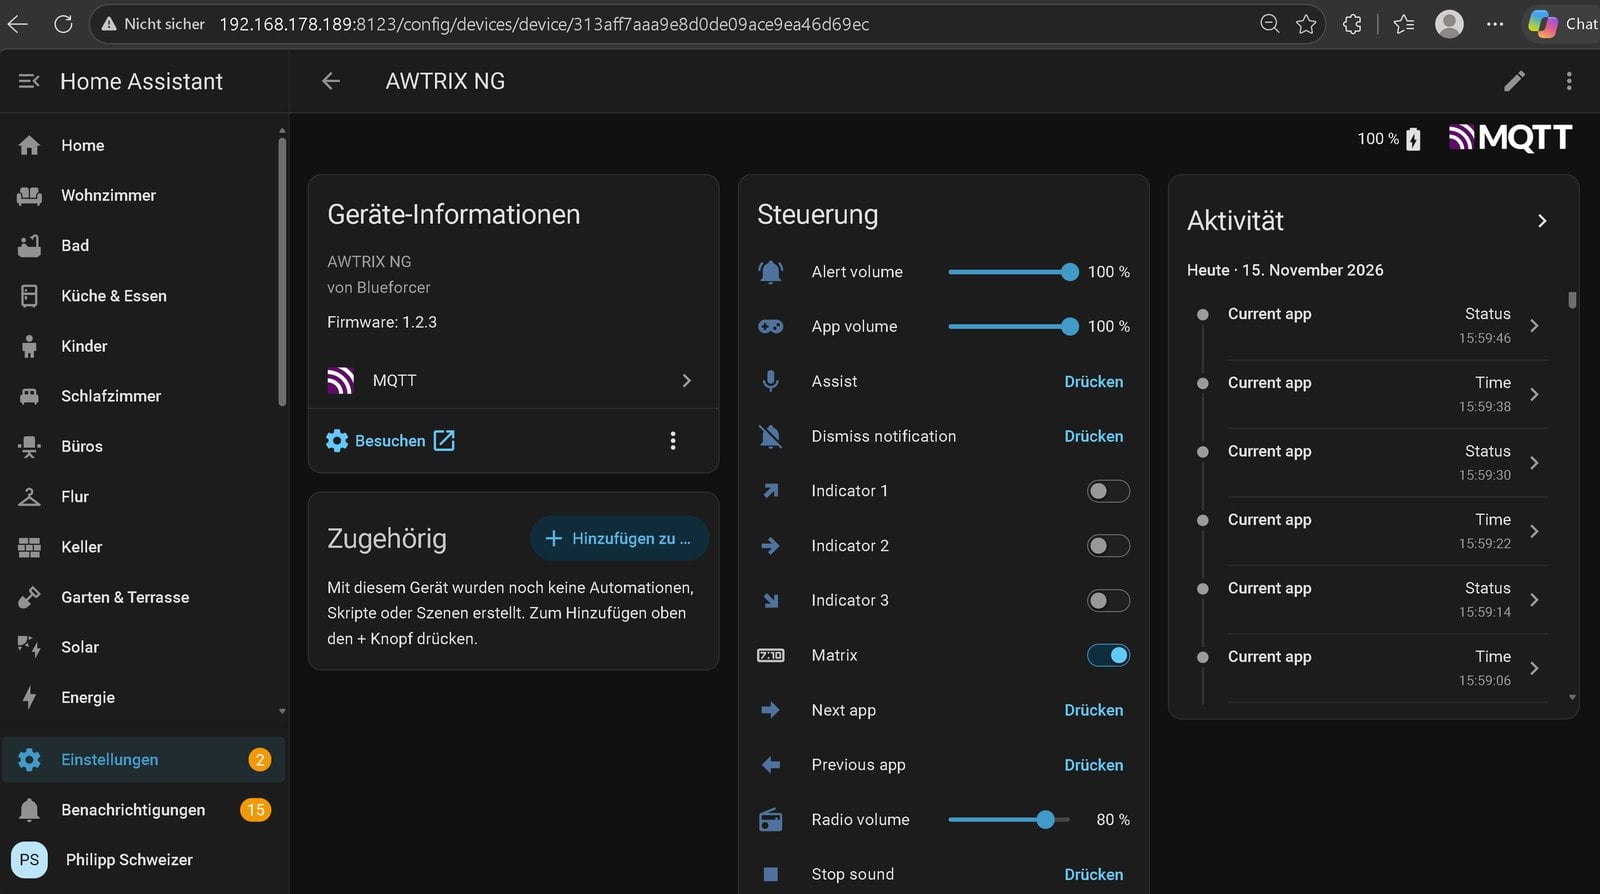
If you run several clocks with AWTRIX NG, give each one its own hostname under System in the Wi-Fi section. Otherwise all clocks end up with the same entity names.
Custom displays with animated icons
We’ll build four pages that the clock shows one after another: temperature and humidity in the living room and outdoors, solar output with household consumption, and the charge level of the home battery. Each page is optional, and the energy and battery pages only make sense with solar panels or a home battery.
Getting the icons onto the clock
AWTRIX NG doesn’t fetch icons by number, so you upload them to the clock as files before creating the automation. For all four pages that’s 14 icons from the LaMetric gallery plus a sofa. If you skip the battery page, you don’t need the nine battery icons. If you skip the energy page, you can leave out the sun and the plug.
| Page | Icon ID | What it shows |
|---|---|---|
| Indoor, temperature | sofa | sofa, download ours or draw your own (see below) |
| Indoor, humidity | 2423 | water drop, animated |
| Outdoor, temperature | 23331 | tree, animated |
| Outdoor, humidity | 1167 | falling drops, animated |
| Solar output | 43697 | pulsing sun |
| Household consumption | 23842 | plug, animated |
| Home battery level | 77669, 77668, 77667, 77666, 77665, 77664, 77663 | battery in seven steps from empty to full, in this order |
| Home battery charging / discharging | 77826 / 77827 | battery with charging or discharging animation |
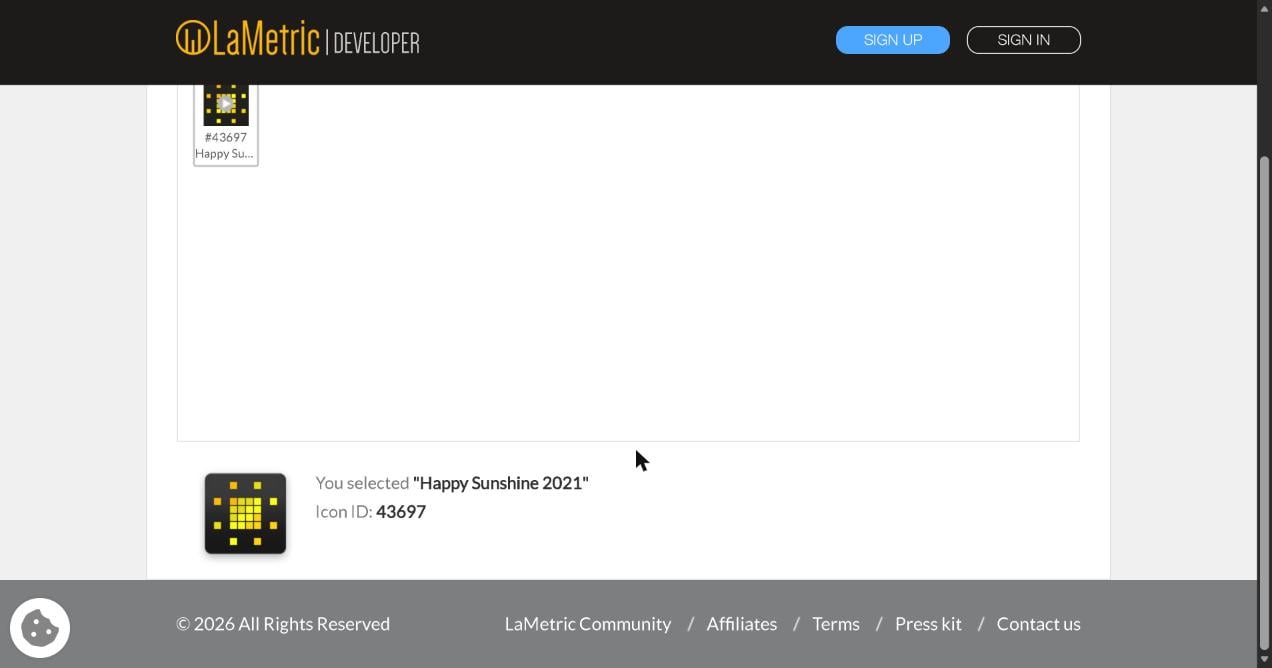
- Open the LaMetric icon gallery and search for the icon ID from the table, for example 43697.
- Click the icon. A large preview and the icon ID appear at the bottom.
- Right-click the large preview, choose Save image as and save the file under its icon ID, for example
43697.gif. Repeat this for every icon. - In the clock’s web interface, open Icons → Add and drag the files into the box. The clock converts PNG files to GIF automatically. The file name without the extension becomes the icon ID.
- Finally, upload or draw the sofa icon, as described below.
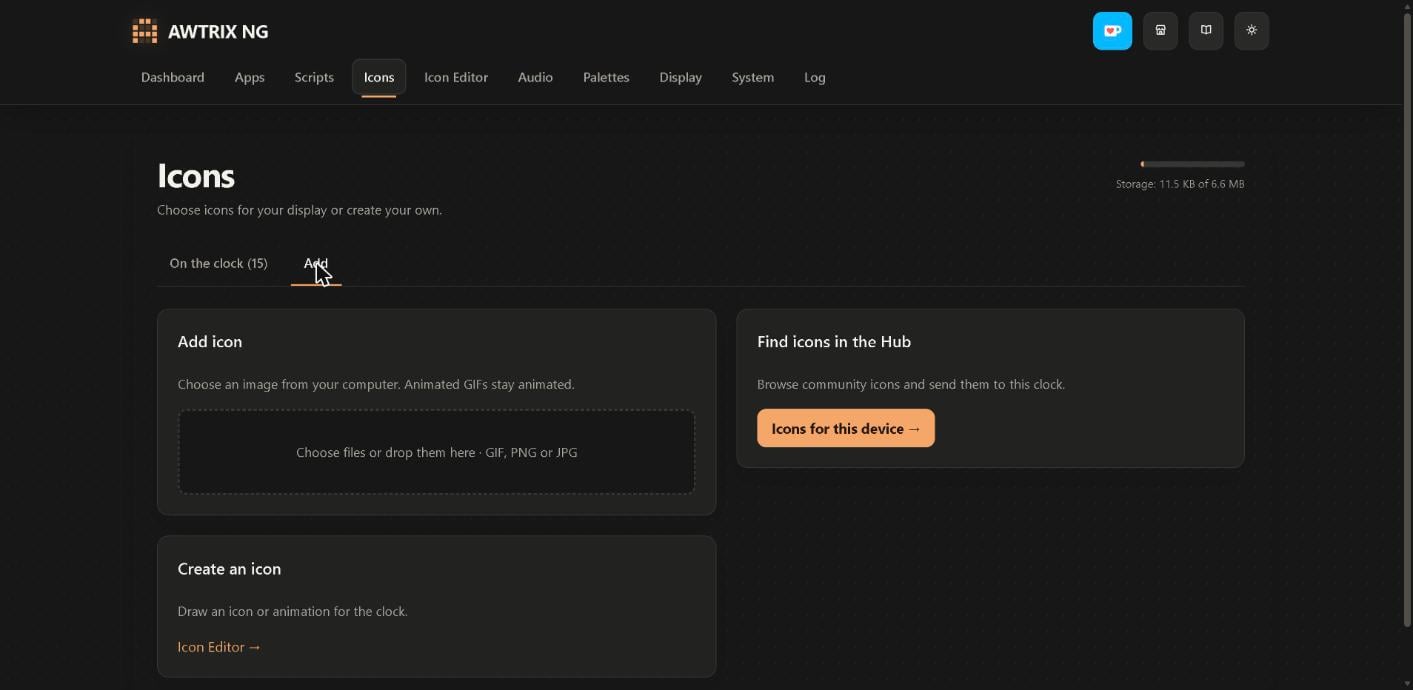
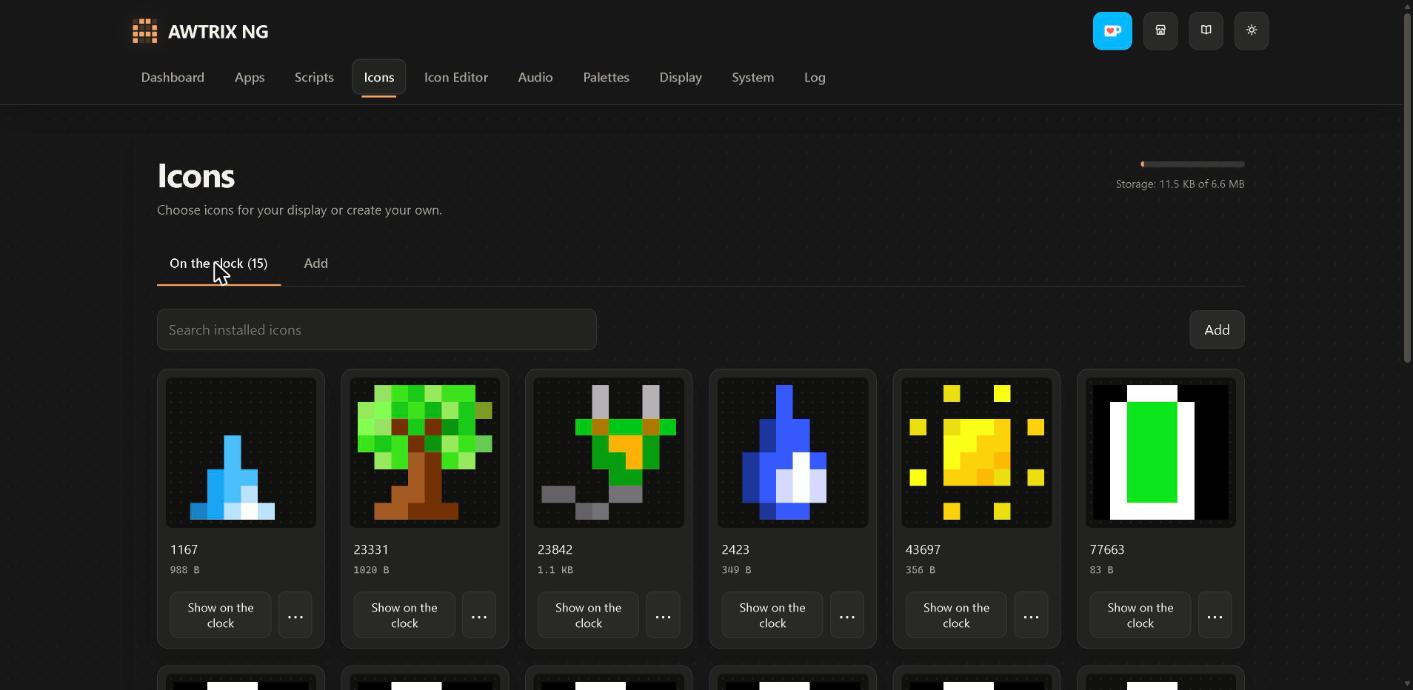
There’s no sofa in the LaMetric gallery that’s recognizable at 8 × 8 pixels. You can download our sofa as a GIF and upload it like the other icons as sofa.gif. Or draw your own in the Icon Editor tab of the web interface, which also supports animations with several frames.
- Open Icon Editor and pick 8×8 under Resize.
- Draw the icon. With Live you see your drawing on the clock as you go.
- Enter
sofaas the name and save. The icon appears in the Icons tab right away.
If you pick a different name, change it in the automation as well. The AWTRIX NG docs cover icons and layouts in more detail.
Instead of uploading files, AWTRIX NG also accepts a web address such as https://developer.lametric.com/content/apps/icon_thumbs/43697 in the icon field and fetches the image itself. The clock then needs internet access and downloads the images again after every restart. Uploaded icons work offline.
How a page is built
Home Assistant sends each page to the clock as its own app. AWTRIX NG calls apps sent to the clock pushed apps. A simple pushed app with text and an icon only uses a coarse 26 × 8 grid where each dot is 2 × 2 pixels. That’s not enough for two lines, so we use a layout instead. It splits the display into boxes on the full 52 × 16 pixels, and each box holds an icon or some text. A box is [x, y, width, height].
| Box | Position | Content |
|---|---|---|
| Top icon | [11, 0, 8, 8] | 8 × 8 icon of the first line |
| Top value | [21, 0, 26, 8] | text, left-aligned next to the icon |
| Bottom icon | [11, 8, 8, 8] | 8 × 8 icon of the second line |
| Bottom value | [21, 8, 26, 8] | text of the second line |
The 11-pixel left margin puts icon and value roughly in the middle of the display, because the values rarely fill their box. A value box fits five characters such as -7.5° or 9999W, which is why the automation drops the decimal at −10 °C and below. If you need more room, reduce the left margin in every box value of the automation, for example to [3, 0, 8, 8] and [13, 0, 34, 8] (and the same with 8 instead of 0 for the second line).
Temperatures are blue below 18 °C, green up to 23 °C and orange above (if your sensors report °F, change the thresholds in the temp_color macro). Humidity is light blue and solar output yellow. Household consumption turns red while you’re drawing power from the grid and is green otherwise. The battery level is red below 20%, yellow below 50% and green above. Below the percentage, an animated icon shows whether the battery is charging (wattage in green) or discharging (orange). When it’s idle, you see a gray dash instead.
The automation for the four pages
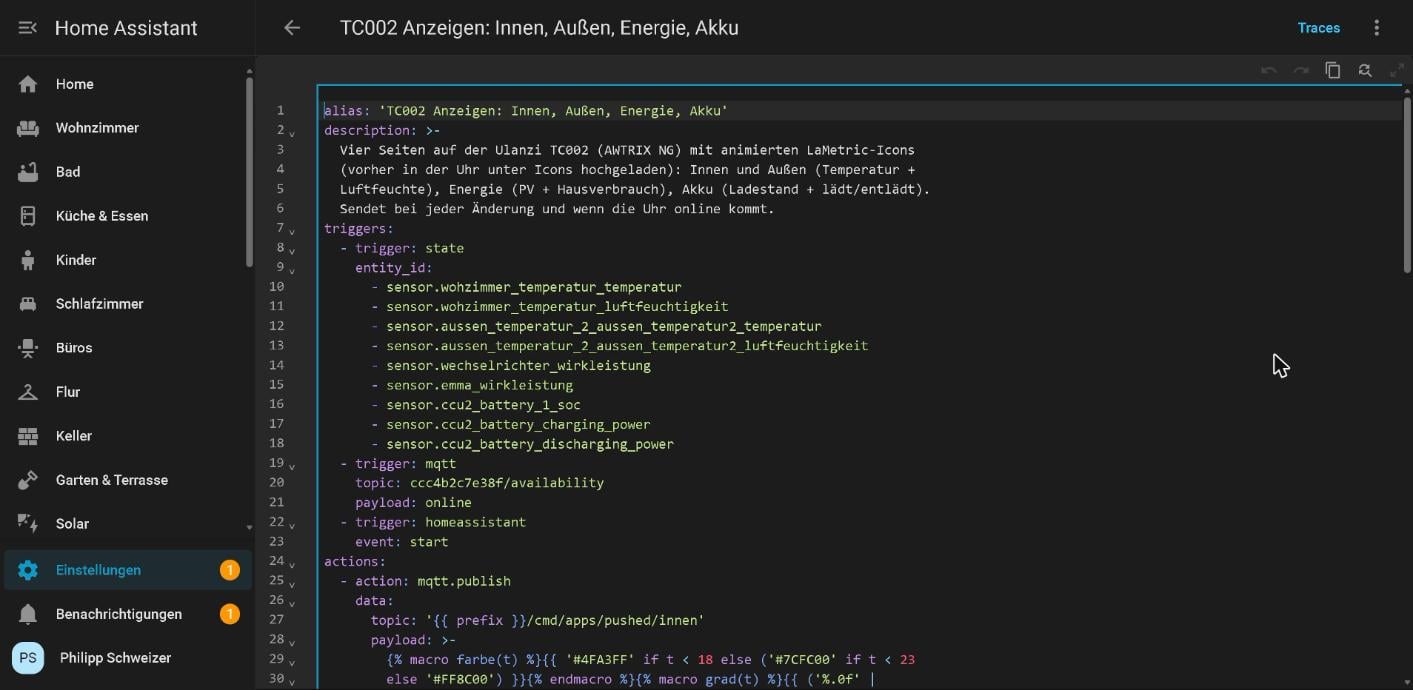
One automation sends all four pages to the clock over MQTT whenever one of the values changes, and also when the clock comes online. That second trigger matters because pushed apps only live in the clock’s RAM and are gone after a restart. Create a new automation under Settings → Automations & scenes, pick Edit in YAML from the menu at the top right and paste the code shown below. If automations are new to you, start with our beginner’s guide to Home Assistant automations.
Before you save, adjust the variables block, the list of sensors in the first trigger and the topic in the MQTT trigger:
| Where | What to enter |
|---|---|
prefix and the …/availability topic | your clock’s device ID (sensor sensor.awtrix_ng_mqtt_prefix) |
indoor, indoor_humidity | temperature and humidity sensor in your living room |
outdoor, outdoor_humidity | outdoor sensor |
pv | current output of your inverter in watts |
grid | grid power in watts, positive when drawing from the grid, negative when feeding in. If your sensor works the opposite way, put a minus in front: {{ -(states('sensor.grid_power') | int(0)) }} |
battery, battery_charge, battery_discharge | home battery charge level in percent and charging/discharging power in watts |
the list under triggers | the same sensors as above |
alias: "TC002 pages: indoor, outdoor, energy, battery"
description: Four pages with animated icons on the Ulanzi TC002 (AWTRIX NG)
mode: single
max_exceeded: silent
triggers:
  - trigger: state
    entity_id:
      - sensor.living_room_temperature
      - sensor.living_room_humidity
      - sensor.outdoor_temperature
      - sensor.outdoor_humidity
      - sensor.pv_power
      - sensor.grid_power
      - sensor.battery_level
      - sensor.battery_charging_power
      - sensor.battery_discharging_power
  - trigger: mqtt
    topic: ccc4b2c7e38f/availability
    payload: online
  - trigger: homeassistant
    event: start
variables:
  prefix: ccc4b2c7e38f
  indoor: "{{ states('sensor.living_room_temperature') | float(0) }}"
  indoor_humidity: "{{ states('sensor.living_room_humidity') | int(0) }}"
  outdoor: "{{ states('sensor.outdoor_temperature') | float(0) }}"
  outdoor_humidity: "{{ states('sensor.outdoor_humidity') | int(0) }}"
  pv: "{{ states('sensor.pv_power') | int(0) }}"
  grid: "{{ states('sensor.grid_power') | int(0) }}"
  battery: "{{ states('sensor.battery_level') | int(0) }}"
  battery_charge: "{{ states('sensor.battery_charging_power') | int(0) }}"
  battery_discharge: "{{ states('sensor.battery_discharging_power') | int(0) }}"
  battery_w: "{{ battery_charge - battery_discharge }}"
  house: "{{ [pv + grid - battery_w, 0] | max }}"
  battery_color: "{{ '#FF5050' if battery < 20 else ('#FFD200' if battery < 50 else '#40FF40') }}"
actions:
  - action: mqtt.publish
    data:
      topic: "{{ prefix }}/cmd/apps/pushed/indoor"
      payload: >-
        {% macro temp_color(t) %}{{ '#4FA3FF' if t < 18 else ('#7CFC00' if t < 23 else '#FF8C00') }}{% endmacro %}
        {% macro deg(t) %}{{ ('%.0f' | format(t)) if t <= -10 else ('%.1f' | format(t)) }}°{% endmacro %}
        {{ {'durationMs': 8000, 'layout': {'version': 1, 'regions': [
          {'id': 'i0', 'box': [11, 0, 8, 8], 'icon': 'sofa'},
          {'id': 'v0', 'box': [21, 0, 26, 8], 'align': 'start', 'scroll': 'static',
           'text': deg(indoor), 'color': temp_color(indoor)},
          {'id': 'i1', 'box': [11, 8, 8, 8], 'icon': '2423'},
          {'id': 'v1', 'box': [21, 8, 26, 8], 'align': 'start', 'scroll': 'static',
           'text': indoor_humidity ~ '%', 'color': '#5BC0FF'}]}} | to_json }}
  - action: mqtt.publish
    data:
      topic: "{{ prefix }}/cmd/apps/pushed/outdoor"
      payload: >-
        {% macro temp_color(t) %}{{ '#4FA3FF' if t < 18 else ('#7CFC00' if t < 23 else '#FF8C00') }}{% endmacro %}
        {% macro deg(t) %}{{ ('%.0f' | format(t)) if t <= -10 else ('%.1f' | format(t)) }}°{% endmacro %}
        {{ {'durationMs': 8000, 'layout': {'version': 1, 'regions': [
          {'id': 'i0', 'box': [11, 0, 8, 8], 'icon': '23331'},
          {'id': 'v0', 'box': [21, 0, 26, 8], 'align': 'start', 'scroll': 'static',
           'text': deg(outdoor), 'color': temp_color(outdoor)},
          {'id': 'i1', 'box': [11, 8, 8, 8], 'icon': '1167'},
          {'id': 'v1', 'box': [21, 8, 26, 8], 'align': 'start', 'scroll': 'static',
           'text': outdoor_humidity ~ '%', 'color': '#5BC0FF'}]}} | to_json }}
  - action: mqtt.publish
    data:
      topic: "{{ prefix }}/cmd/apps/pushed/energy"
      payload: >-
        {{ {'durationMs': 8000, 'layout': {'version': 1, 'regions': [
          {'id': 'i0', 'box': [11, 0, 8, 8], 'icon': '43697'},
          {'id': 'v0', 'box': [21, 0, 26, 8], 'align': 'start', 'scroll': 'static',
           'text': pv ~ 'W', 'color': '#FFD200'},
          {'id': 'i1', 'box': [11, 8, 8, 8], 'icon': '23842'},
          {'id': 'v1', 'box': [21, 8, 26, 8], 'align': 'start', 'scroll': 'static',
           'text': house ~ 'W', 'color': '#FF5050' if grid > 0 else '#40FF40'}]}} | to_json }}
  - action: mqtt.publish
    data:
      topic: "{{ prefix }}/cmd/apps/pushed/battery"
      payload: >-
        {% set level = (battery * 6 / 100) | round(0) | int %}
        {% set level_icon = ['77669', '77668', '77667', '77666', '77665', '77664', '77663'][level] %}
        {% if battery_w > 0 %}{% set direction = {'id': 'dir', 'box': [11, 8, 8, 8], 'icon': '77826'} %}
        {% elif battery_w < 0 %}{% set direction = {'id': 'dir', 'box': [11, 8, 8, 8], 'icon': '77827'} %}
        {% else %}{% set direction = {'id': 'dir', 'box': [11, 8, 8, 8],
          'draw': [['rectFill', 2, 3, 4, 2, '#606060']]} %}{% endif %}
        {{ {'durationMs': 8000, 'layout': {'version': 1, 'regions': [
          {'id': 'bat', 'box': [11, 0, 8, 8], 'icon': level_icon},
          {'id': 'soc', 'box': [21, 0, 26, 8], 'align': 'start', 'scroll': 'static',
           'text': battery ~ '%', 'color': battery_color},
          direction,
          {'id': 'w', 'box': [21, 8, 26, 8], 'align': 'start', 'scroll': 'static',
           'text': (battery_w | abs) ~ 'W',
           'color': '#40FF40' if battery_w > 0 else ('#FF8C00' if battery_w < 0 else '#606060')}]}} | to_json }}
Many systems have no sensor for household consumption, so the automation calculates it as house = PV + grid − battery. Battery power is positive while charging and negative while discharging. If you still need to add your inverter to Home Assistant, our guide Huawei SUN2000 with Home Assistant walks through it.
To remove a page, delete its action (the topic tells you which one) and remove its sensors from the trigger. Then set the matching variables to 0. For example, outdoor: "{{ states('sensor.outdoor_temperature') | float(0) }}" becomes outdoor: 0.
- Outdoor page: delete the
…/outdooraction and setoutdoorandoutdoor_humidityto0. - Battery page: delete the
…/batteryaction and setbattery,battery_chargeandbattery_dischargeto0. The energy page then calculates without a battery. - Energy page: delete the
…/energyaction as well and setpvandgridto0.
Save the automation and choose Run actions from the menu at the top right. Otherwise nothing is sent until one of the values changes.
Turning the knob into a thermostat control
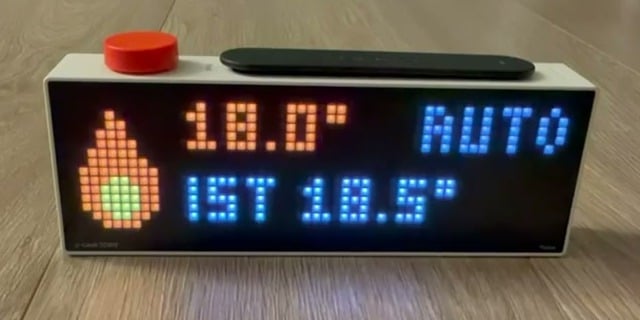
A small app on the clock takes over the knob while it’s on screen. Each click changes your thermostat’s target temperature by 0.5 °C, and pressing the knob cycles through auto, manual (heat) and off. As soon as another app is showing, the knob goes back to brightness and volume. Radiator thermostats such as Homematic IP support all three modes.
Loading the app onto the clock
The app is written in Berry, the scripting language of AWTRIX NG. Copy the code into a text editor and save it as heating.ax. The AWTRIX NG scripting docs explain the commands.
# @name    Heating
# @desc    Thermostat from Home Assistant: turn the knob to change the setpoint, press it to change the mode
# @version 1.0
# @config  topic text "MQTT topic" default="awtrix/heating" help="Base topic, the same as in the Home Assistant automations"
import json

class Heating
  var base, target, current, mode, tmin, tmax
  var pending, last_turn, hold_until
  var top, tag, bottom, color, core
  var flame

  def init()
    self.base = store.get("topic")
    self.target = nil
    self.current = nil
    self.mode = "auto"
    self.tmin = 5
    self.tmax = 30
    self.pending = false
    self.last_turn = 0
    self.hold_until = 0
    # 8 x 13 flame: # = outer color, o = core
    self.flame = ["...#....", "...##...", "..###...", "..####..", ".#####..",
                  ".######.", "########", "###oo###", "##oooo##", "##oooo##",
                  "##oooo##", ".##oo##.", "..####.."]
    self.build()
  end

  def setup()
    mqtt.subscribe(self.base + "/state", / t, p -> self.on_state(p))
  end

  # Home Assistant sends {"target":21.5,"current":20.5,"mode":"auto","min":5,"max":30.5}
  def on_state(p)
    var d = json.load(p)
    if d == nil return end
    if d.find("current") != nil self.current = num(d["current"]) end
    if d.find("min") != nil self.tmin = num(d["min"]) end
    if d.find("max") != nil self.tmax = num(d["max"]) end
    # Homematic reports short in-between modes while switching: keep the local mode for a moment
    if d.find("mode") != nil && now_ms() > self.hold_until self.mode = d["mode"] end
    # while the knob is turned, or shortly after sending, keep the local setpoint
    if d.find("target") != nil && !self.pending && now_ms() > self.hold_until
      self.target = num(d["target"])
    end
    self.build()
  end

  def on_knob(ev)
    if ev == "left" || ev == "right"
      if self.target == nil || self.mode == "off" return true end
      var step = ev == "right" ? 0.5 : -0.5
      self.target = max(self.tmin, min(self.target + step, self.tmax))
      self.pending = true
      self.last_turn = now_ms()
      self.build()
      return true
    elif ev == "press"
      var nxt = {"auto": "heat", "heat": "off", "off": "auto"}
      self.mode = nxt.find(self.mode, "auto")
      mqtt.publish(self.base + "/set/mode", self.mode)
      self.hold_until = now_ms() + 15000
      self.build()
      return true
    end
    return true
  end

  # stay 20 s on screen instead of the usual 7 s; every turn or press restarts the time
  def duration()
    return 20000
  end

  def loop()
    # send the new setpoint once the knob has rested for a second
    if self.pending && now_ms() - self.last_turn > 1000
      self.pending = false
      self.hold_until = now_ms() + 15000
      mqtt.publish(self.base + "/set/target", str(self.target))
    end
  end

  def fmt(v)
    if v == nil return "--" end
    var t = int(v * 10 + 0.5)
    return str(t / 10) + "." + str(t % 10) + "°"
  end

  def build()
    if self.mode == "off"
      self.top = "OFF"
      self.tag = ""
      self.color = 0x3A6EA5
      self.core = 0x9EC9FF
    else
      self.top = self.fmt(self.target)
      self.tag = self.mode == "heat" ? "MAN" : "AUTO"
      self.color = self.mode == "heat" ? 0xFF2A00 : 0xFF7A00
      self.core = 0xFFD200
    end
    self.bottom = "NOW " + self.fmt(self.current)
  end

  def draw()
    clear()
    font("small")
    var y = 0
    for row : self.flame
      for x : 0 .. 7
        var c = row[x]
        if c == "#" pixel(1 + x, 2 + y, self.color)
        elif c == "o" pixel(1 + x, 2 + y, self.core)
        end
      end
      y += 1
    end
    text(12, 6, self.top, self.pending ? 0xFFFFFF : self.color)
    if self.tag != ""
      text(width() - text_width(self.tag), 6, self.tag, 0x808080)
    end
    text(12, 14, self.bottom, 0xC0C0C0)
  end
end

return Heating()
If your thermostat has no auto mode, change the line var nxt = … to var nxt = {"heat": "off", "off": "heat"} before uploading. A press then only switches between heating and off.
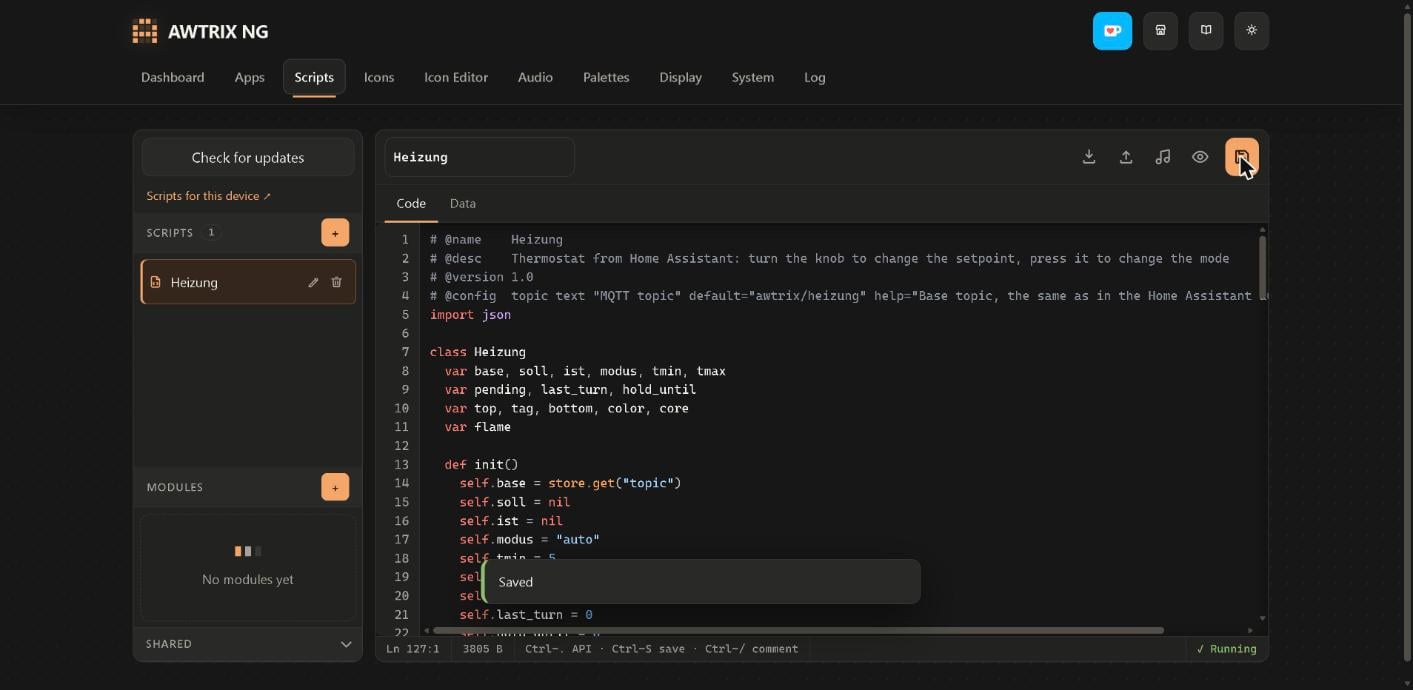
- In the clock’s web interface, open Scripts and click the upward arrow (upload) at the top right. Select the file. The code appears in the editor, and the clock takes the name Heating from the
@nameline. It isn’t saved yet. - Click the orange save icon on the far right. The app now appears in the list and Running shows at the bottom right.
The two automations
Create both automations as you did for the displays. In both, replace every climate.office_thermostat with your thermostat.
The first one sends the target and current temperature and the mode to the clock whenever something changes on the thermostat:
alias: "TC002 heating: status to the clock"
description: Sends target temperature, current temperature and mode to the Heating app on the TC002
mode: queued
max: 10
triggers:
  - trigger: state
    entity_id: climate.office_thermostat
  - trigger: homeassistant
    event: start
variables:
  thermostat: climate.office_thermostat
actions:
  - action: mqtt.publish
    data:
      topic: awtrix/heating/state
      retain: true
      payload: >-
        {{ {'target': state_attr(thermostat, 'temperature'),
            'current': state_attr(thermostat, 'current_temperature'),
            'mode': states(thermostat),
            'min': state_attr(thermostat, 'min_temp'),
            'max': state_attr(thermostat, 'max_temp')} | to_json }}
The second one sets the temperature and mode when you turn or press the knob:
alias: "TC002 heating: commands from the clock"
description: Sets target temperature and HVAC mode when the TC002 knob is turned or pressed
mode: queued
max: 10
triggers:
  - trigger: mqtt
    topic: awtrix/heating/set/target
    id: target
  - trigger: mqtt
    topic: awtrix/heating/set/mode
    id: mode
actions:
  - choose:
      - conditions:
          - condition: trigger
            id: target
        sequence:
          - action: climate.set_temperature
            target:
              entity_id: climate.office_thermostat
            data:
              temperature: "{{ trigger.payload | float }}"
      - conditions:
          - condition: trigger
            id: mode
        sequence:
          - action: climate.set_hvac_mode
            target:
              entity_id: climate.office_thermostat
            data:
              hvac_mode: "{{ trigger.payload }}"
You don’t need to change the awtrix/heating topic. If you use several clocks, change it in the app’s code before uploading (the default value in the @config topic line) and make the same change in both automations.
To test it, switch to the Heating app on the clock. After a few seconds it shows your thermostat’s target and current temperature. Turn the knob one click and let go: about a second later the new target temperature shows up in Home Assistant too.
How the app behaves
The app sends a new target temperature only after you’ve left the knob alone for a second, so several clicks in a row result in just one command. That spares wireless thermostats, which can only transmit for a limited time per hour. The app stays on screen for 20 seconds, and every turn of the knob extends that. The flame is orange in auto mode, red in manual and blue when off.
Using the TC002 as a voice assistant for Home Assistant
The clock sends your question to Assist, Home Assistant’s voice assistant. Speech recognition and spoken replies can run locally with the Whisper (speech-to-text) and Piper (text-to-speech) apps, or through the paid Home Assistant Cloud. For the cloud, choose Home Assistant Cloud for both when you create the assistant. This guide sets up the local version, so everything stays on your network. For more on this, including a Raspberry Pi as the server, see Local voice assistant with Home Assistant.
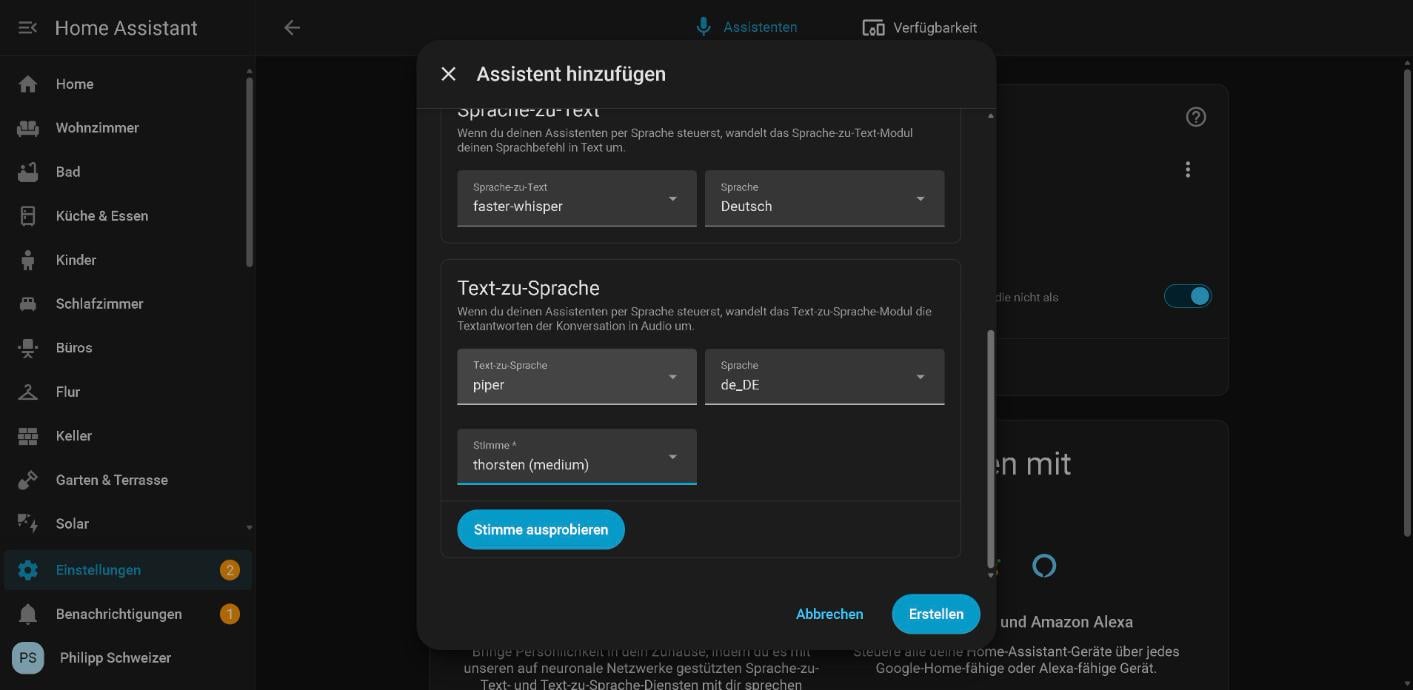
Our screenshots show Home Assistant in German with a German assistant (Whisper language de, Piper voice Thorsten). For English, keep en and pick an English Piper voice.
Installing Whisper and Piper
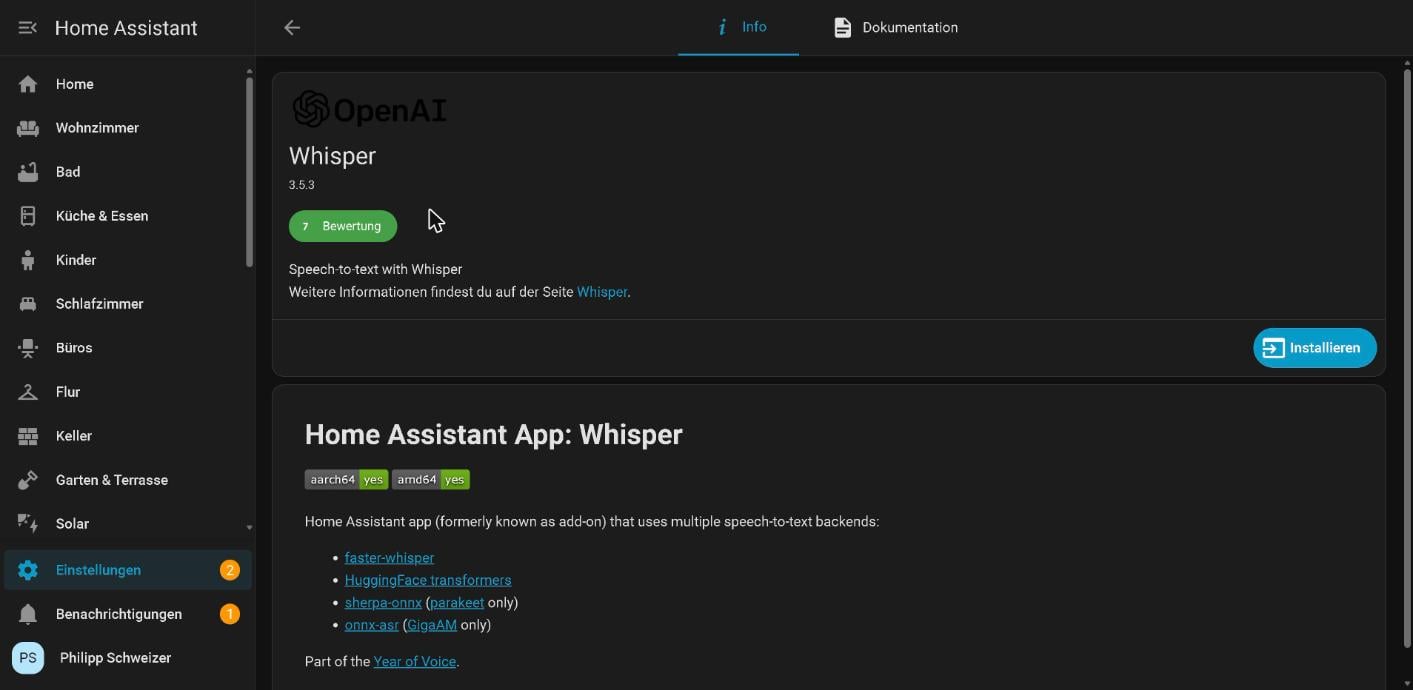
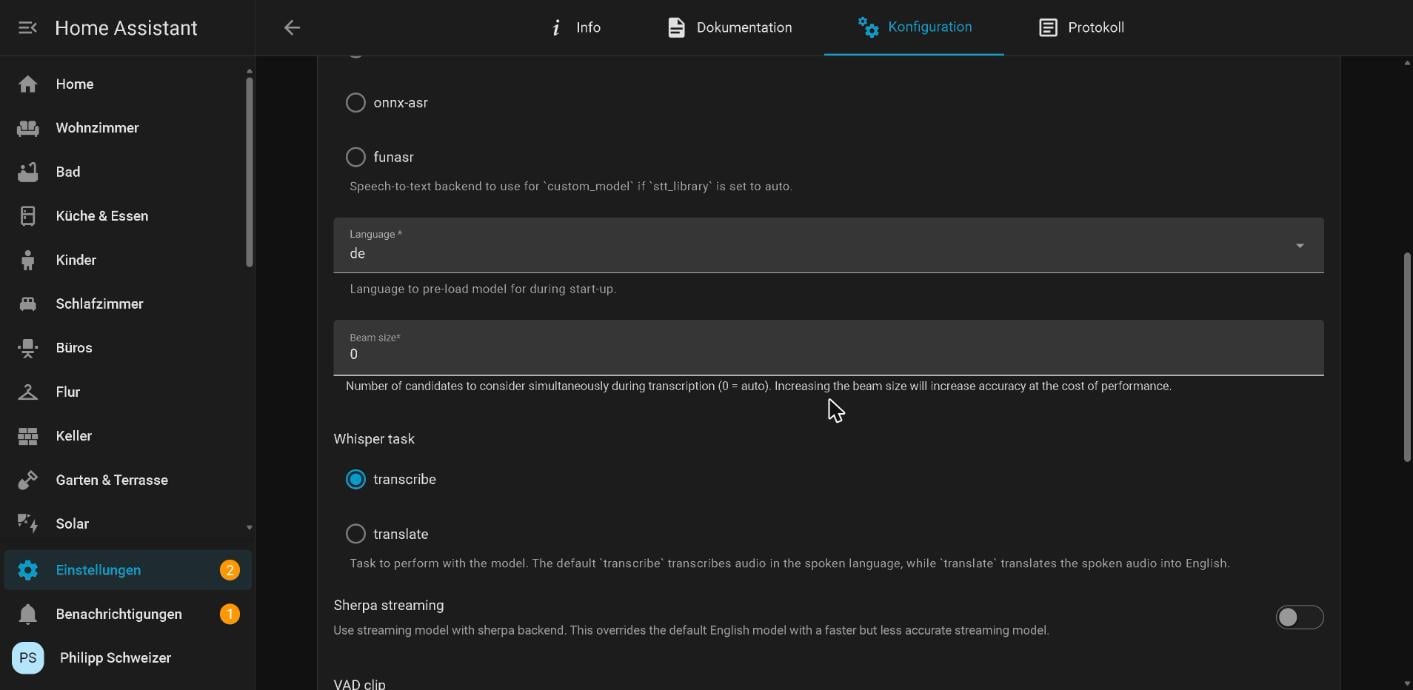
- In Home Assistant, open Settings → Apps → App store, search for Whisper and install the app.
- Go to the Configuration tab and check Language. It’s set to
enby default, which is what you want for English. Start the app. - Install the Piper app the same way, choose a voice in its configuration, for example
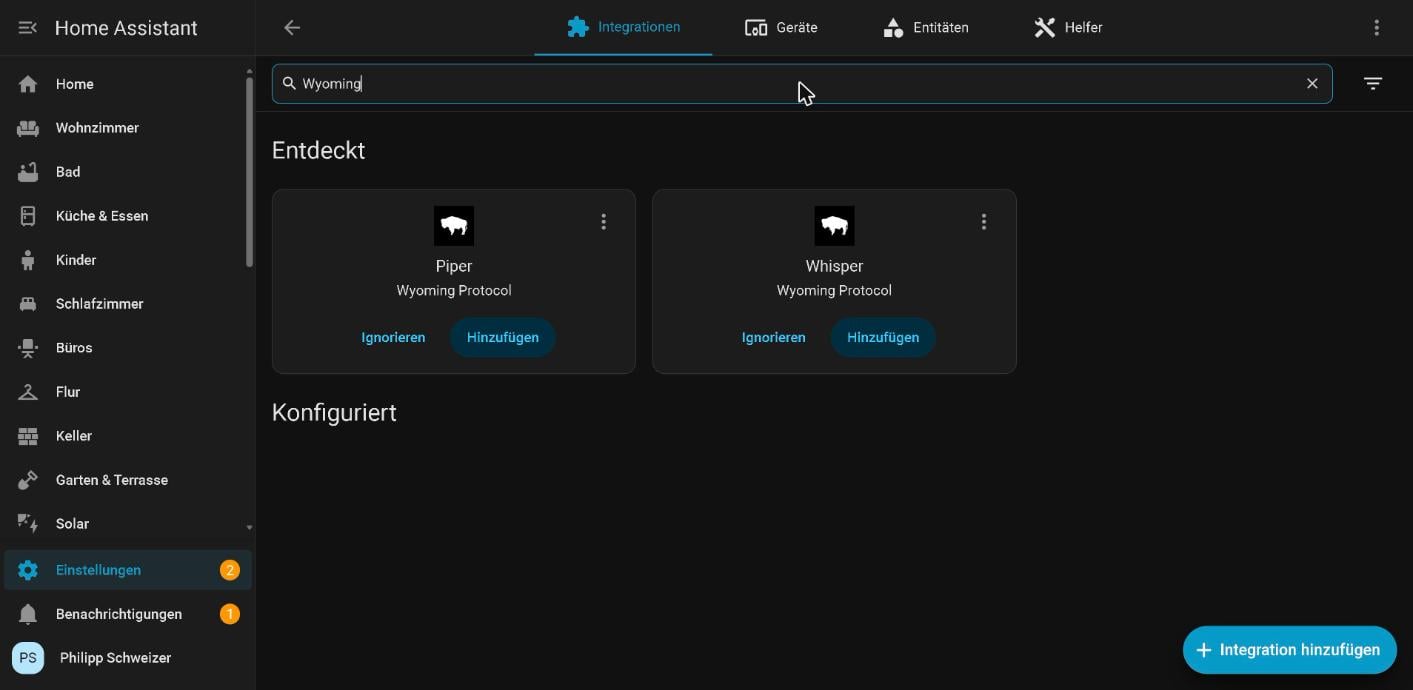
en_US-lessac-medium, and start it. - Both then appear under Settings → Devices & services as discovered “Wyoming Protocol” services. Wyoming is the protocol Home Assistant uses to talk to them. Click Add on each and confirm the dialog.
Creating the voice assistant
- Open Settings → Voice assistants and click Add assistant.
- Give it a name, for example “Pixel clock (local)”, and choose your language.
- Set Speech-to-text to
faster-whisper(the speech recognition engine of the Whisper app) and Text-to-speech topiperwith the voice you installed. - Click Create.
Connecting the clock to the voice assistant
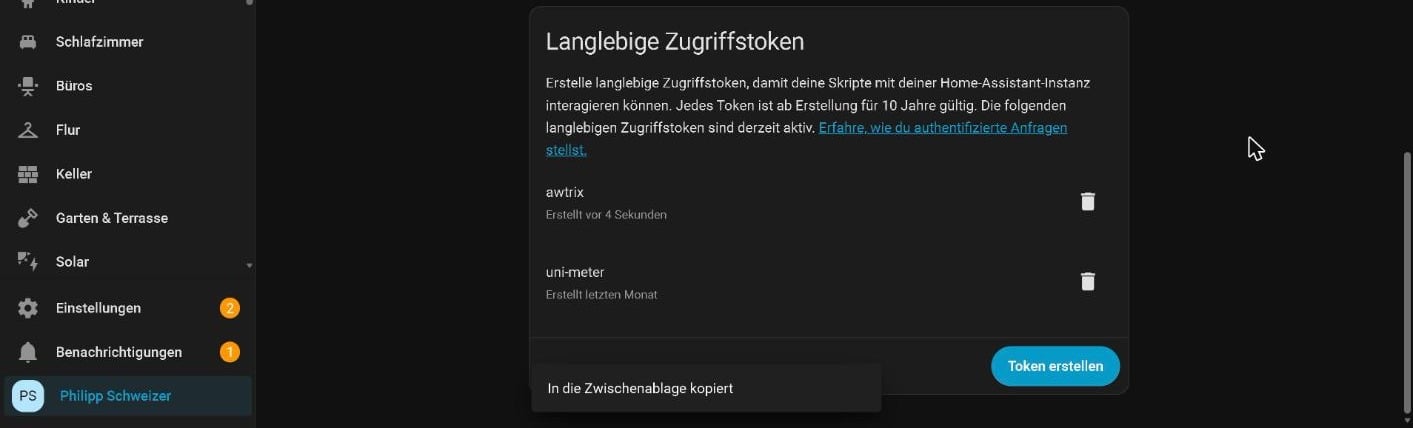
- In Home Assistant, click your profile name at the bottom left, switch to Security and click Create token under Long-lived access tokens. Name it something like
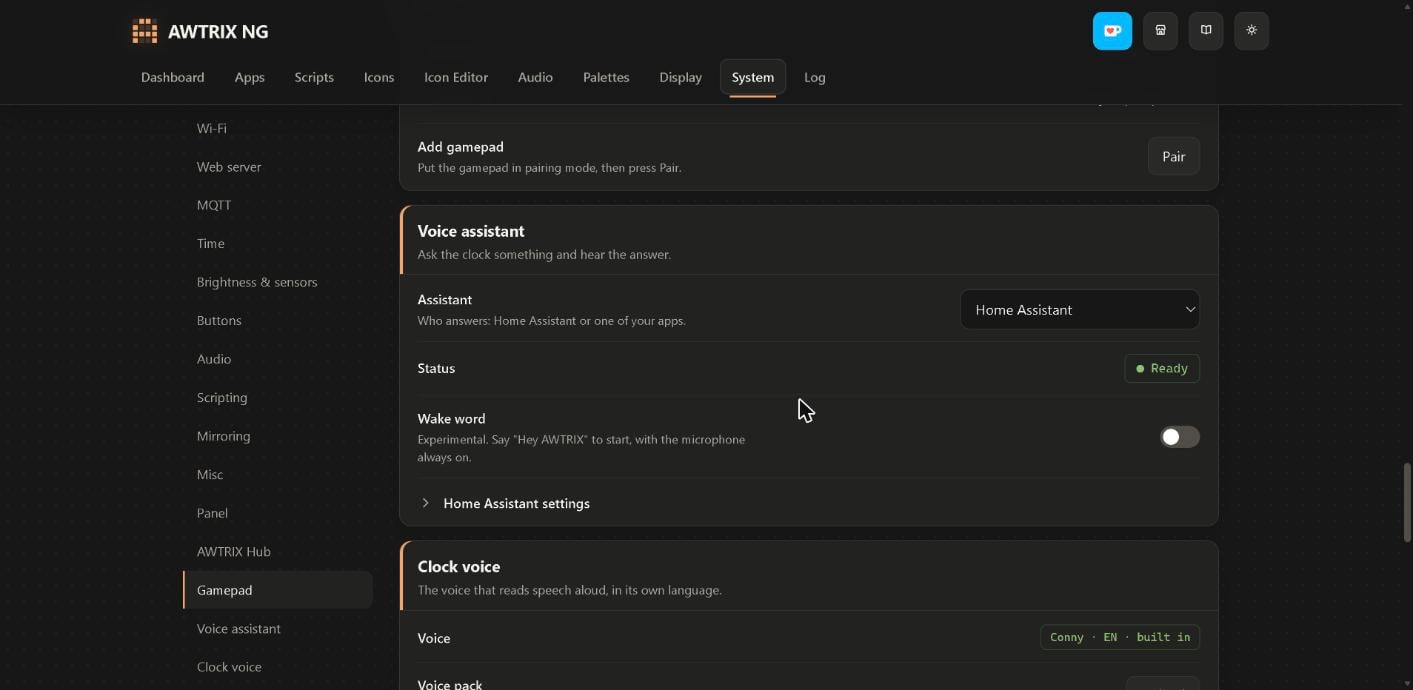
awtrix. Copy the token immediately, because Home Assistant shows it only once. It gives full access to your Home Assistant, so treat it like a password. - In the clock’s web interface, open System → Voice assistant and choose Home Assistant under Assistant.
- Enter your Home Assistant’s address under Address, for example
http://192.168.178.189:8123, paste the token and click Connect. - Pick your new assistant under HA assistant. The status changes to Ready. If you skip this, the clock uses Home Assistant’s default assistant, which often has no speech recognition, and reports Speech not set up.
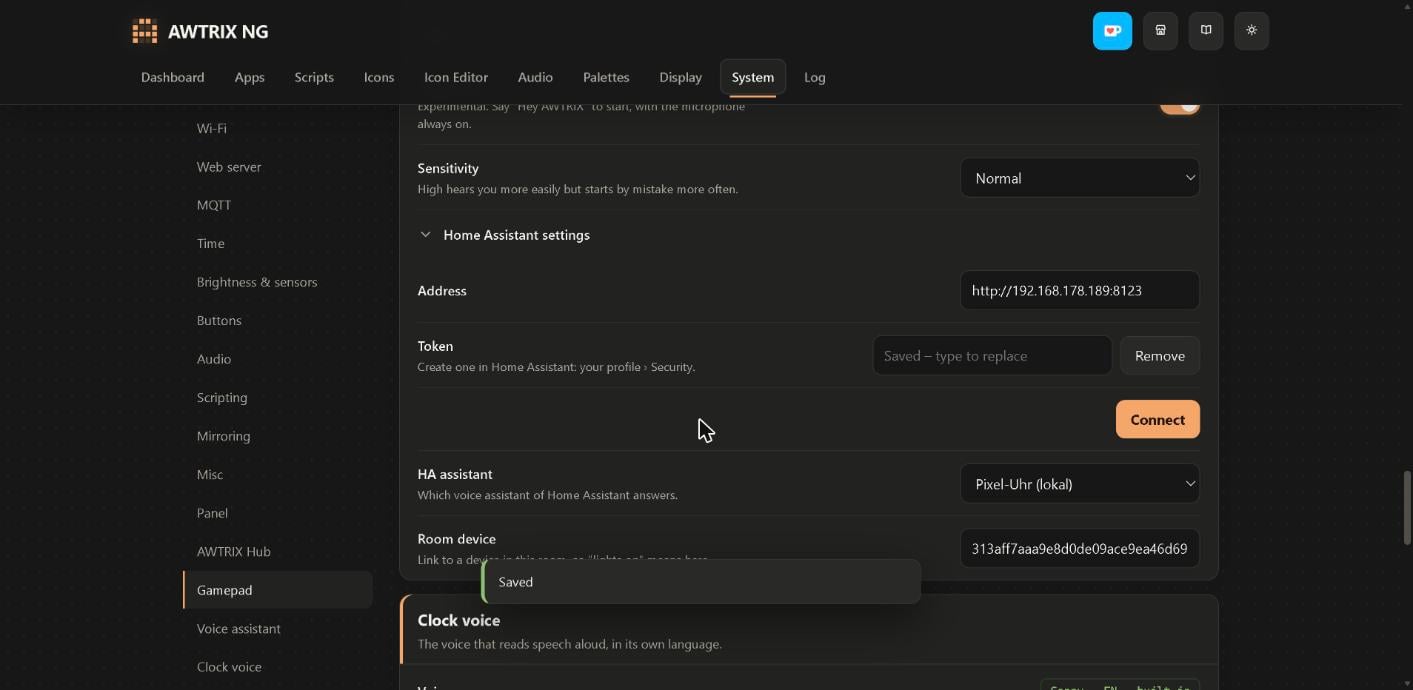
Optionally, Room device tells the assistant which room the clock is in, so “turn on the light” switches the light in that room:
- In Home Assistant, open the clock’s device page, click the pencil icon at the top right and pick an area.
- On the same page, copy the full address from the browser’s address bar, for example
http://192.168.178.189:8123/config/devices/device/313aff…. - Paste it into the Room device field. The clock keeps only the device ID.
Talking to the clock
Hold the knob down for half a second. The animated Home Assistant house appears on the display. Start speaking once its mouth opens wide. Home Assistant detects the end of your question after a short pause, and the clock stops listening after about 15 seconds at the latest. A short press ends the recording right away. The answer comes from the clock’s speaker.
Try something like “What’s the temperature in the bathroom?”, “Turn on the living room light” or “Set the bathroom temperature to 21 degrees”. On our x86 PC, Whisper took around three seconds to transcribe a question once we stopped speaking.
Instead of holding the knob, you can turn on the wake word “Hey AWTRIX” under System → Voice assistant. The AWTRIX NG docs call it experimental, and our clock didn’t respond to it reliably. If you want to try it anyway, set the sensitivity to High and only speak once the clock has finished its last answer. Otherwise, stick to the knob or button.awtrix_ng_assist.
Helping Assist understand your rooms
If the clock says an area doesn’t exist or no matching device was found there, it understood you correctly. The problem is your Home Assistant setup:
- Area names: Assist matches areas by the exact name you say. If your area is called “Upstairs study”, give it the alias “Office” in the area settings.
- Devices in the right area: Assist answers “What’s the temperature in the bathroom?” using the thermostat in the “Bathroom” area. If it sits in another area, Assist finds nothing.
- Exposure: under Settings → Voice assistants in the Expose tab you decide which entities Assist can see.
Coming from the TC001: what changes
If you’re coming from a TC001 with AWTRIX 3, your existing automations won’t run on AWTRIX NG without changes:
| AWTRIX 3 (TC001) | AWTRIX NG (TC002) | |
|---|---|---|
| MQTT topic for your own apps | <prefix>/custom/<name> | <prefix>/cmd/apps/pushed/<name> |
| How long an app stays on screen | "duration": 3 (seconds) | "durationMs": 3000 (milliseconds) |
| Loading icons | type the LaMetric number into the Icons tab | upload a file, use a web address, the icon editor or icons from AWTRIX Hub, a community collection that needs an account |
| Apps after a restart | stored permanently with "save": true | RAM only, Home Assistant has to send them again |
| Space for text | 32 × 8 pixels | pushed apps on a 26 × 8 grid, layouts with 52 × 16 pixels |
In AWTRIX NG the icon ID is a string in quotes, so "icon": "43697".
Troubleshooting
| Problem | Cause and fix |
|---|---|
| The installer can’t find the clock | Use a data cable, switch the clock off and on, and connect only one clock. |
| The clock shows no IP address after installing | Check the Wi-Fi name and password (the clock only supports 2.4 GHz). |
| The clock doesn’t show up in Home Assistant | Check the broker address and MQTT user, turn on HA discovery and restart the clock. |
| Your pages are gone after the clock restarts | The automation needs the trigger on <prefix>/availability = online. |
| An icon is missing or blank | Compare the icon name in the automation with the file name on the clock (without the extension). Icons from a web address need internet access. |
| An animated icon from a web address stays small | Animated GIFs from a web address aren’t scaled up. Upload the file to the clock instead. |
| Values get cut off | A value box fits five characters. Drop the unit or make the box wider (see How a page is built). |
| The voice assistant says “Speech not set up” | Choose the assistant with Whisper and Piper under HA assistant. |
| Whisper doesn’t understand your language | Set Language in the Whisper app configuration to your language. |
| Assist can’t find the room | Check area names, aliases and which entities are exposed. |
Frequently asked questions
No. The TC002 uses AWTRIX NG, the successor to AWTRIX 3. AWTRIX NG also runs on the TC001, while AWTRIX 3 only runs on the TC001 and DIY ESP32 clocks.
Partly. The MQTT setup is the same, but the layouts are built for the TC002’s 52 × 16 pixels. The knob and the voice assistant are TC002-only.
No. The installer writes AWTRIX NG straight to the clock over USB.
No. Unlike the TC001, the TC002 has no sensors for temperature, humidity or light. It gets room values from sensors in Home Assistant.
Yes. With Whisper and Piper, both speech recognition and spoken replies run locally in Home Assistant. The Home Assistant Cloud option needs internet access.
Yes. Set Whisper’s language and choose a Piper voice in that language.
Verdict
The displays, thermostat control and voice assistant work independently, so you can set up only the parts you need. There are two limits. The wake word wasn’t reliable for us, and the clock has no room sensors, so you need your own sensors in Home Assistant.
You’ll find more Home Assistant projects in our overview of all Home Assistant guides.