Connect Home Assistant to AI – Set Up an MCP Server for Claude, ChatGPT & Gemini
Home Assistant can do almost anything – which is exactly why so many beginners struggle to build their own automations, design dashboards, or debug errors. Until now, that meant learning YAML, understanding templates, and digging through forums. With a Home Assistant MCP server, you hand that work to an AI instead.
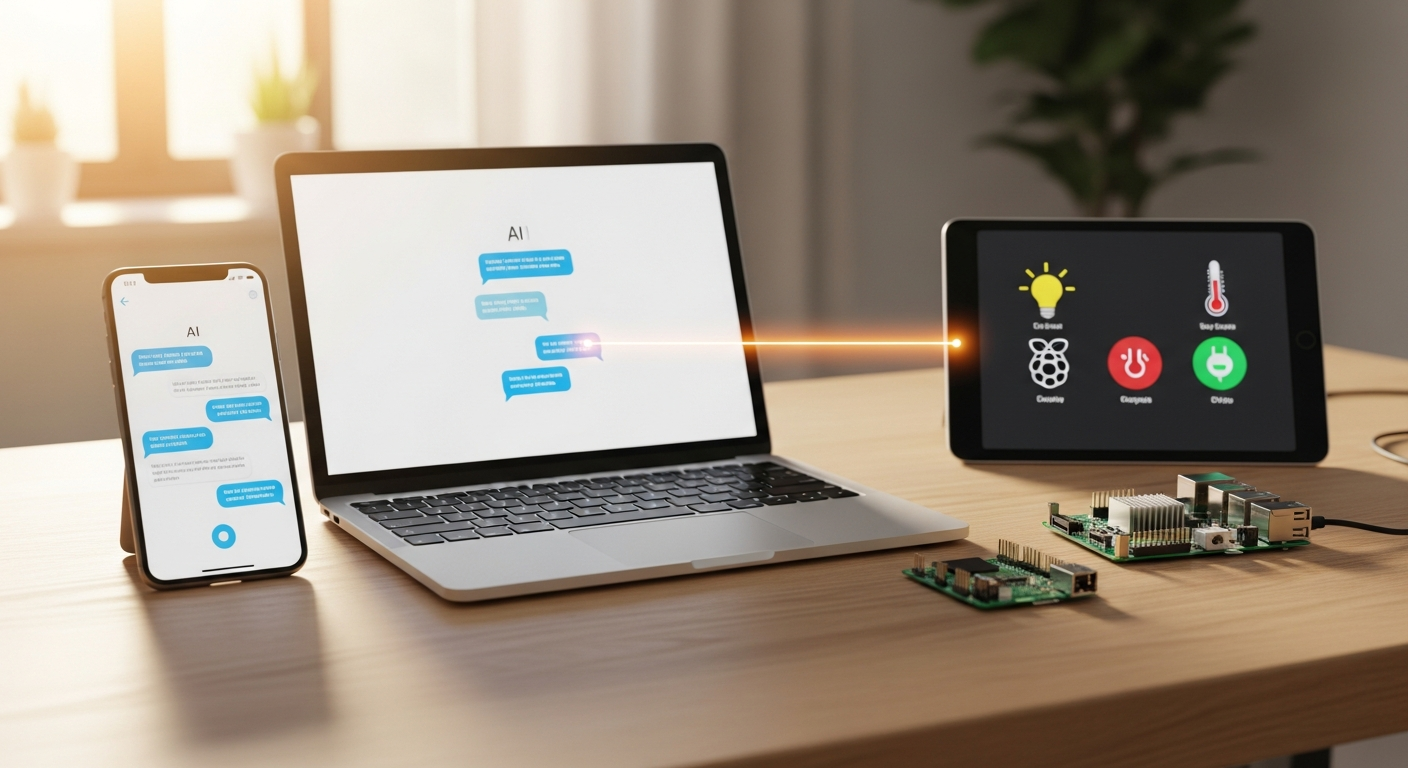
With an MCP server (Model Context Protocol, an open interface between AIs and other software), you connect Home Assistant directly to an AI of your choice – Claude, ChatGPT, or Gemini – and describe in plain language what you need, such as “Build me a dashboard card that shows which windows are open.” The AI finds the right entities itself, writes the code, and sets it up in Home Assistant.
In short
To have an AI build automations, dashboards, and sensors, install the free community project ha-mcp. Make Home Assistant reachable through Nabu Casa, a reverse proxy, or a Cloudflare Tunnel, then add ha-mcp to your AI as a connector. If you only need to control devices and read data, Home Assistant’s official MCP server is enough.
- You need: Home Assistant 2026.8 or later (ideally the current release) on a Raspberry Pi with any installation type, plus an AI account. Claude is the easiest to set up. With ChatGPT, automations need a Business plan or higher. Outside the US, Gemini works through the free Antigravity CLI.
- Installation: ha-mcp as a custom component from the Marketplace, built in from Home Assistant 2026.11. On 2026.10 and older, use HACS.
- Official server: a one-click switch under Settings → System → AI since 2026.10, with history and logs since 2026.11. It can’t build automations or dashboards.
- Before you start: cloud AI connectors can’t present a client certificate you issued. If Home Assistant sits behind Cloudflare Access with mTLS, MCP access needs an exception.
- Create an account just for HA-MCP (administrator, local access only)
- Under Settings → Marketplace, search for “HA-MCP” and install it (on 2026.10 and older, use HACS)
- Under Settings → Devices & services, add the integration, choose the “HA-MCP Server” entry, and turn on remote access (for example “Secret URL”)
- Under Configure, copy the webhook URL (with Nabu Casa or an external URL set, it already shows your external address) and add it at claude.ai as a custom connector
- Give the AI a first task, such as “Which lights are on right now?”
On Home Assistant OS or Supervised, you can use the app (add-on) instead – see “Step 1: Install ha-mcp”.
What you need
- Home Assistant 2026.8 or later on a Raspberry Pi. That’s the technical minimum – the project officially supports only the current stable release. With the recommended route, the installation type doesn’t matter: OS, Supervised, Container, and Core all work. Don’t have the hardware yet? Home Assistant runs on a Raspberry Pi 5*, or you can get the ready-made Home Assistant Green*. My Home Assistant hardware comparison helps you pick.
- The Marketplace, which you’ll use to install the custom component. It’s built into Settings from Home Assistant 2026.11. My HACS guide covers what to do on older versions.
- Only for the app/add-on route: Home Assistant OS or Supervised with the App Store under Settings → Apps (before Home Assistant 2026.2: Settings → Add-ons → Add-on Store)
- For access from cloud AIs (Claude, ChatGPT): a way to reach Home Assistant from the internet – Nabu Casa, an existing reverse proxy, or your own Cloudflare Tunnel
- An account with Claude, ChatGPT, or Google Gemini. The table in step 3 shows what you get with which AI and plan.
No remote access yet? My guide Set Up Cloudflare Tunnel on the Raspberry Pi walks you through it – no port forwarding, with mTLS hardening.
Official vs. unofficial MCP server
Home Assistant has shipped its own official MCP server since version 2025.2. The community project ha-mcp can do a lot more:
| Feature | Official MCP server | Unofficial (ha-mcp) |
|---|---|---|
| Entity access | Depending on your settings, only entities exposed to the Assist voice assistant, or every entity | Every entity in the system |
| Control devices, run actions | Yes | Yes |
| Read history and logs | Yes, since 2026.11 | Yes |
| Create/edit automations and scripts | No | Yes |
| Create/edit scenes | Only with the scene.create action | Yes |
| Build/edit dashboards | No | Yes |
| Debug automations from traces | No | Yes |
| Manage helpers, areas, zones, labels, groups | No | Yes |
| Backups, apps/add-ons, HACS, device/entity registry | Partly, such as starting a backup or restarting an app | Yes |
| Installation types | All | All as a custom component, OS/Supervised only as an app |
| Setup effort | Low | Medium |
If you only want your AI to control devices and answer questions (“turn on the living room light”, “what was in the log yesterday?”), the official server is enough. For automations, dashboards, and sensors, you need ha-mcp.
Set up the official MCP server
To turn on the official server (Home Assistant 2026.10 or later):
- Go to Settings → System → AI.
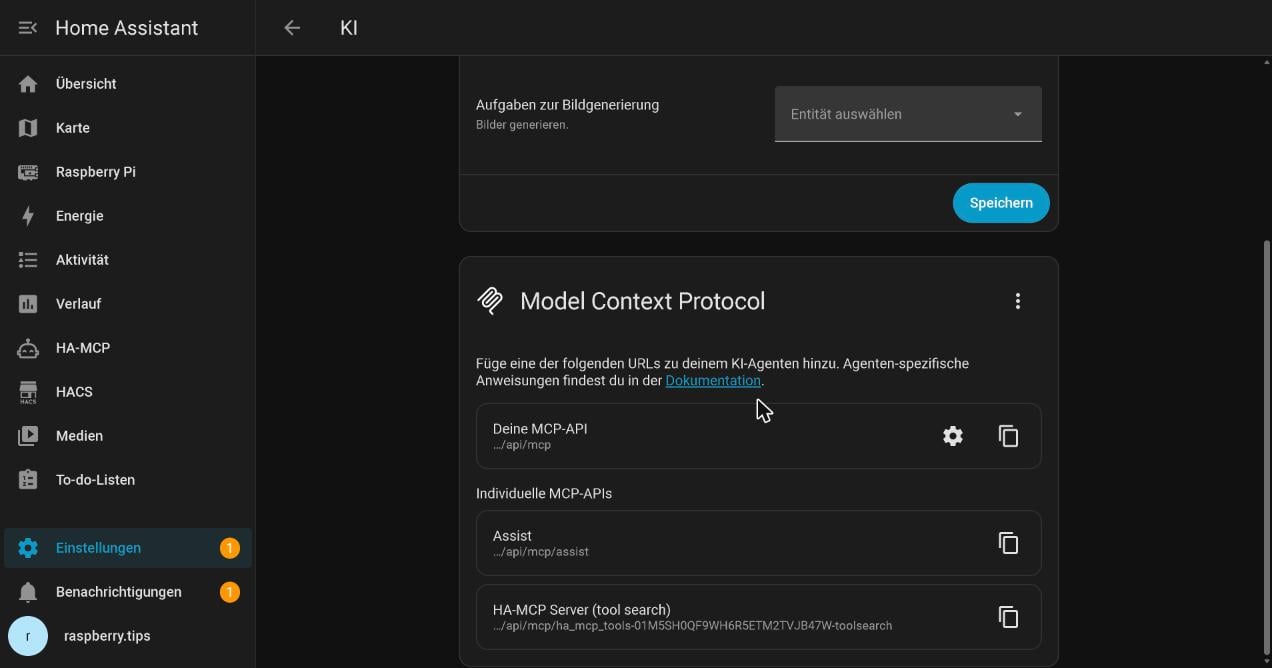
- Click Enable on the “Model Context Protocol” card.
- Under “Main URL”, copy the address with Copy URL. It ends in
/api/mcp.
Cloud-based AIs such as Claude and ChatGPT need to reach Home Assistant over the internet, for example through Nabu Casa or a tunnel.
A fresh setup exposes all AI tools and only lets administrator accounts connect. The AI signs in with your Home Assistant account via OAuth: you approve access in your browser, and the AI never sees your password.
Since Home Assistant 2026.11, the server has two sets of tools. Device control only sees and controls what you’ve exposed to Assist. Home Assistant sees every entity along with history and logs, and can call any action, which on Home Assistant OS includes shutting down the host. That tool set always requires an administrator account.
You decide what the AI may do under Settings → Devices & services → Model Context Protocol → Configure. Read-only limits the AI to tools that don’t change anything. Turn off Expose all AI tools and you pick just Device control in the same dialog. Both settings apply to the main URL. The URLs listed under “Individual URLs” on the AI page ignore them.
Connect the official server to Claude
On claude.ai, add a custom connector under Customize → Connectors and paste the address you copied. Claude then shows a dialog: choose Sign in now for authentication and Use Claude’s published identity for the OAuth client. Then select Connect on the connector’s page and sign in to Home Assistant. To test it, ask Claude “Which lights are on right now?” For ChatGPT and other AIs, see the official documentation.
If your Home Assistant sits behind Cloudflare Access with a client certificate, Cloudflare will block Claude’s connector: the exception in step 2 below only covers ha-mcp’s webhook, not /api/mcp.
Which route is right for you?
ha-mcp comes as a custom component that runs inside Home Assistant and as an app (add-on), both with the same tools. Which one you can use depends on your installation:
| If you run … | Use … | Why |
|---|---|---|
| Home Assistant OS or Supervised | Custom component (recommended) or app/add-on | The custom component has remote access built in, the app works without HACS |
| Home Assistant Container or Core (e.g. Docker on the Pi) | Custom component | Apps aren’t available there |
Important: run only one of the two as your server. The custom component fully replaces the app. The only exception is the optional entry for the YAML tools further down, which isn’t a second server.
Step 1: Install ha-mcp
The project is called “Home Assistant MCP Server” (repository homeassistant-ai/ha-mcp).
Custom component (recommended, every installation type)
The custom component runs as an integration directly inside Home Assistant. These steps reflect Home Assistant 2026.11 (November 2026). Start by creating a dedicated account for HA-MCP:
- Go to Settings → People → Add person and enter a name, e.g. “hamcp”
- Turn on Allow login and set a username and password
- Turn on Local access only and Administrator. Setup won’t work without administrator rights.
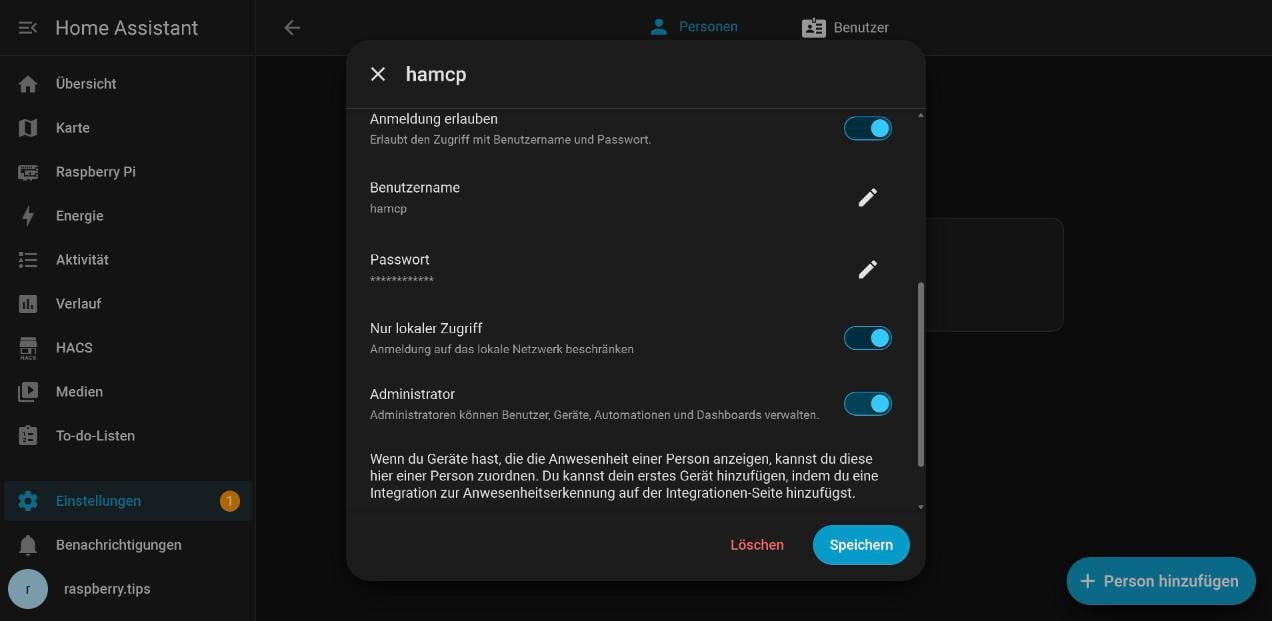
Why a separate account? HA-MCP turns it into an access token called “HA-MCP Server” that only works on your home network, and it doesn’t keep the password. Home Assistant then records the AI’s changes under that account. You can use a long-lived access token from your own account instead (Profile → Security), but that one also works from outside your network if it ever leaks.
Now install the custom component through the Marketplace. You don’t need a GitHub account for this:
- Open Settings → Marketplace and search for “HA-MCP” under Browse. The first time you open the Marketplace, it shows a risk notice you need to accept before you can install anything. On Home Assistant 2026.10 and older, use HACS instead: open Custom repositories from the three dots in the top right and add
https://github.com/homeassistant-ai/ha-mcpwith the type Integration.
- Open the entry named HA-MCP — Manage Home Assistant with AI (HA-MCP Custom Component in older versions). Its description reads “Configure and automate Home Assistant with Claude, ChatGPT, and other AI assistants”. The search also lists “Ha Mcp For Xiaozhi” – that’s a different project.
- Select Install, then Install again in the dialog (in HACS: Download twice)
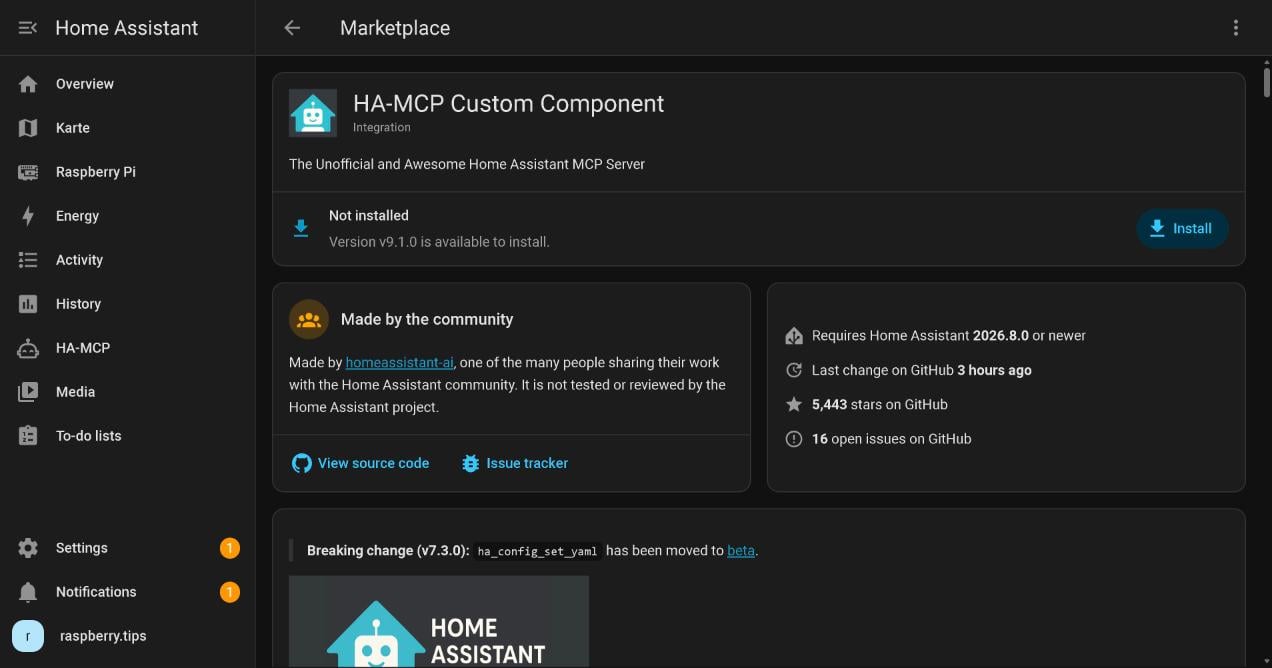
The Marketplace offers the current stable release. If you installed ha-mcp through HACS from the older ha-mcp-integration repository, there’s nothing to change: according to the project, it keeps getting the same releases. Keep GitHub connected in the Marketplace, though, or it stops checking that repository for updates.
- If Settings shows a repair at the top asking you to restart for HA-MCP, open it and select Restart. If setup starts right away instead, skip the next step and go straight to entering the account details.
- Go to Settings → Devices & services → Add integration, search for “HA-MCP”, pick HA-MCP — Manage Home Assistant with AI (older versions: HA-MCP Custom Component), then HA-MCP Server (recommended)
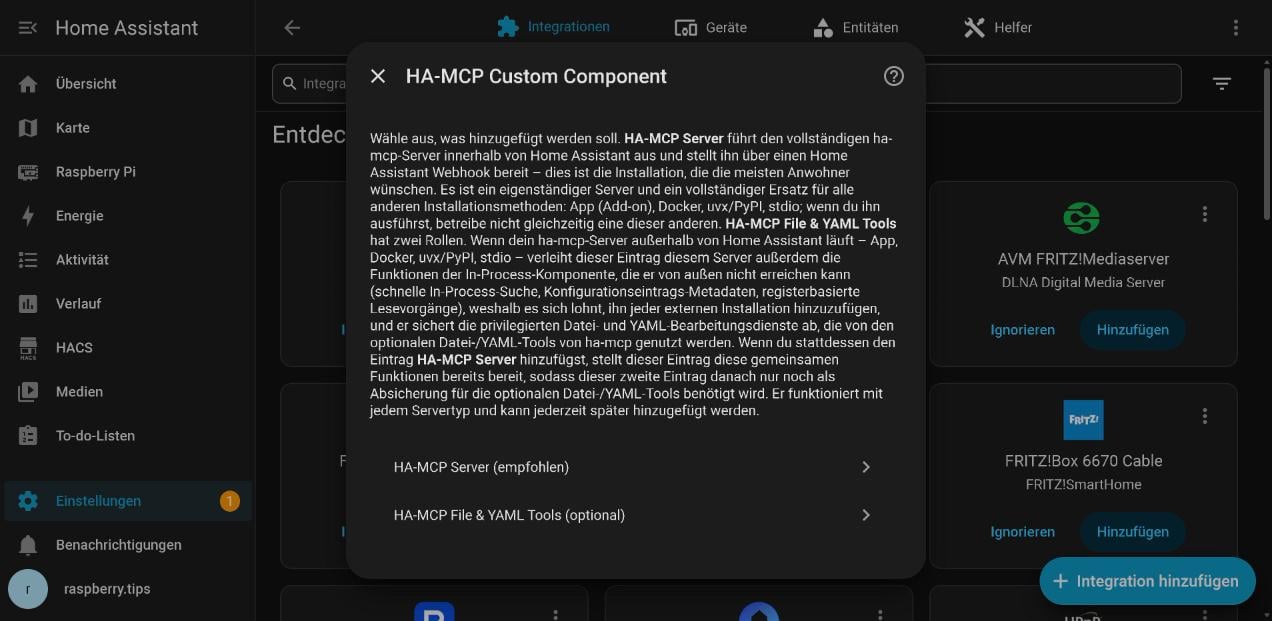
- Enter the new account’s username and password – not your own login. (If you’d rather use your own account, paste an access token in the field above instead.)
- Below that, choose how your AI reaches the server. Remote access through Home Assistant and Network access both start out switched off. For a quick start, pick “Secret URL (no sign-in)”; Claude, ChatGPT, and the Antigravity CLI then connect with the URL alone. If the server stays reachable from the internet, pick “Home Assistant sign-in” instead (the project’s recommendation) – the AI then logs in with a Home Assistant administrator account, as shown in step 3. For access from your home network, also set Network access to “Local network”.
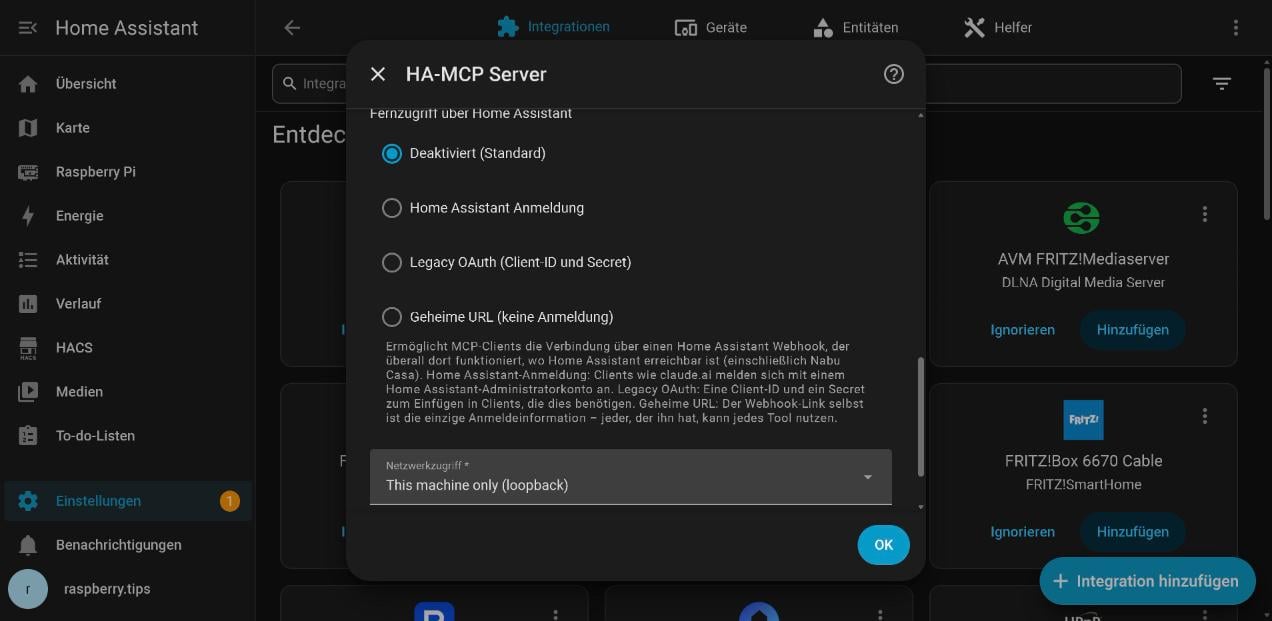
- Confirm with Submit and close the device dialog with Skip and finish
- On the integration page, click the gear icon (Configure) next to the “HA-MCP Server” entry. Your addresses are listed under “Connect URL(s)”.
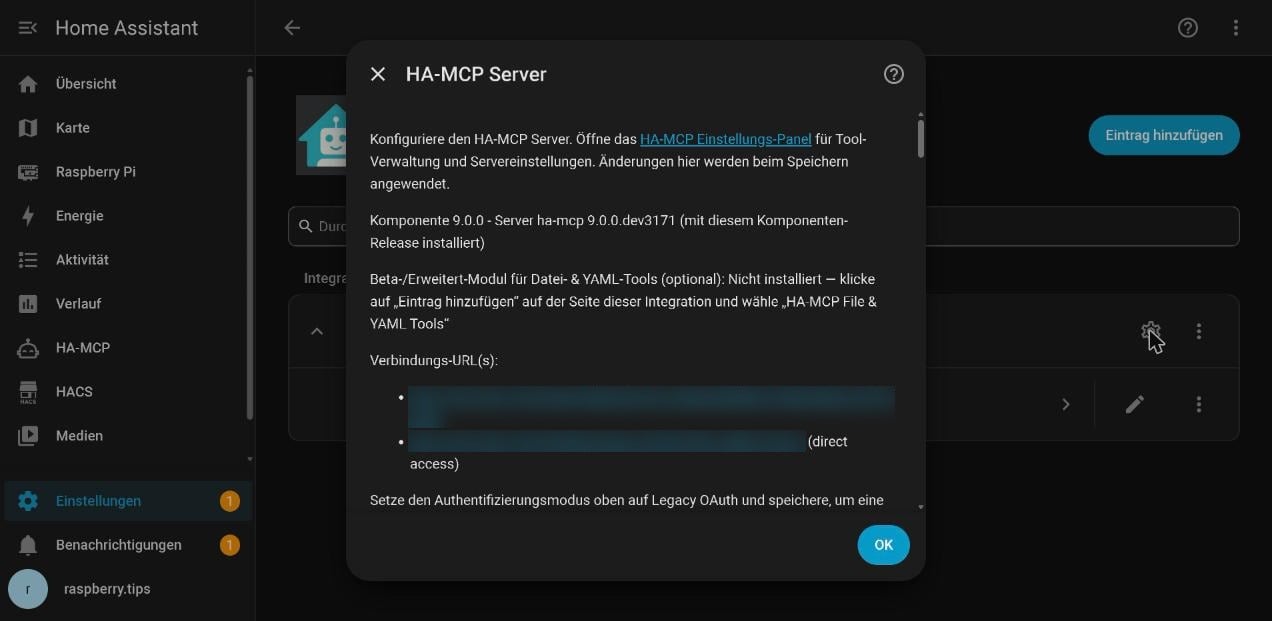
You get two addresses, each with a random secret part:
Webhook:  http://<ha-ip>:8123/api/webhook/mcp_1a2b3c4d5e6f7a8b9c0d1e2f3a4b5c6d
Direct:   http://<ha-ip>:9584/private_Xy7Kq2LmN9pRtW4vZs8b
Use the direct address only on your home network; the webhook address is what remote access in step 2 builds on. Treat both like a password: anyone who has them can use every tool.
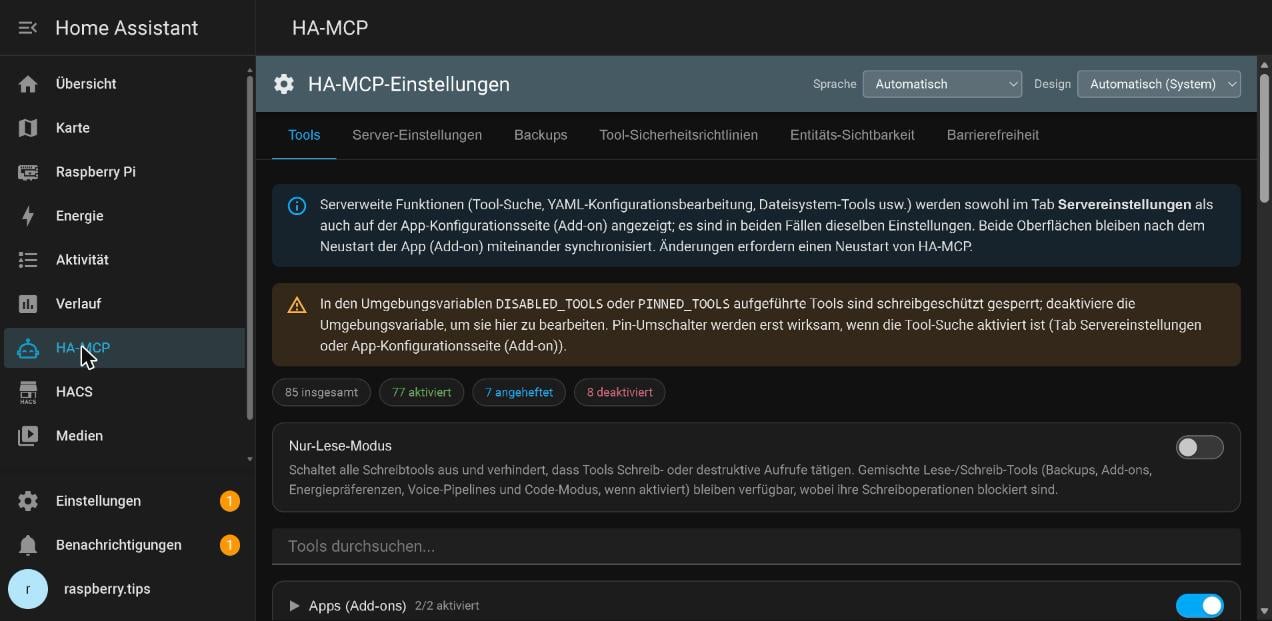
You’ll find ha-mcp’s settings under the new HA-MCP entry in the sidebar. That’s where you switch off individual tools, turn on read-only mode, or change server settings. They’re the same switches as in the app; my recommendations are under “Recommended settings” below.
App/add-on (Home Assistant OS and Supervised only)
- Go to Settings → Apps → App Store (or Add-ons → Add-on Store on older HA versions)
- Open the three-dot menu in the top right, choose Repositories, and add the URL
https://github.com/homeassistant-ai/ha-mcp - Reload the page, install “Home Assistant MCP Server”, and start it
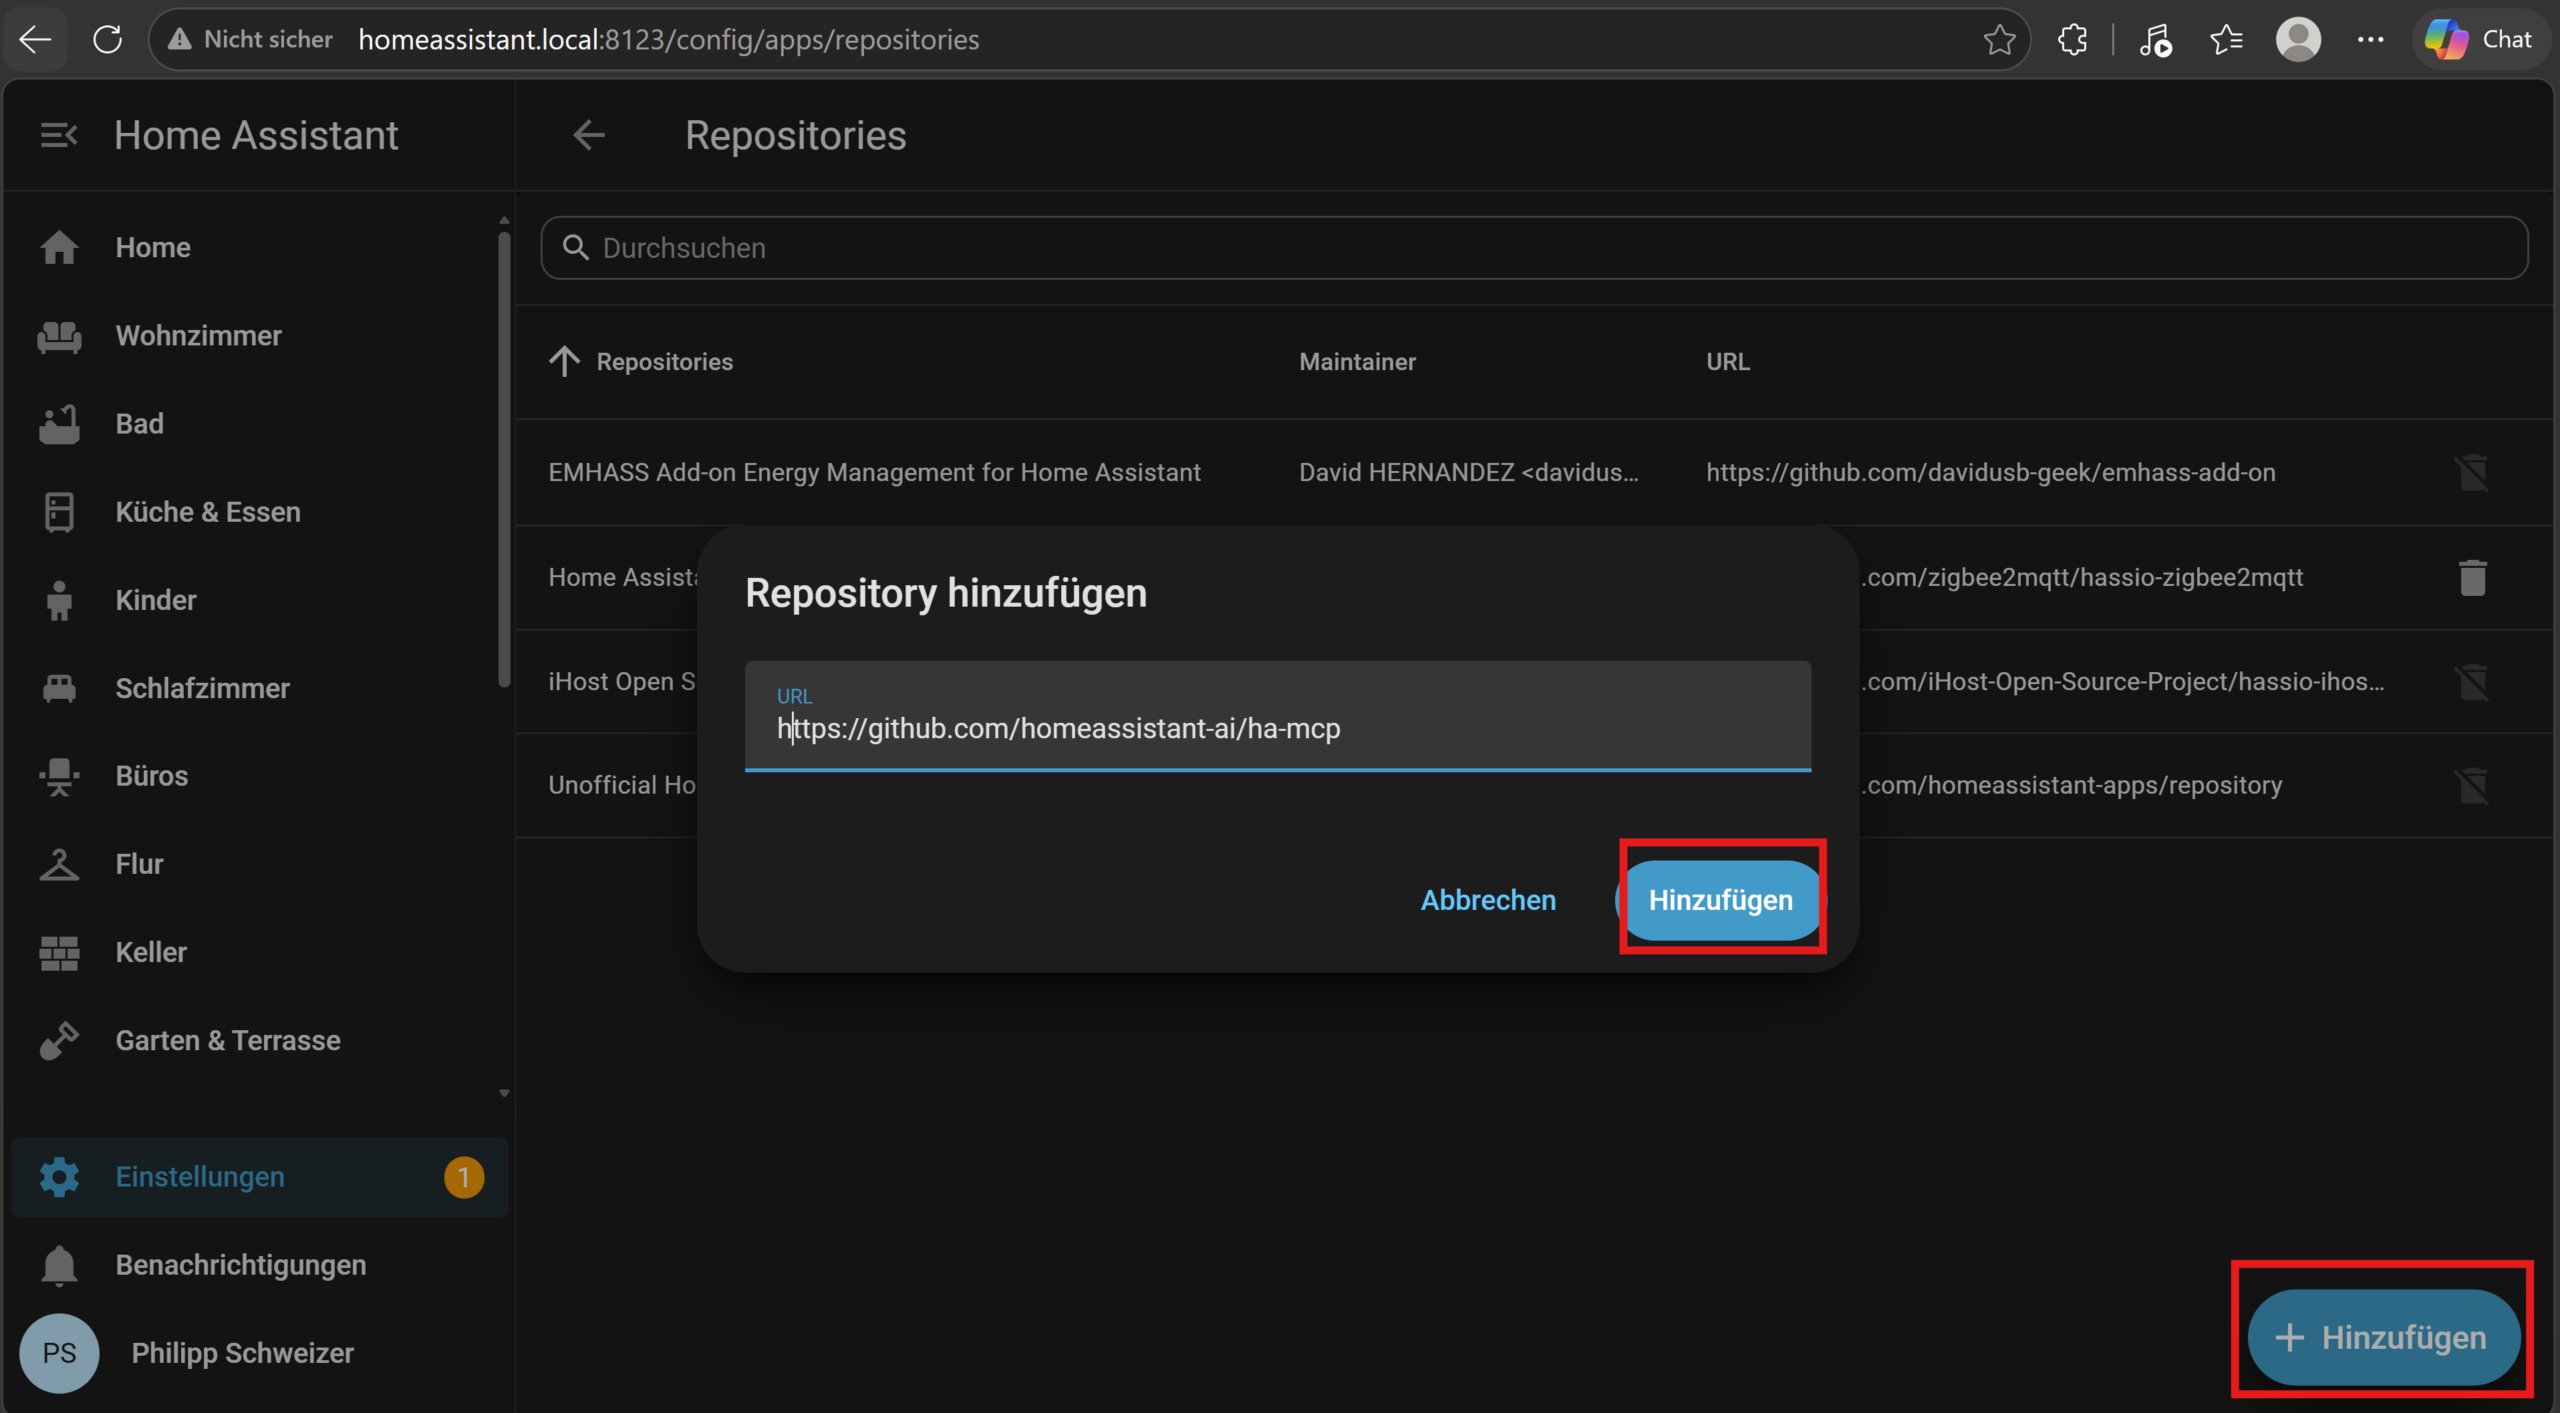
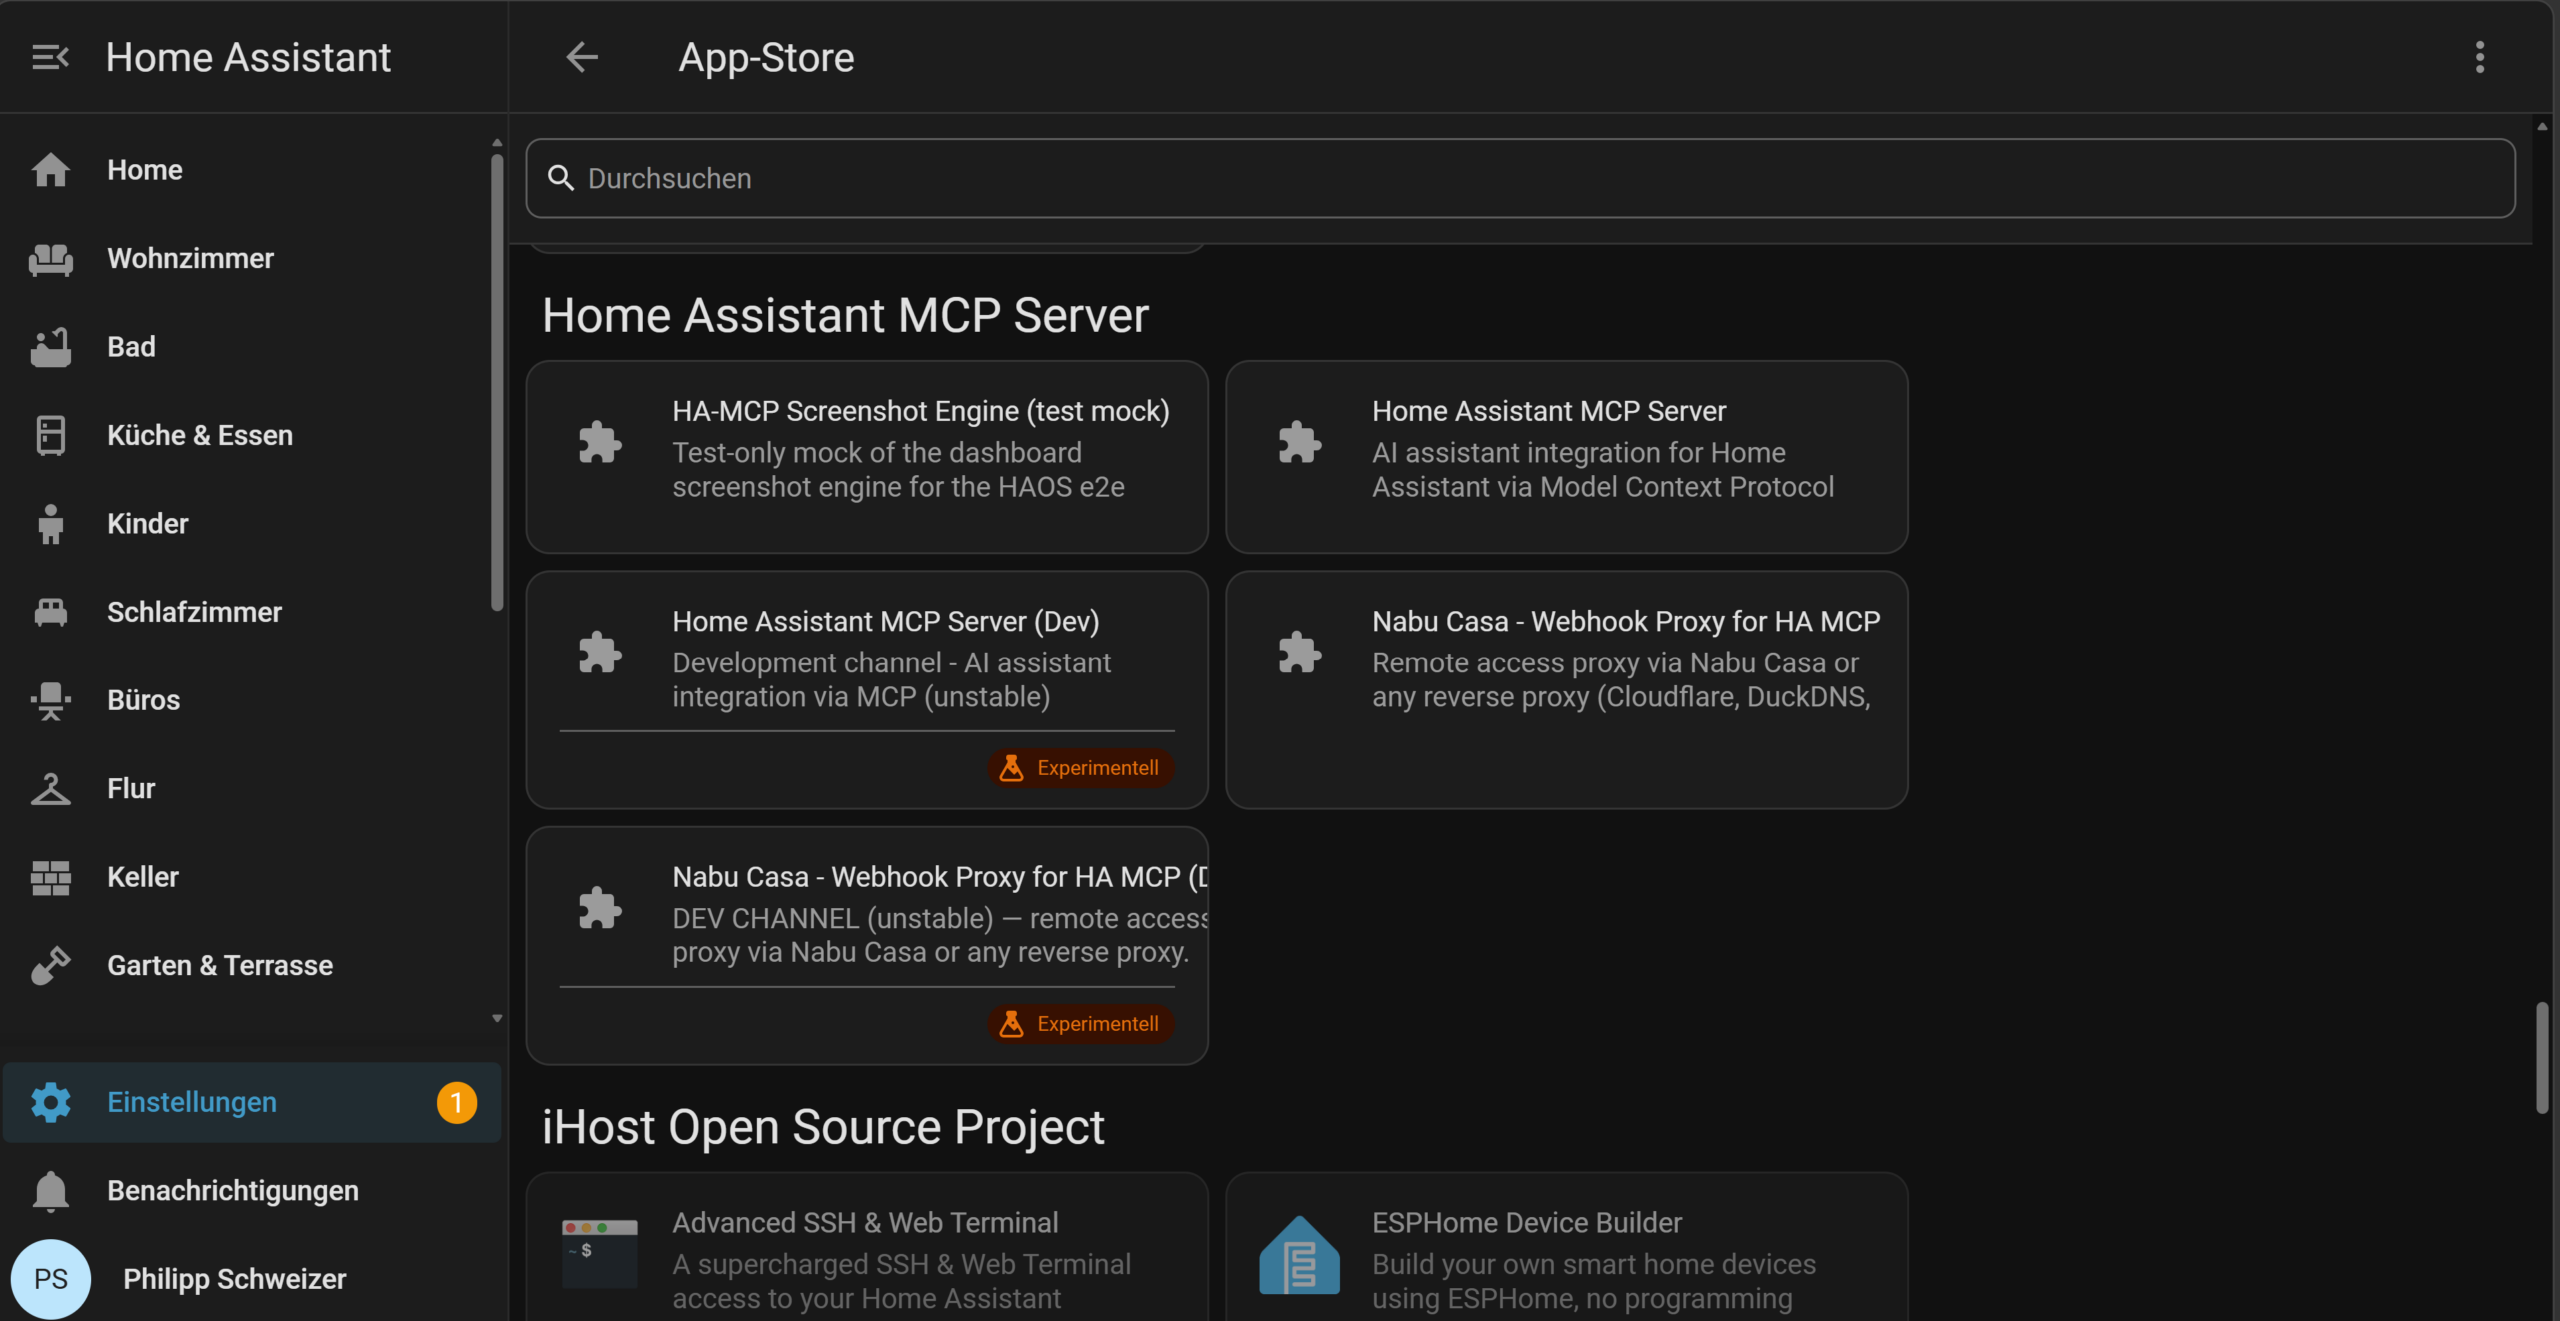
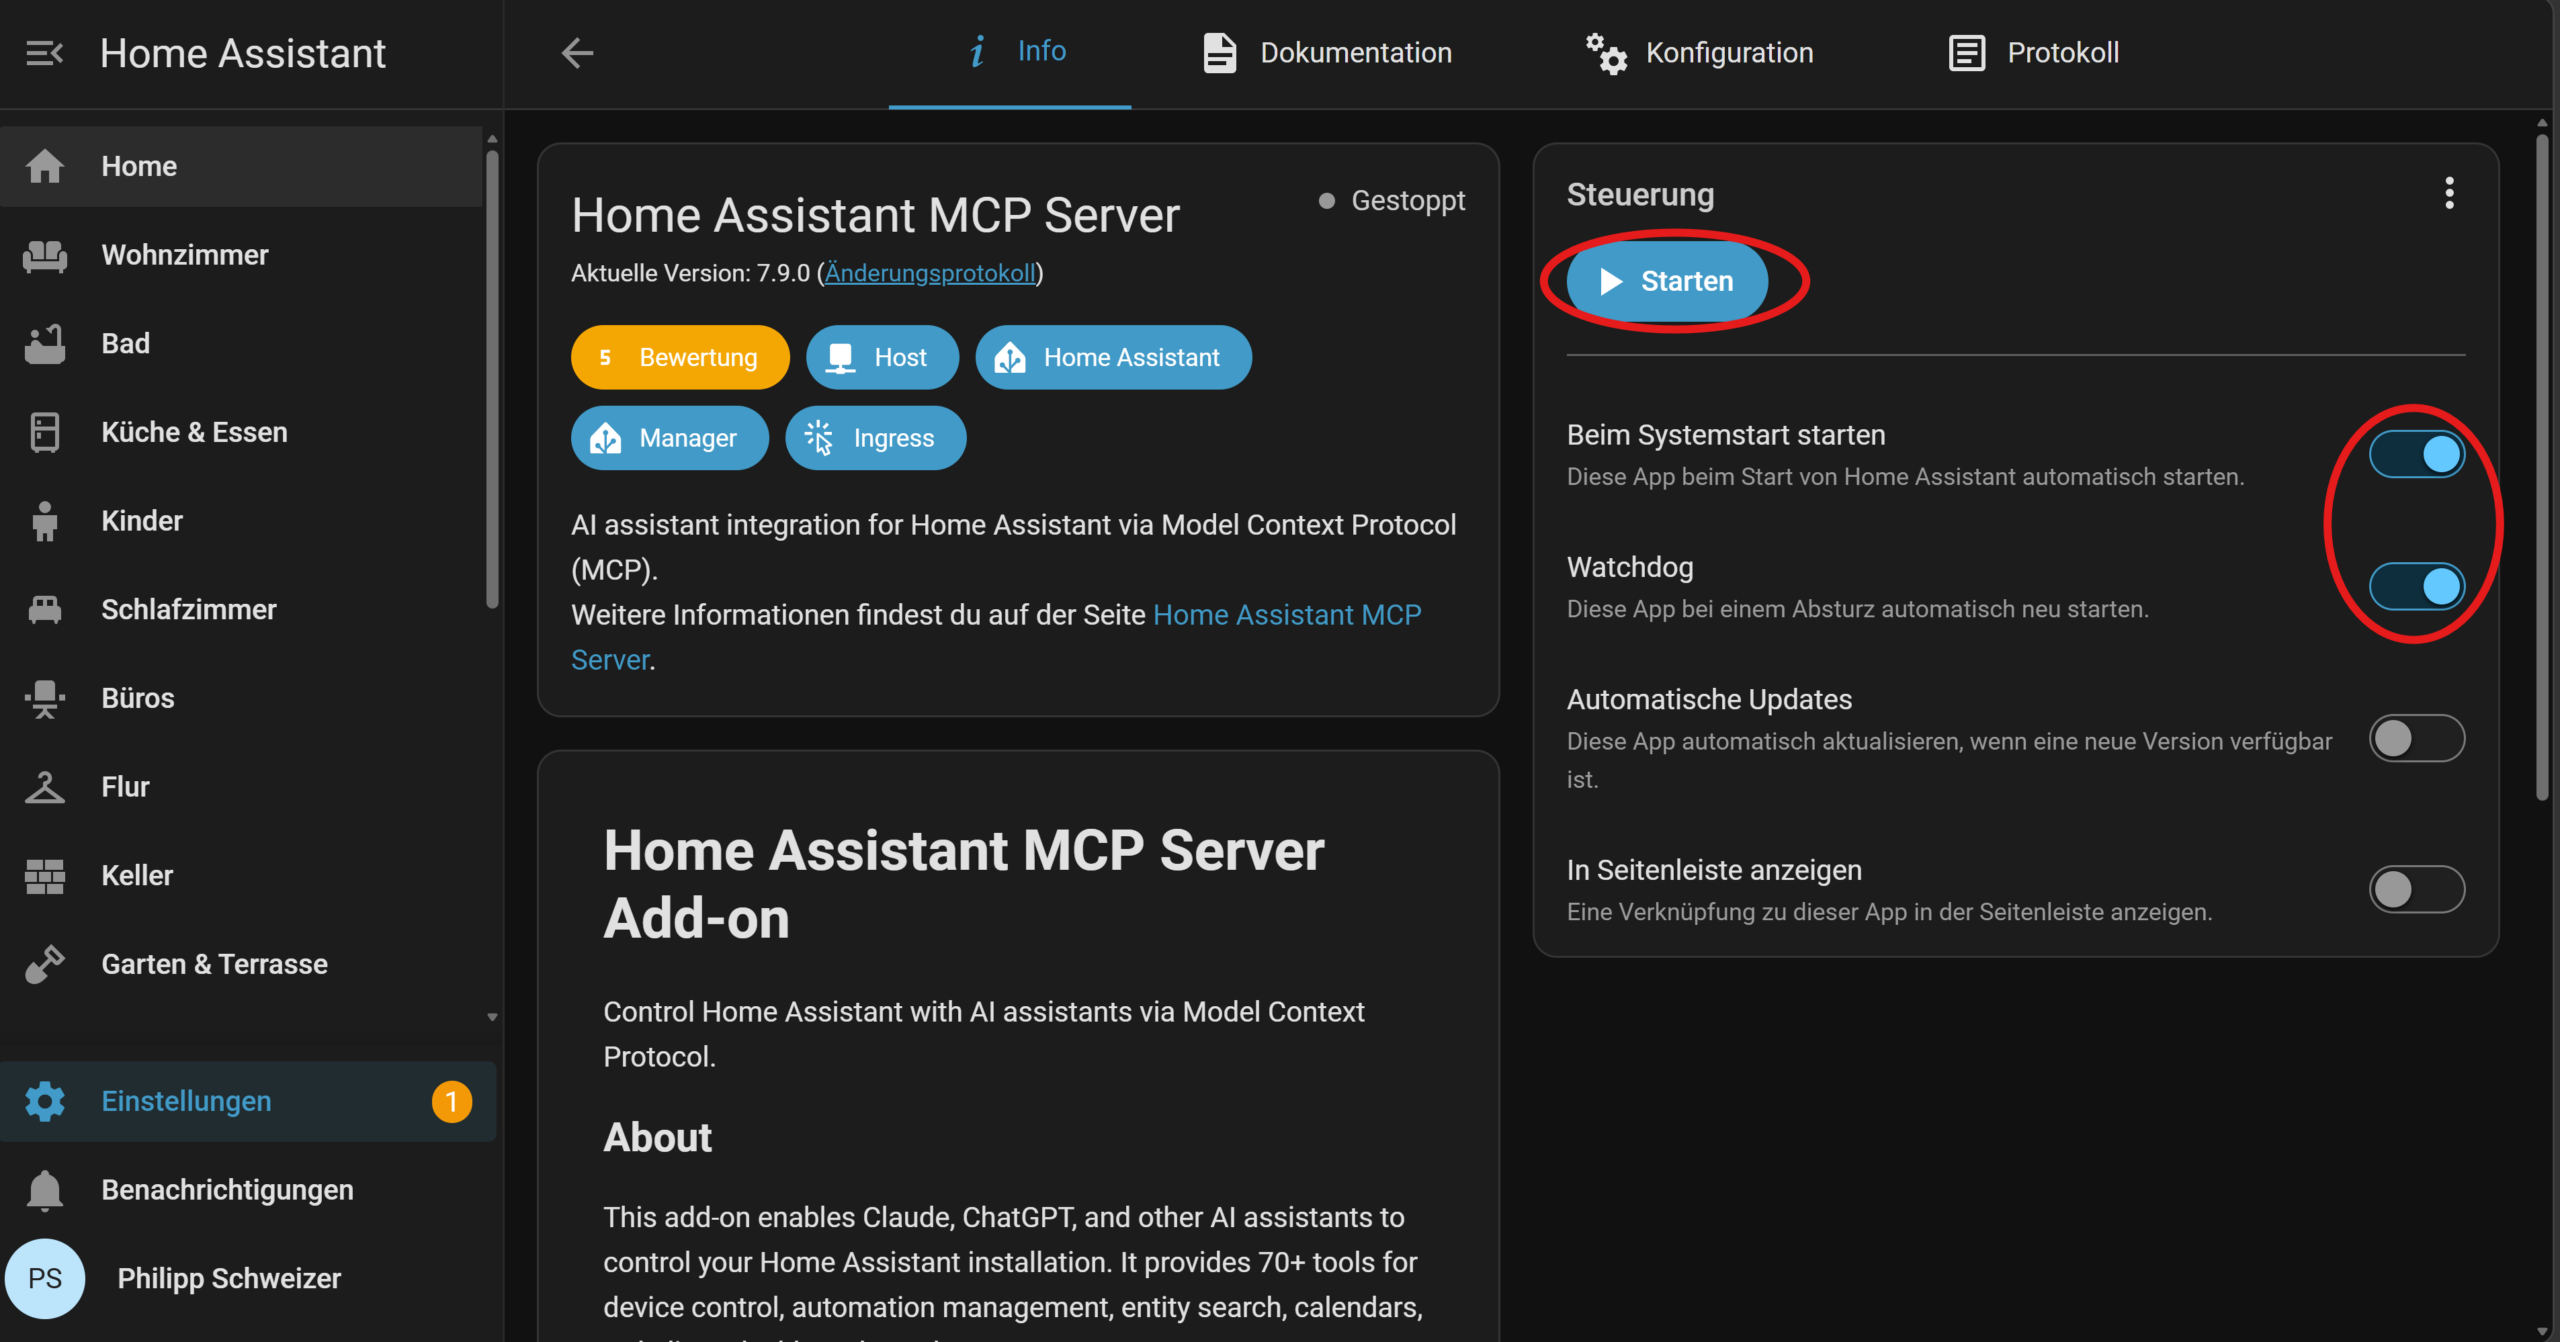
Then open the app’s Logs tab. It shows your ready-to-use MCP server URL, already secured with a 128-bit random path, for example:
🔐 MCP Server URL: http://<ha-ip>:9583/private_zctpwlX7ZkIAr7oqdfLPxw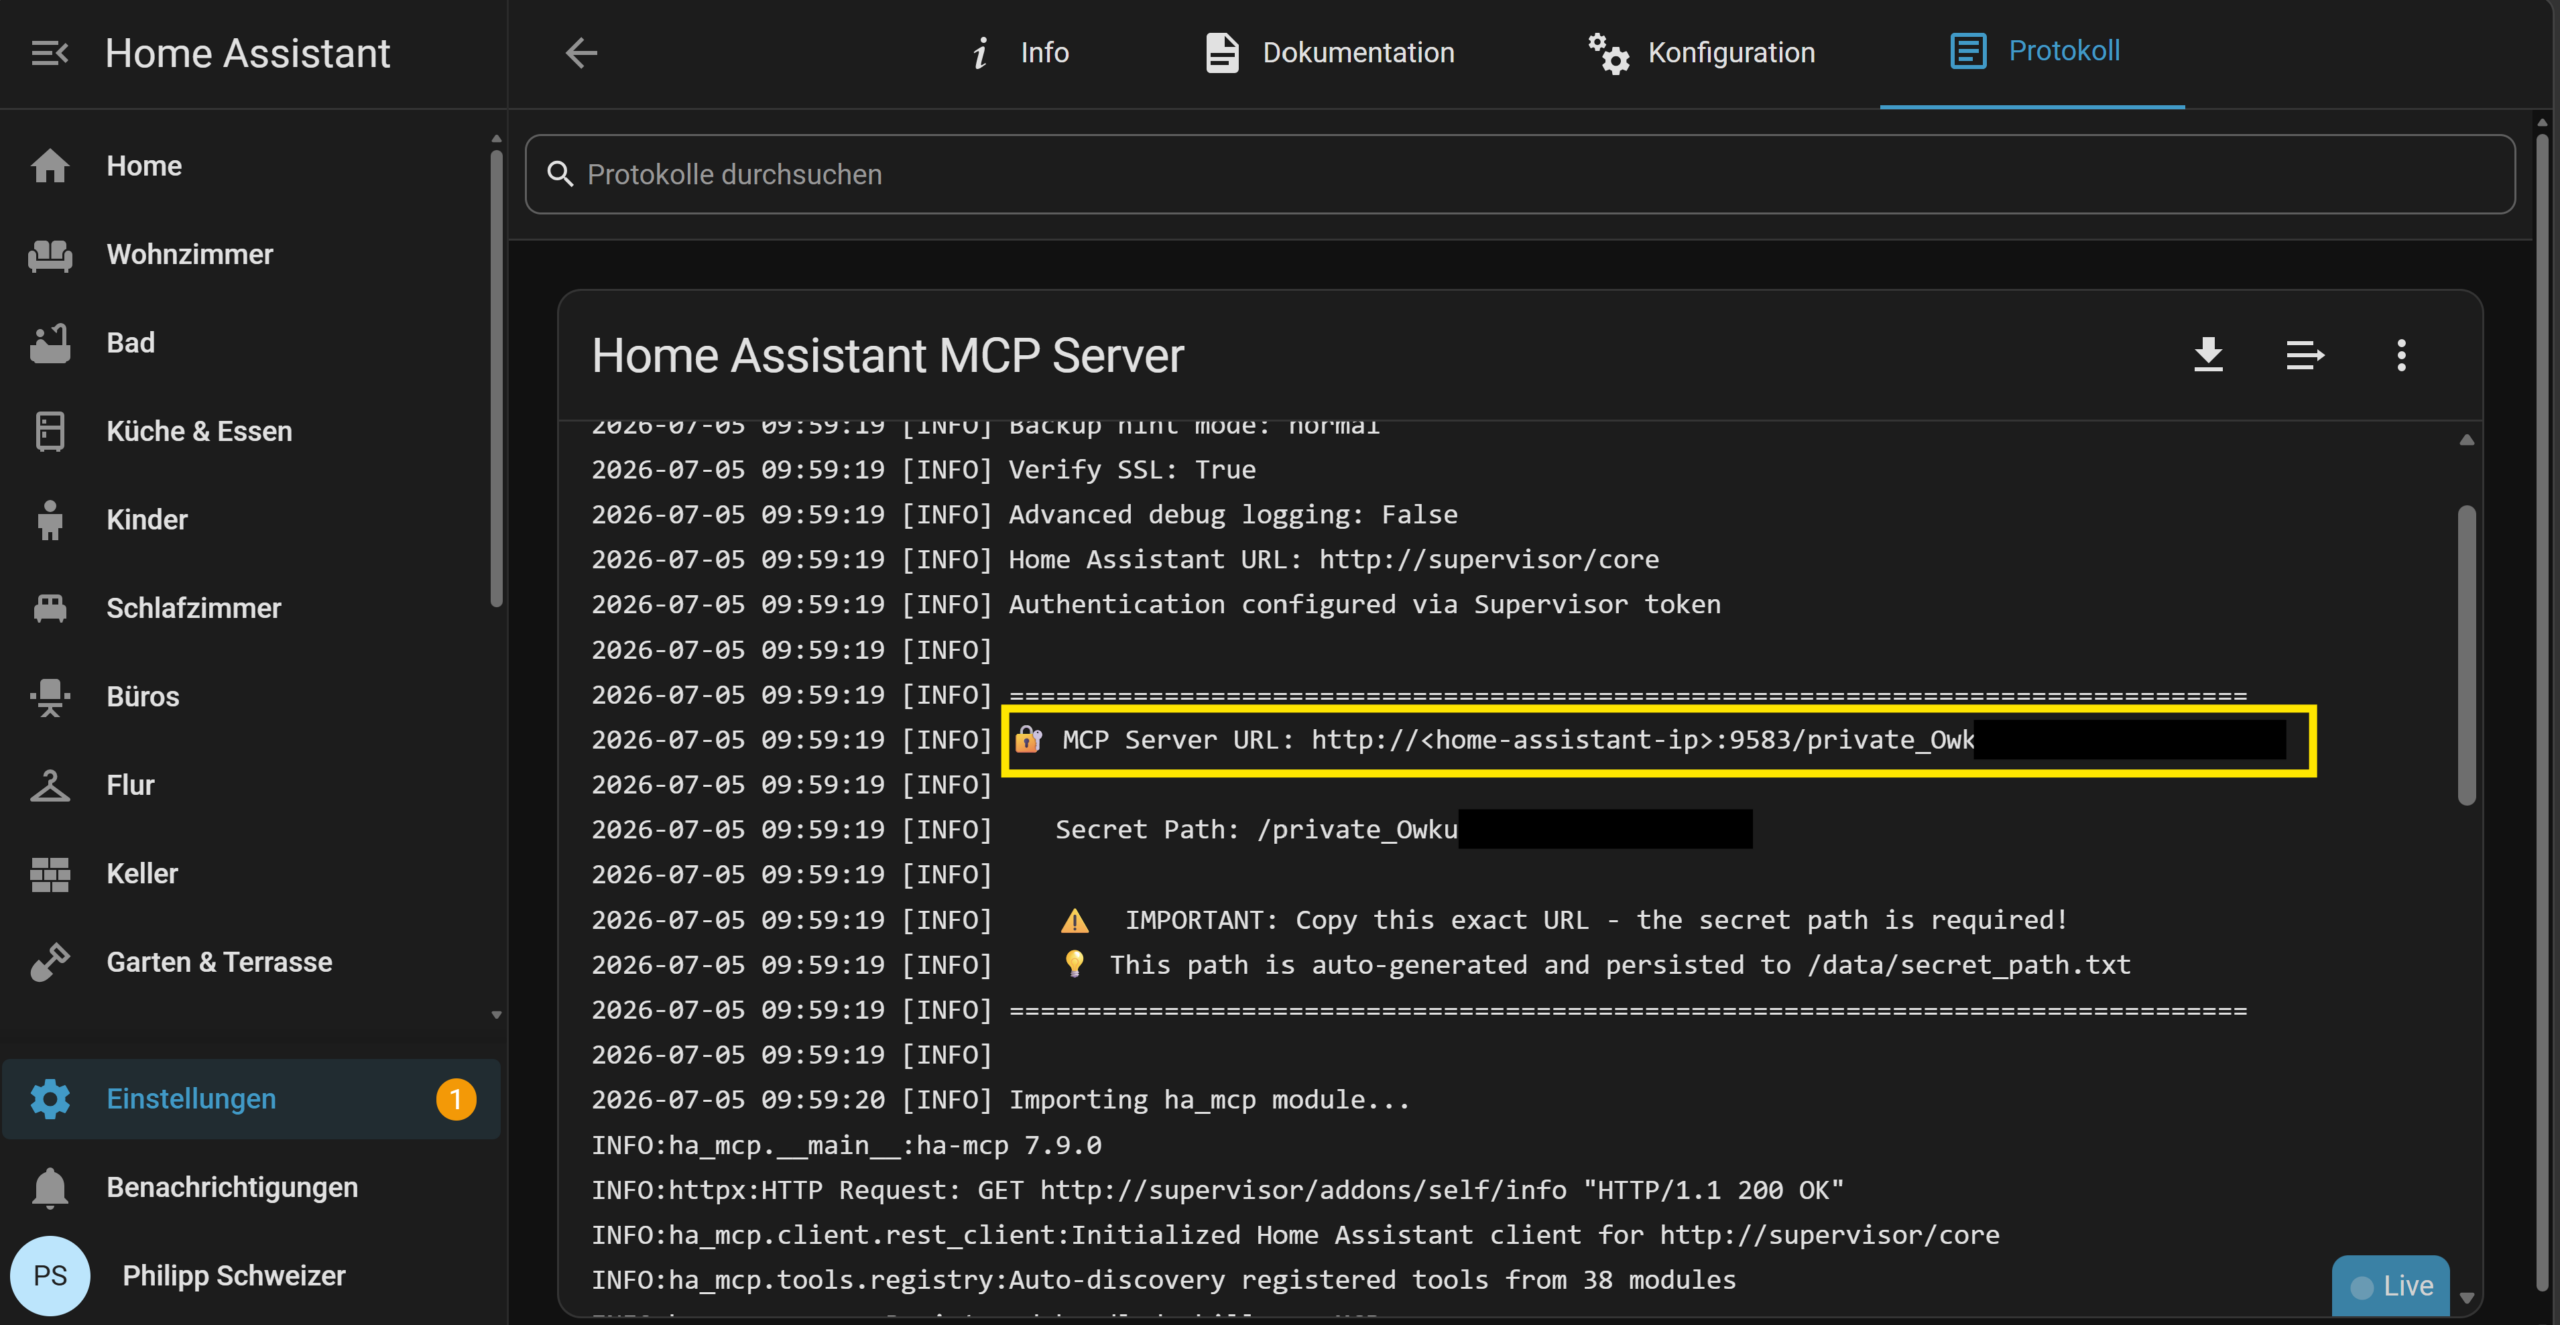
Use this local URL on your home network (for Claude Desktop or Claude Code in step 3); for cloud AIs, step 2 adds a remote URL. You don’t need to create a token or password – the app authenticates through the Home Assistant Supervisor, and the random path in the URL is what keeps others out.
Recommended settings (both routes)
These settings apply to both routes. With the custom component, you’ll find them in the “HA-MCP” panel; with the app, in the config tab or the Tool Settings web UI via “Open Web UI”:
- Tool Search (
enable_tool_search): Off by default. Leave it off on clients with their own tool search (claude.ai, Claude Desktop, Claude Code), or the two searches clash. Turn it on for clients or models without one (such as Claude Haiku, Gemini, or local models), or if your client caps the number of tools (e.g. at 100). - Tool Security Policies (
enable_tool_security_policies): Optionally enable this if you want manual approval in the settings UI for critical actions (locks, alarm systems, writing automations). - Read Only Mode (
read_only_mode): Handy for the first test run or shared installations – switches off every write-capable tool. - Automatic backups (
enable_auto_backup): On by default – leave it that way. ha-mcp then saves a copy of each automation, script, dashboard, or helper before changing it, so you can restore it if needed. - You can disable or pin individual tools in the settings UI if you don’t need them or think they’re too risky.
Together with the official MCP server: ha-mcp plugs its tools into Home Assistant as another LLM API. The custom component does this on its own and then shows up under Settings → System → AI in “Individual URLs” as “HA-MCP Server (tool search)”. The app announces itself as a discovered MCP server that you confirm first. If the official server is enabled, it passes these tools on to your AI too, by default. If you don’t want that, open the “Model Context Protocol” integration, click Configure, turn off “Expose all AI tools”, and pick only the sets of tools you want.
On your home network you can already reach ha-mcp via the local URL (app: port 9583, custom component: port 9584), e.g. with VS Code, Cursor, or other HTTP-capable MCP clients.
Step 2: Set up remote access
For cloud AIs like Claude or ChatGPT to reach your MCP server, you need a publicly reachable, HTTPS-secured URL. With the custom component that’s mostly taken care of; for the app there are two options.
Custom component: the webhook is built in
The custom component registers its own webhook in Home Assistant. It runs over whatever access you already have – Nabu Casa, Cloudflare Tunnel, or your reverse proxy. You don’t need a webhook proxy or a second hostname. You choose what’s allowed during setup under Remote access through Home Assistant:
- Disabled (default): no access through the webhook. The panel and Home Assistant’s own voice assistants still work.
- Secret URL (no sign-in): the webhook address is the only secret, just like with the app.
- Home Assistant sign-in: Claude and ChatGPT find the sign-in on their own and log in with a Home Assistant administrator account, so the URL alone is no longer enough. The project recommends this mode if the server stays online and says to keep the secret URL strictly private.
- Legacy OAuth (Client ID and Secret): for clients that ask you to paste a client ID and secret
Network access controls the direct port 9584: “This machine only (loopback)” closes it, “Local network” opens it to devices on your home network.
You can change both later under Configure, where “Remote access through Home Assistant” becomes two fields: “Remote access via webhook” (on or off) and “Authentication mode” (“Secret webhook URL”, “Sign in with Home Assistant (OAuth)”, or “Legacy OAuth”). According to the docs, the component works out your external address on its own. If you use your own domain without Nabu Casa, enter it there under External URL (optional), without a port like :8123.
Your remote URL for Claude, ChatGPT, and the others is the webhook address from step 1 with your external address in place of the local one. Once Nabu Casa is active or an external URL is set, Configure lists it as the first connect URL:
https://<your-external-address>/api/webhook/mcp_1a2b3c4d5e6f7a8b9c0d1e2f3a4b5c6dApp, option A: Webhook Proxy app (if you already use Nabu Casa or a reverse proxy)
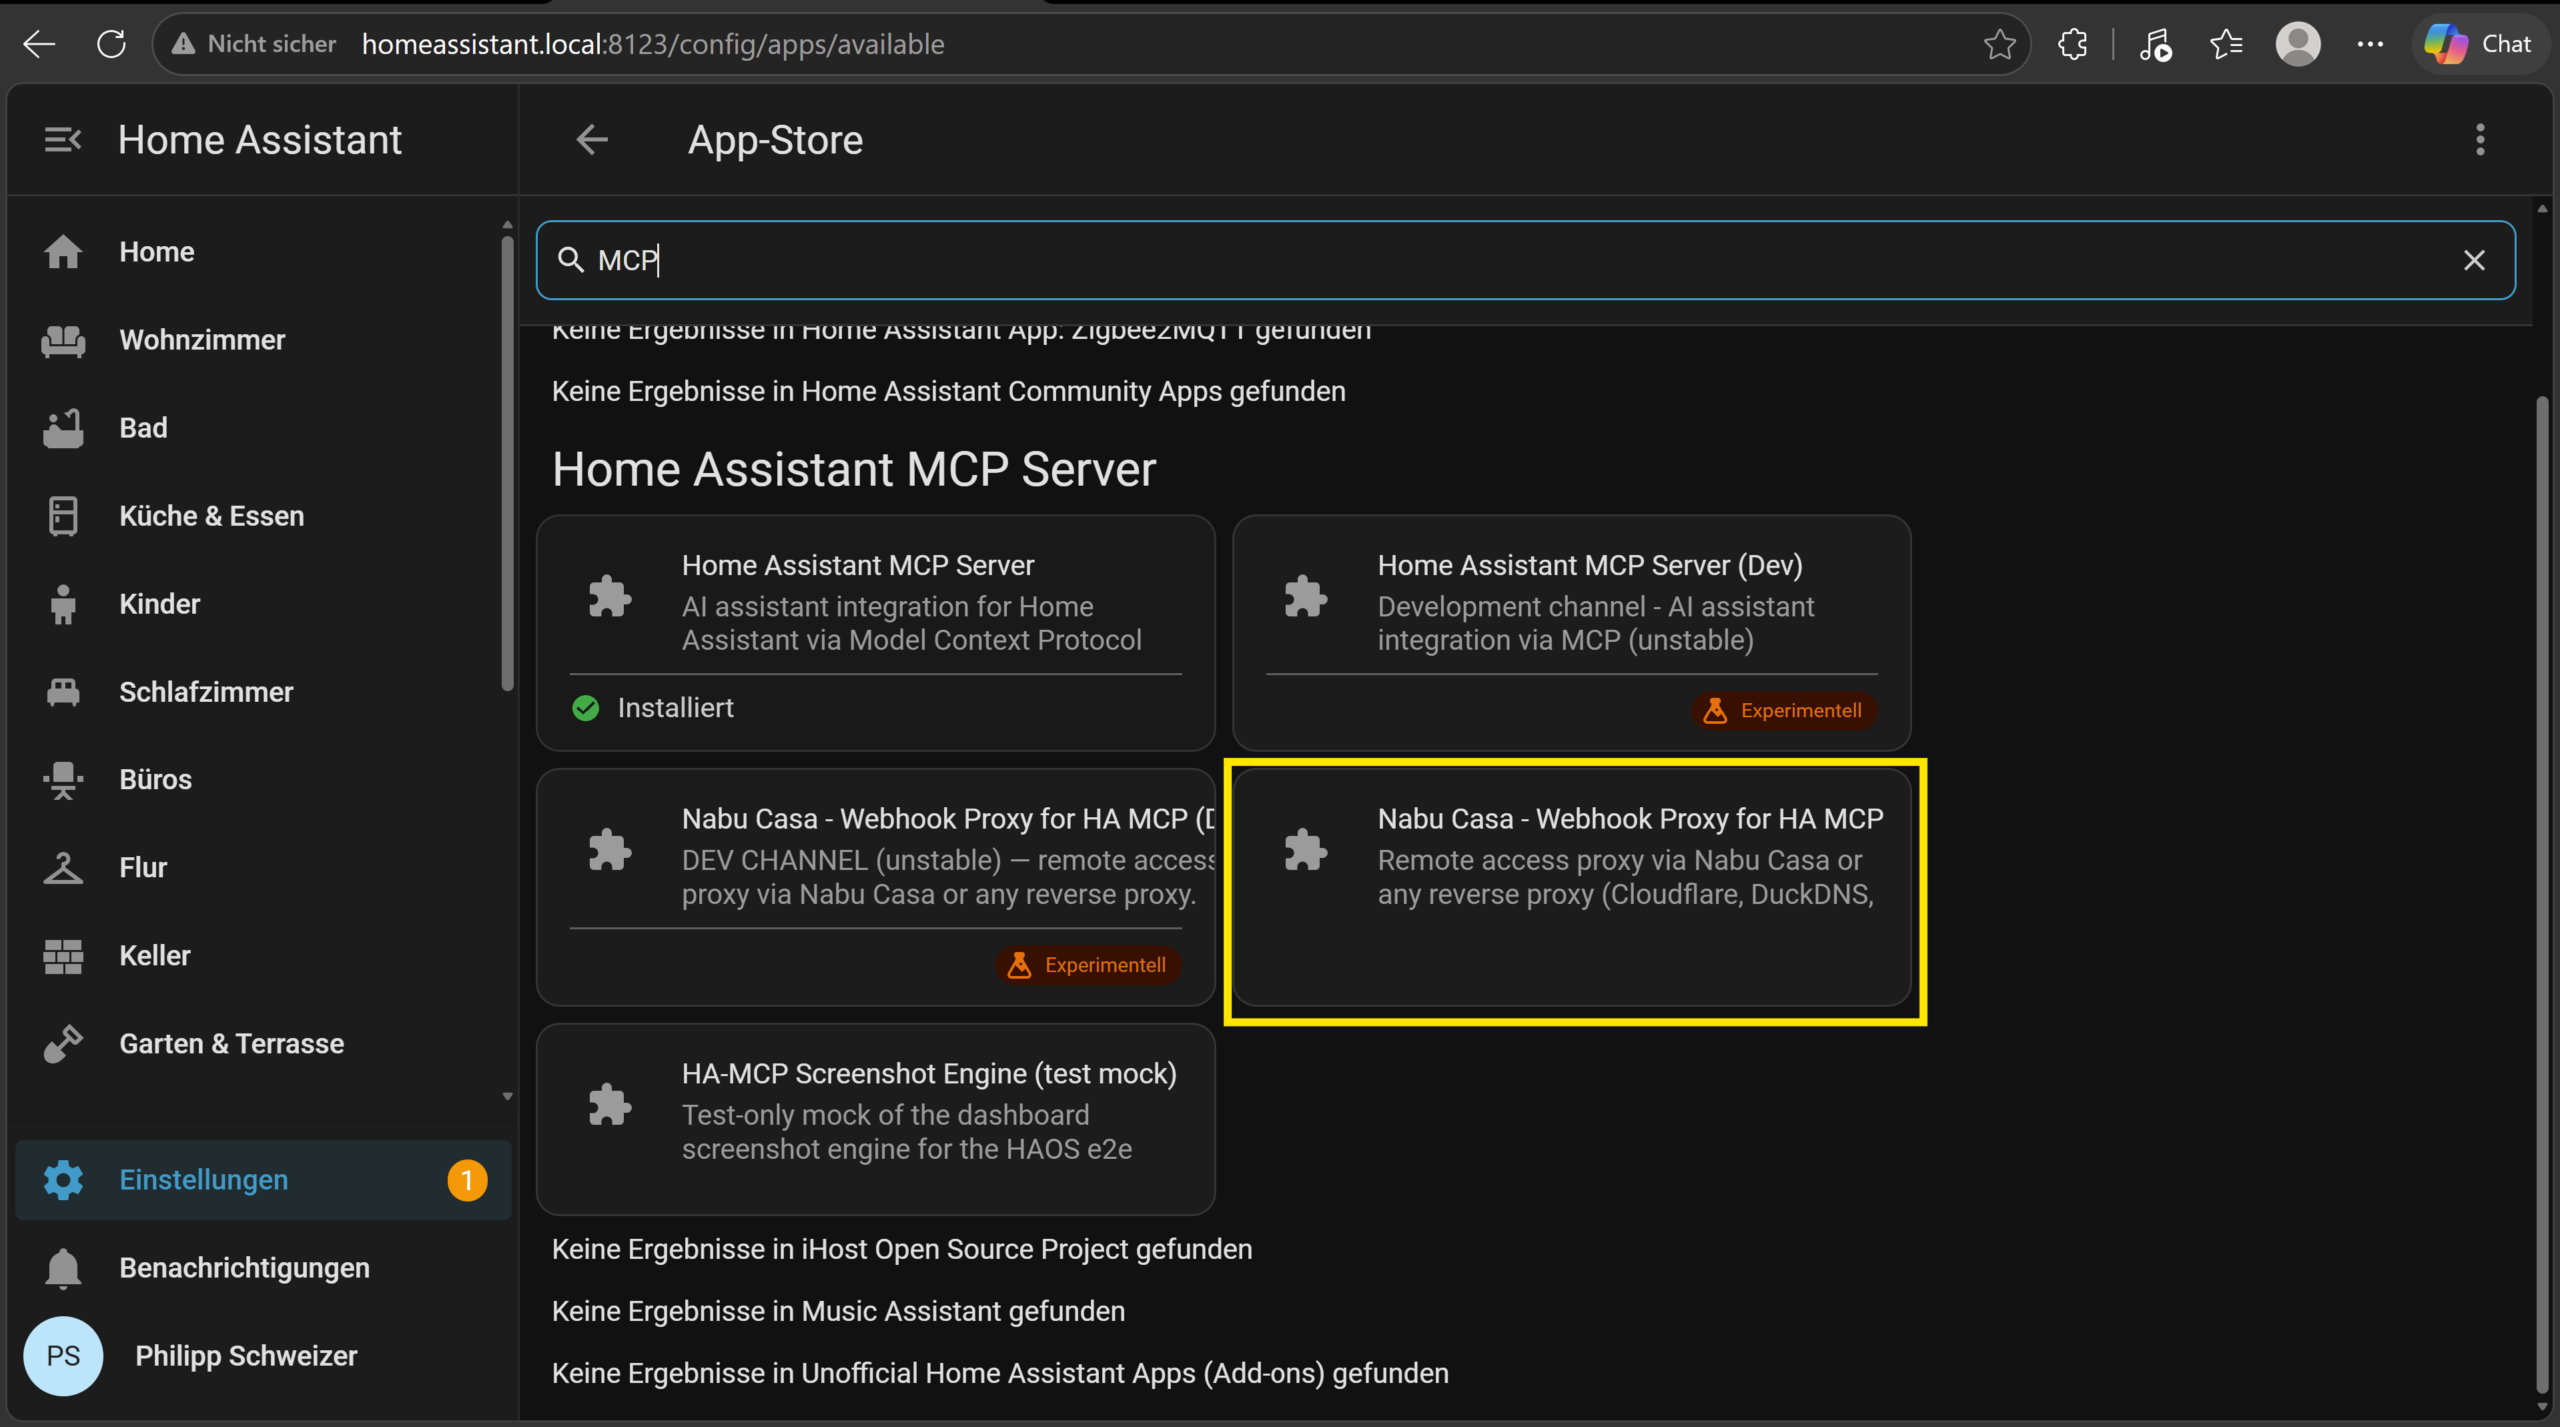
The “Webhook Proxy for HA MCP” app (same repository) routes MCP traffic through your existing Home Assistant access – Nabu Casa, Cloudflare Tunnel, DuckDNS, or any other reverse proxy that already points at your Home Assistant instance. You don’t need an additional hostname or a second tunnel for this:
- The MCP Server app from step 1 must already be running
- Install and start “Webhook Proxy for HA MCP” (listed with “Nabu Casa” in its name) from the same App Store
- If you don’t use Nabu Casa (e.g. with your own Cloudflare Tunnel), enter your public Home Assistant URL in the Webhook Proxy app’s settings – with Nabu Casa, the app detects it automatically
- Restart Home Assistant (do a full restart in the settings, top right)
- Copy the finished remote URL from the Webhook Proxy app’s Logs tab, e.g.:
MCP Server URL (remote): https://<your-external-url>/api/webhook/mcp_7eacf143b0f5d31269417ae3304ee534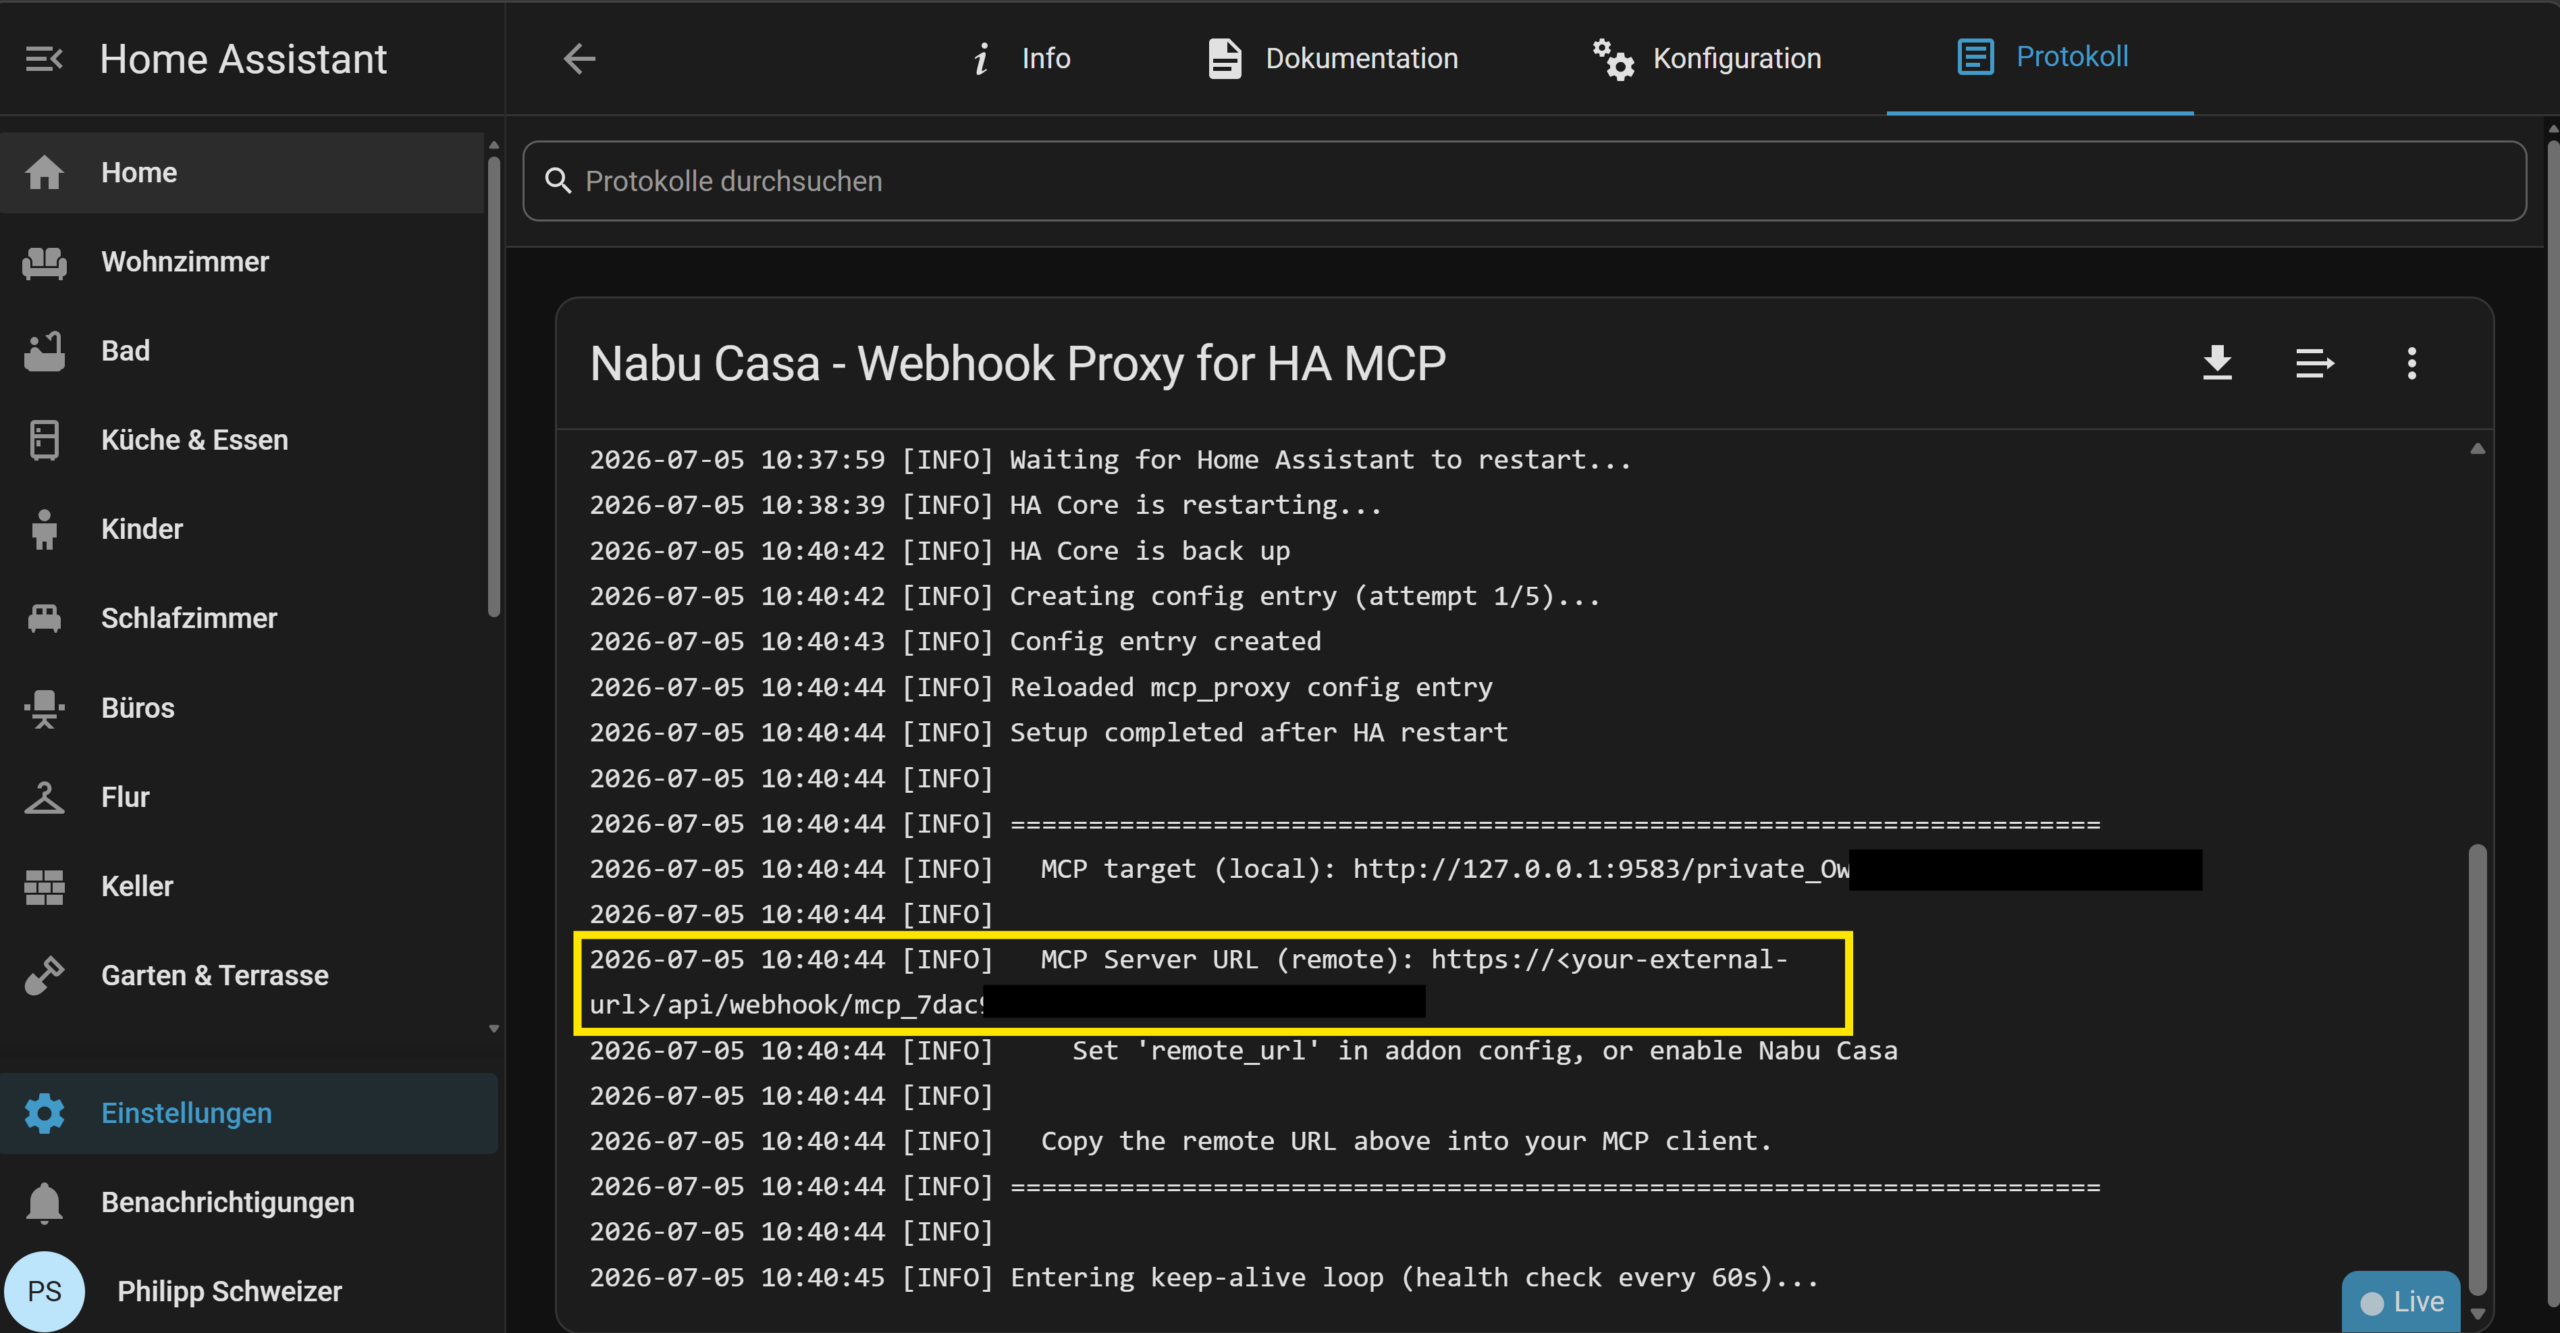
The app finds your MCP Server app automatically. The webhook path (/api/webhook/mcp_...) stays stable across restarts, because the ID is stored locally.
App, option B: your own Cloudflared tunnel (if you don’t have remote access yet)
Alternatively, use a dedicated tunnel just for the MCP server, as described in my Cloudflare Tunnel article (Part A). This is only for the app – the custom component doesn’t need it. Add this to the Cloudflared app configuration:
additional_hosts:
  - hostname: ha-mcp.yourdomain.com
    service: http://localhost:9583
If localhost doesn’t work from inside the Cloudflared container (its own Docker container), use the MCP Server app’s container hostname instead, which you’ll find on its Info page (e.g. b37de126-ha-mcp). Then restart the Cloudflared app. Your remote URL for step 3 is the new hostname plus the random path from your local URL.
Cloudflare pitfalls (custom component and app)
⚠️ Watch out for Cloudflare’s AI blocking: Cloudflare can block AI traffic even when browser access to the same URL works fine. Open Security → Settings, filter by Bot traffic, and select AI Crawler and Agent access policies. Don’t set Agents to Block. Cloudflare uses that category for traffic that acts on a person’s behalf in real time, which is exactly what your AI’s requests to the MCP server are. New domains default to “Allow (do not block)”.
Blocking countries? If you’ve blocked countries in Cloudflare, for example with the rule from the Cloudflare Tunnel article that only lets in visitors from a few countries, that rule can also lock out Claude and ChatGPT: their requests come from the providers’ servers, not from your home network, and those IP addresses aren’t necessarily in the countries you allow. Add a skip rule for Anthropic’s outbound IP ranges in position 1 of your own WAF rules, so it bypasses all your other custom rules:
(ip.src in {160.79.104.0/21 153.61.208.0/20}) and http.host eq "homeassistant.your-domain.com"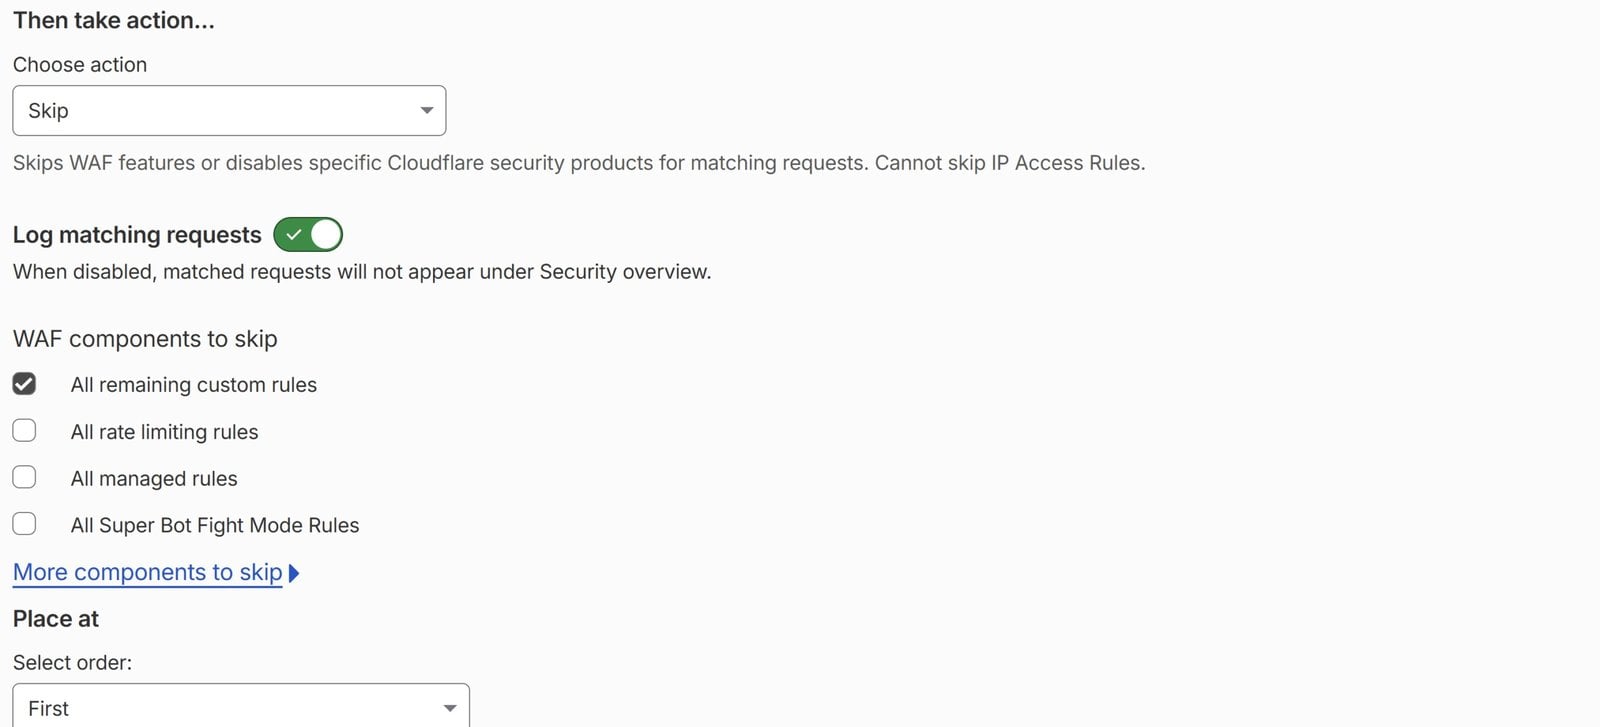
If you run the app with its own MCP hostname (option B), you can scope the country rule to your main hostname instead. With the custom component and option A, everything runs over the same hostname, so the skip rule is the only fix. OpenAI does publish an IP list for ChatGPT, but the ranges change all the time. If ChatGPT needs to get through without you constantly updating that list, exempt the /api/webhook/ path from the country rule. The random path in the URL is then your only protection.
Client certificate (mTLS)? If Home Assistant sits behind Cloudflare Access with a client certificate, no cloud AI gets through – the “Security” section further down explains why. When access runs through the webhook (custom component or option A), exempt just that path from the mTLS requirement. If you copied the WAF rule from the Cloudflare Tunnel article, extend it with this exception:
(http.host eq "homeassistant.your-domain.com" and not cf.tls_client_auth.cert_verified and not starts_with(http.request.uri.path, "/api/webhook/"))The /api/webhook/ path stays protected anyway, because the webhook carries its own random ID in the path – that ID is the authentication for this one endpoint. With a dedicated MCP hostname (option B), exempt that hostname from mTLS instead.
Step 3: Connect the MCP server to your AI
Here’s how Claude, ChatGPT, and Gemini compare:
| AI | Minimum plan | Can build automations? | Where to set it up | Desktop and mobile |
|---|---|---|---|---|
| Claude | Free (1 connector), otherwise Pro/Max | Yes | claude.ai (web), Custom Connector | Syncs automatically to the desktop app and iOS/Android |
| ChatGPT | Business/Enterprise, read-only on Pro (as of Oct 2026) | Business/Enterprise only | chatgpt.com → Plugins → Add custom MCP server | Per OpenAI, available on ChatGPT web only |
| Gemini | Free (Antigravity CLI) | Yes, via the CLI | Antigravity CLI, agy mcp add | Web app “custom apps” in the US only |
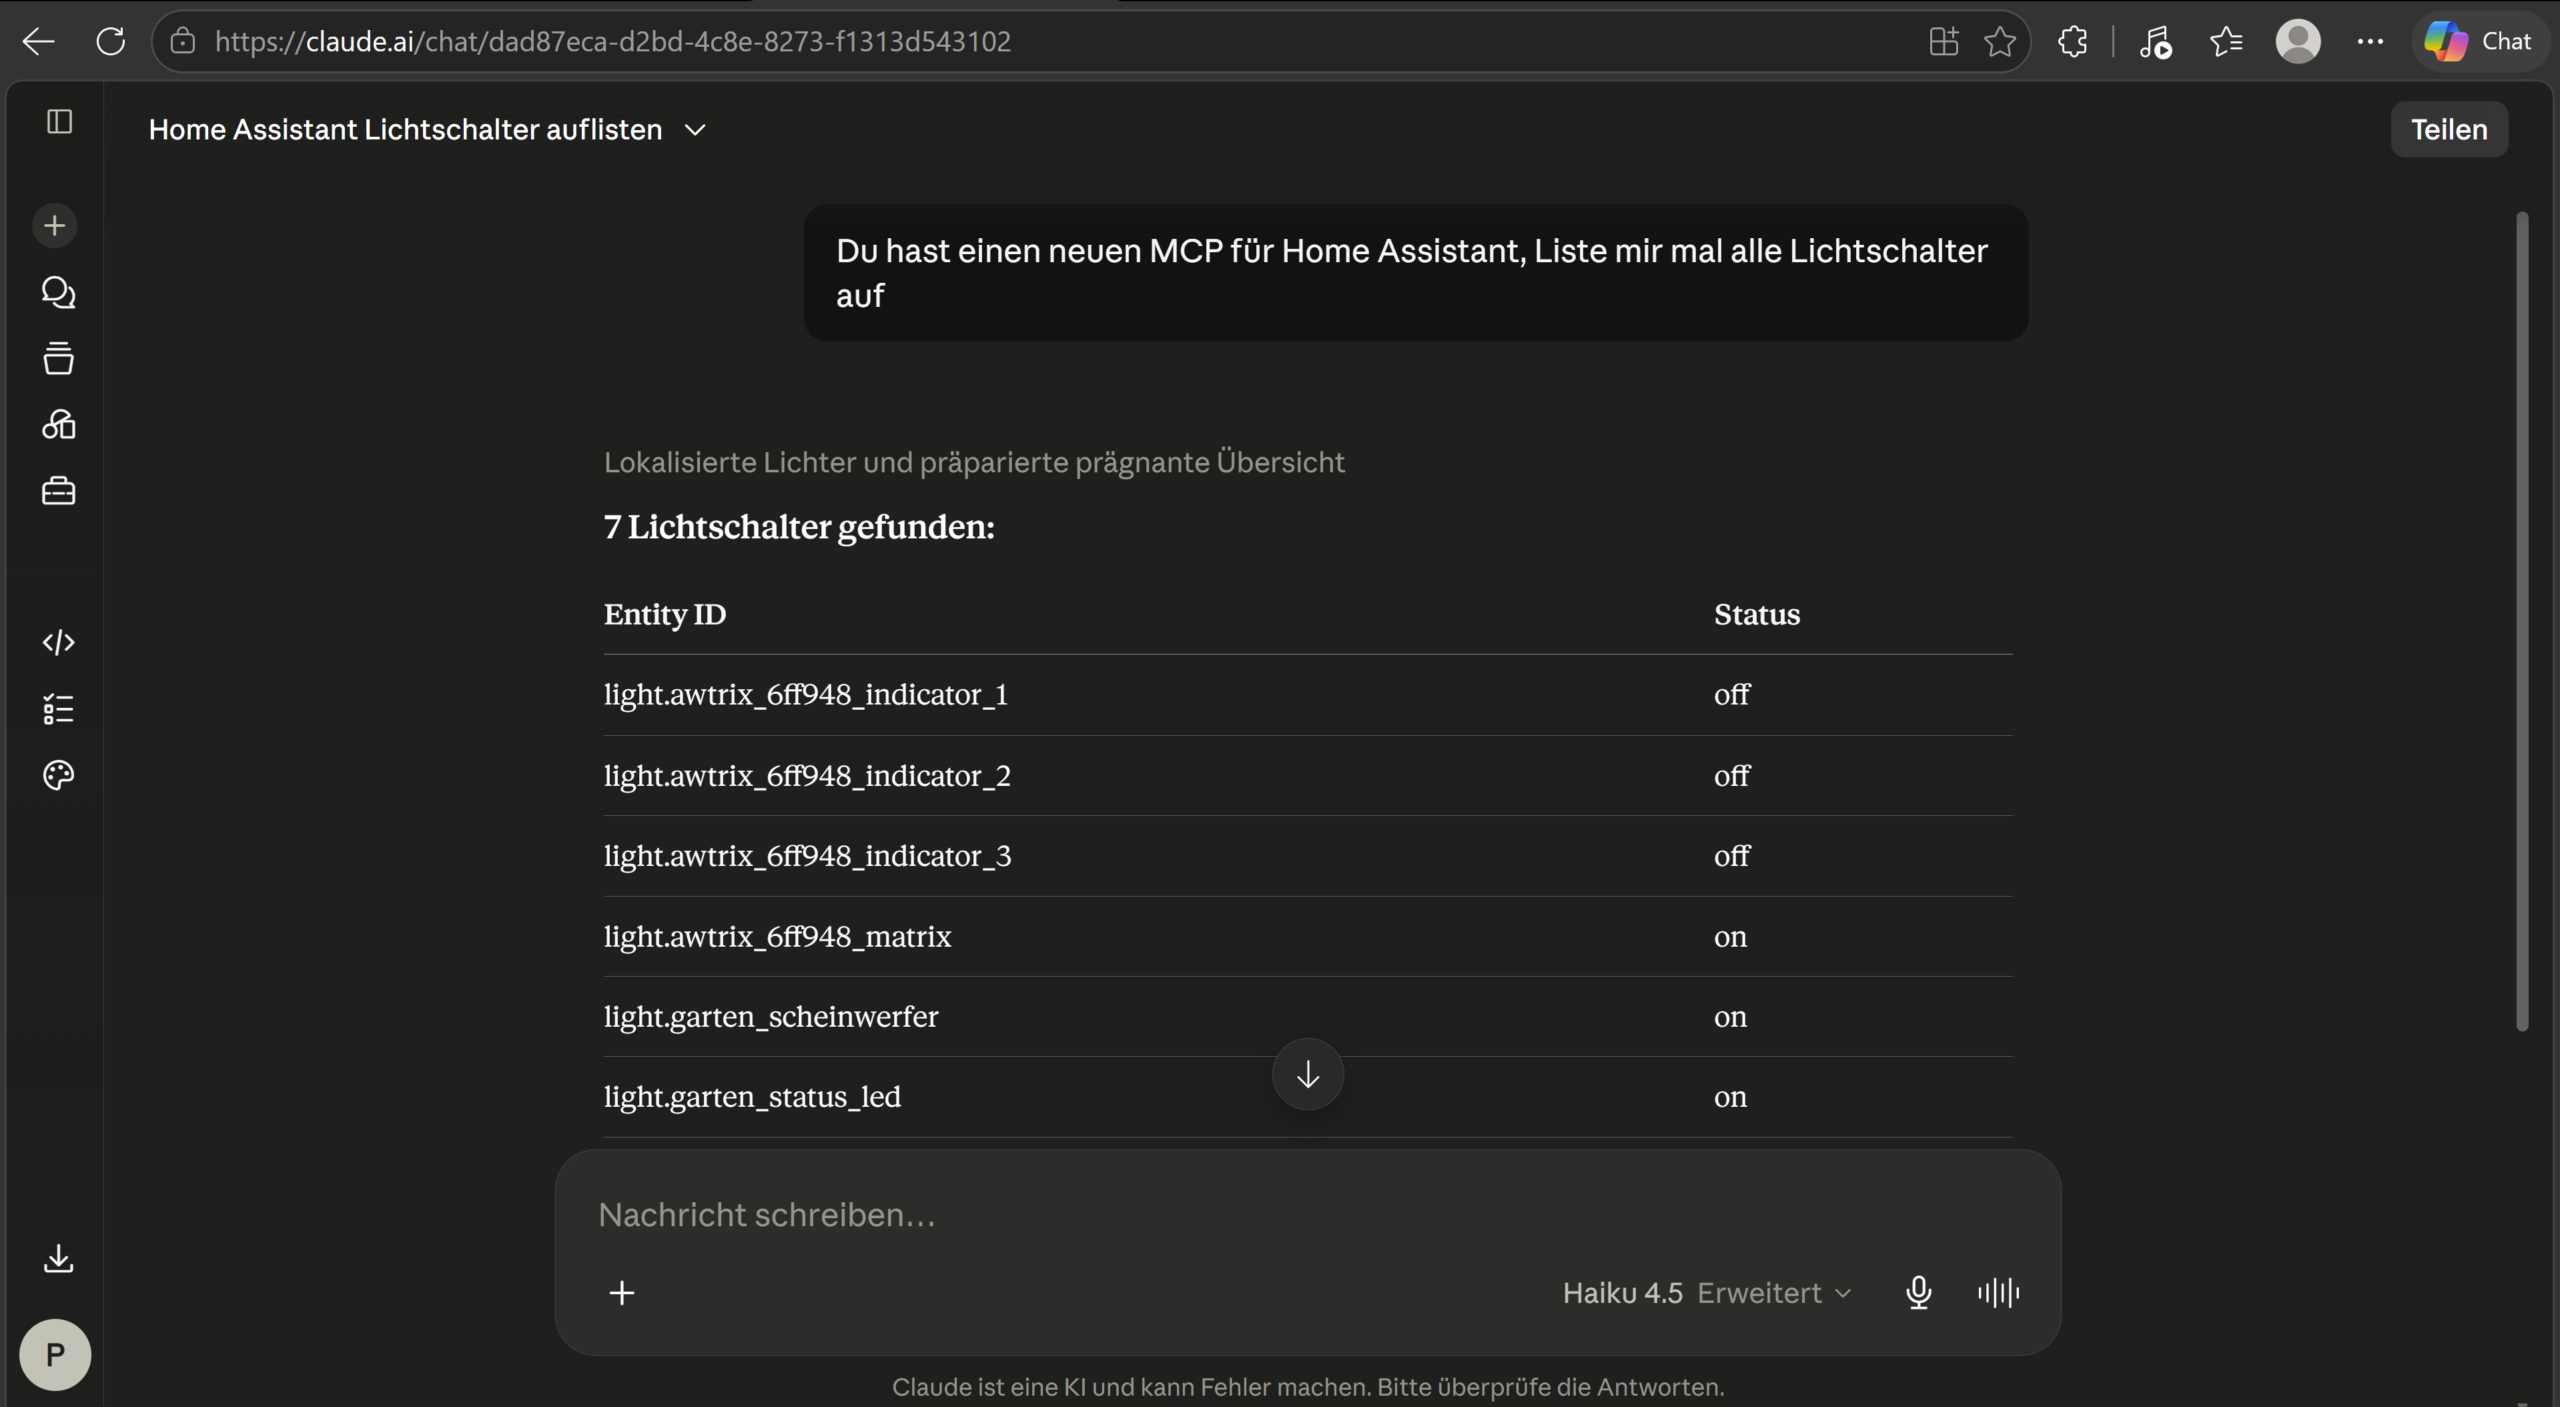
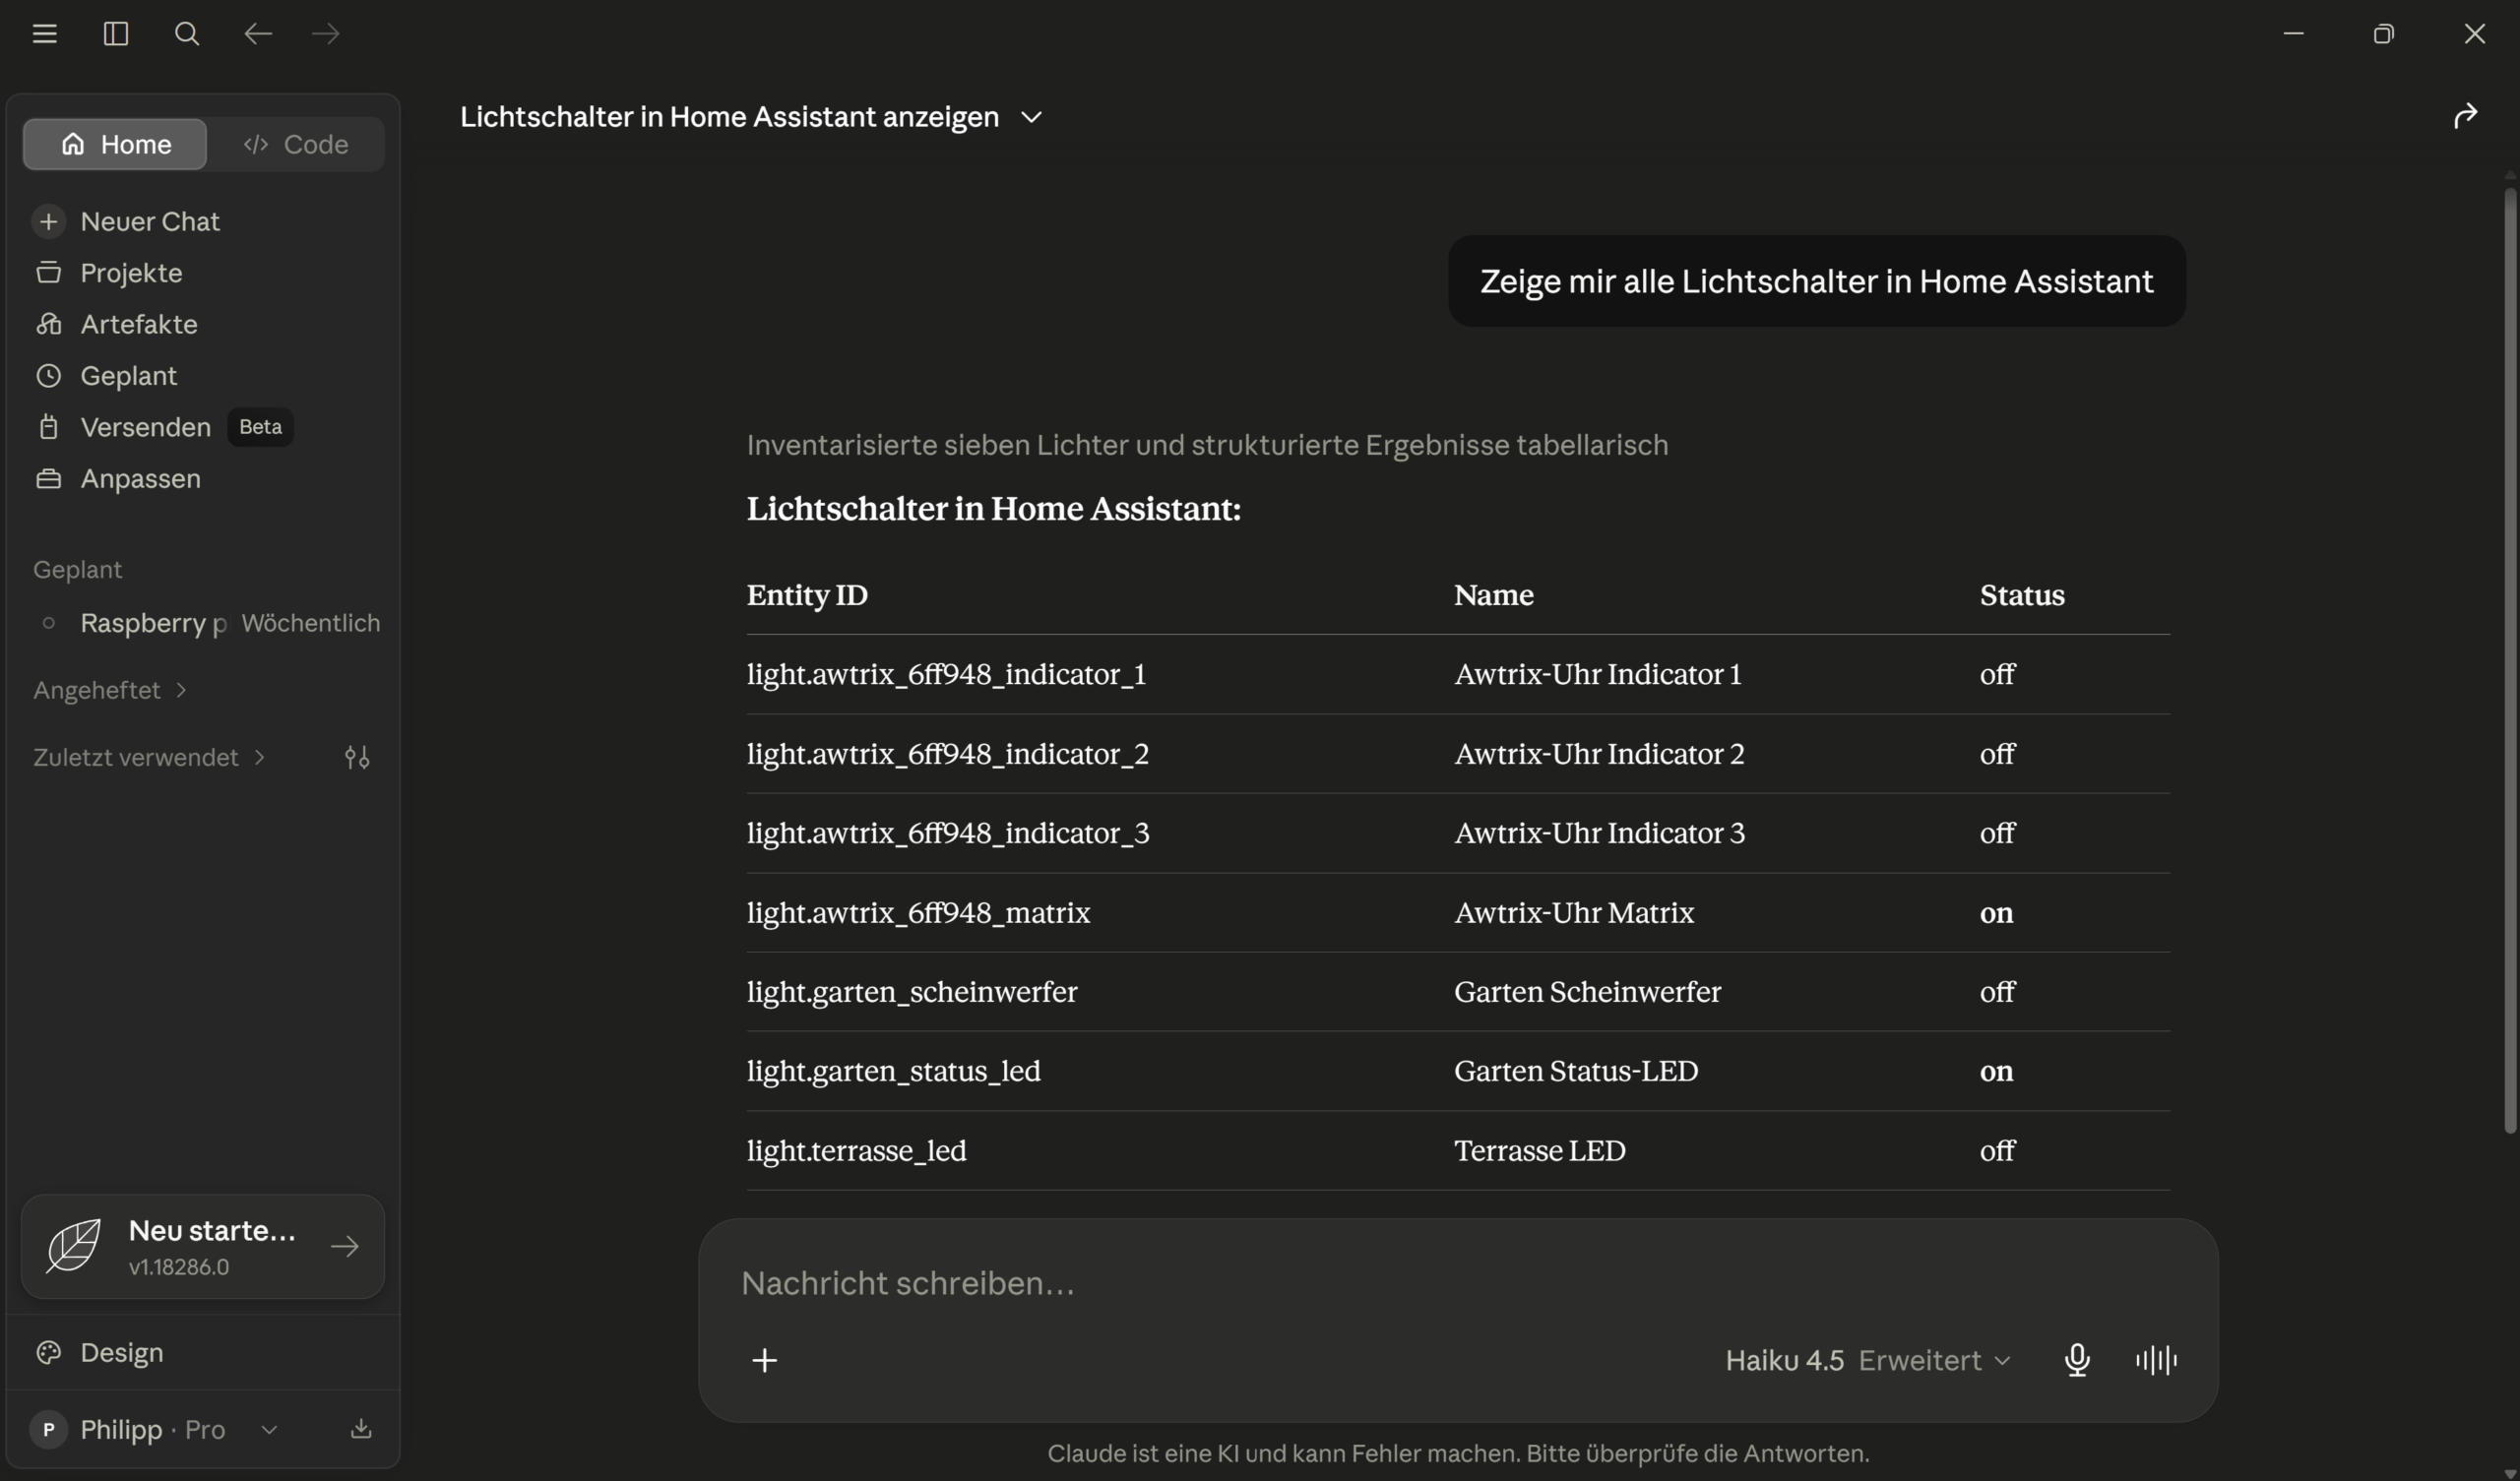
You don’t need to give the AI instructions of your own: ha-mcp includes best practices in its ha_get_skill_guide tool, and the AI calls it when needed, for example to set up helpers, utility meters, or template sensors correctly. To check that everything works, give it a read-only task such as “Which lights are on right now?” – the AI calls ha-mcp’s tools and lists your lights.
Connecting Claude (web, desktop, smartphone)
Option 1 – Web connector (recommended): once you set it up on claude.ai, it also shows up automatically in Claude Desktop and in the iOS and Android apps.
- Log in at claude.ai, go to Customize → Connectors (the Connectors page)
- Add a custom connector using the plus icon (+), and name it, e.g., “Home Assistant”
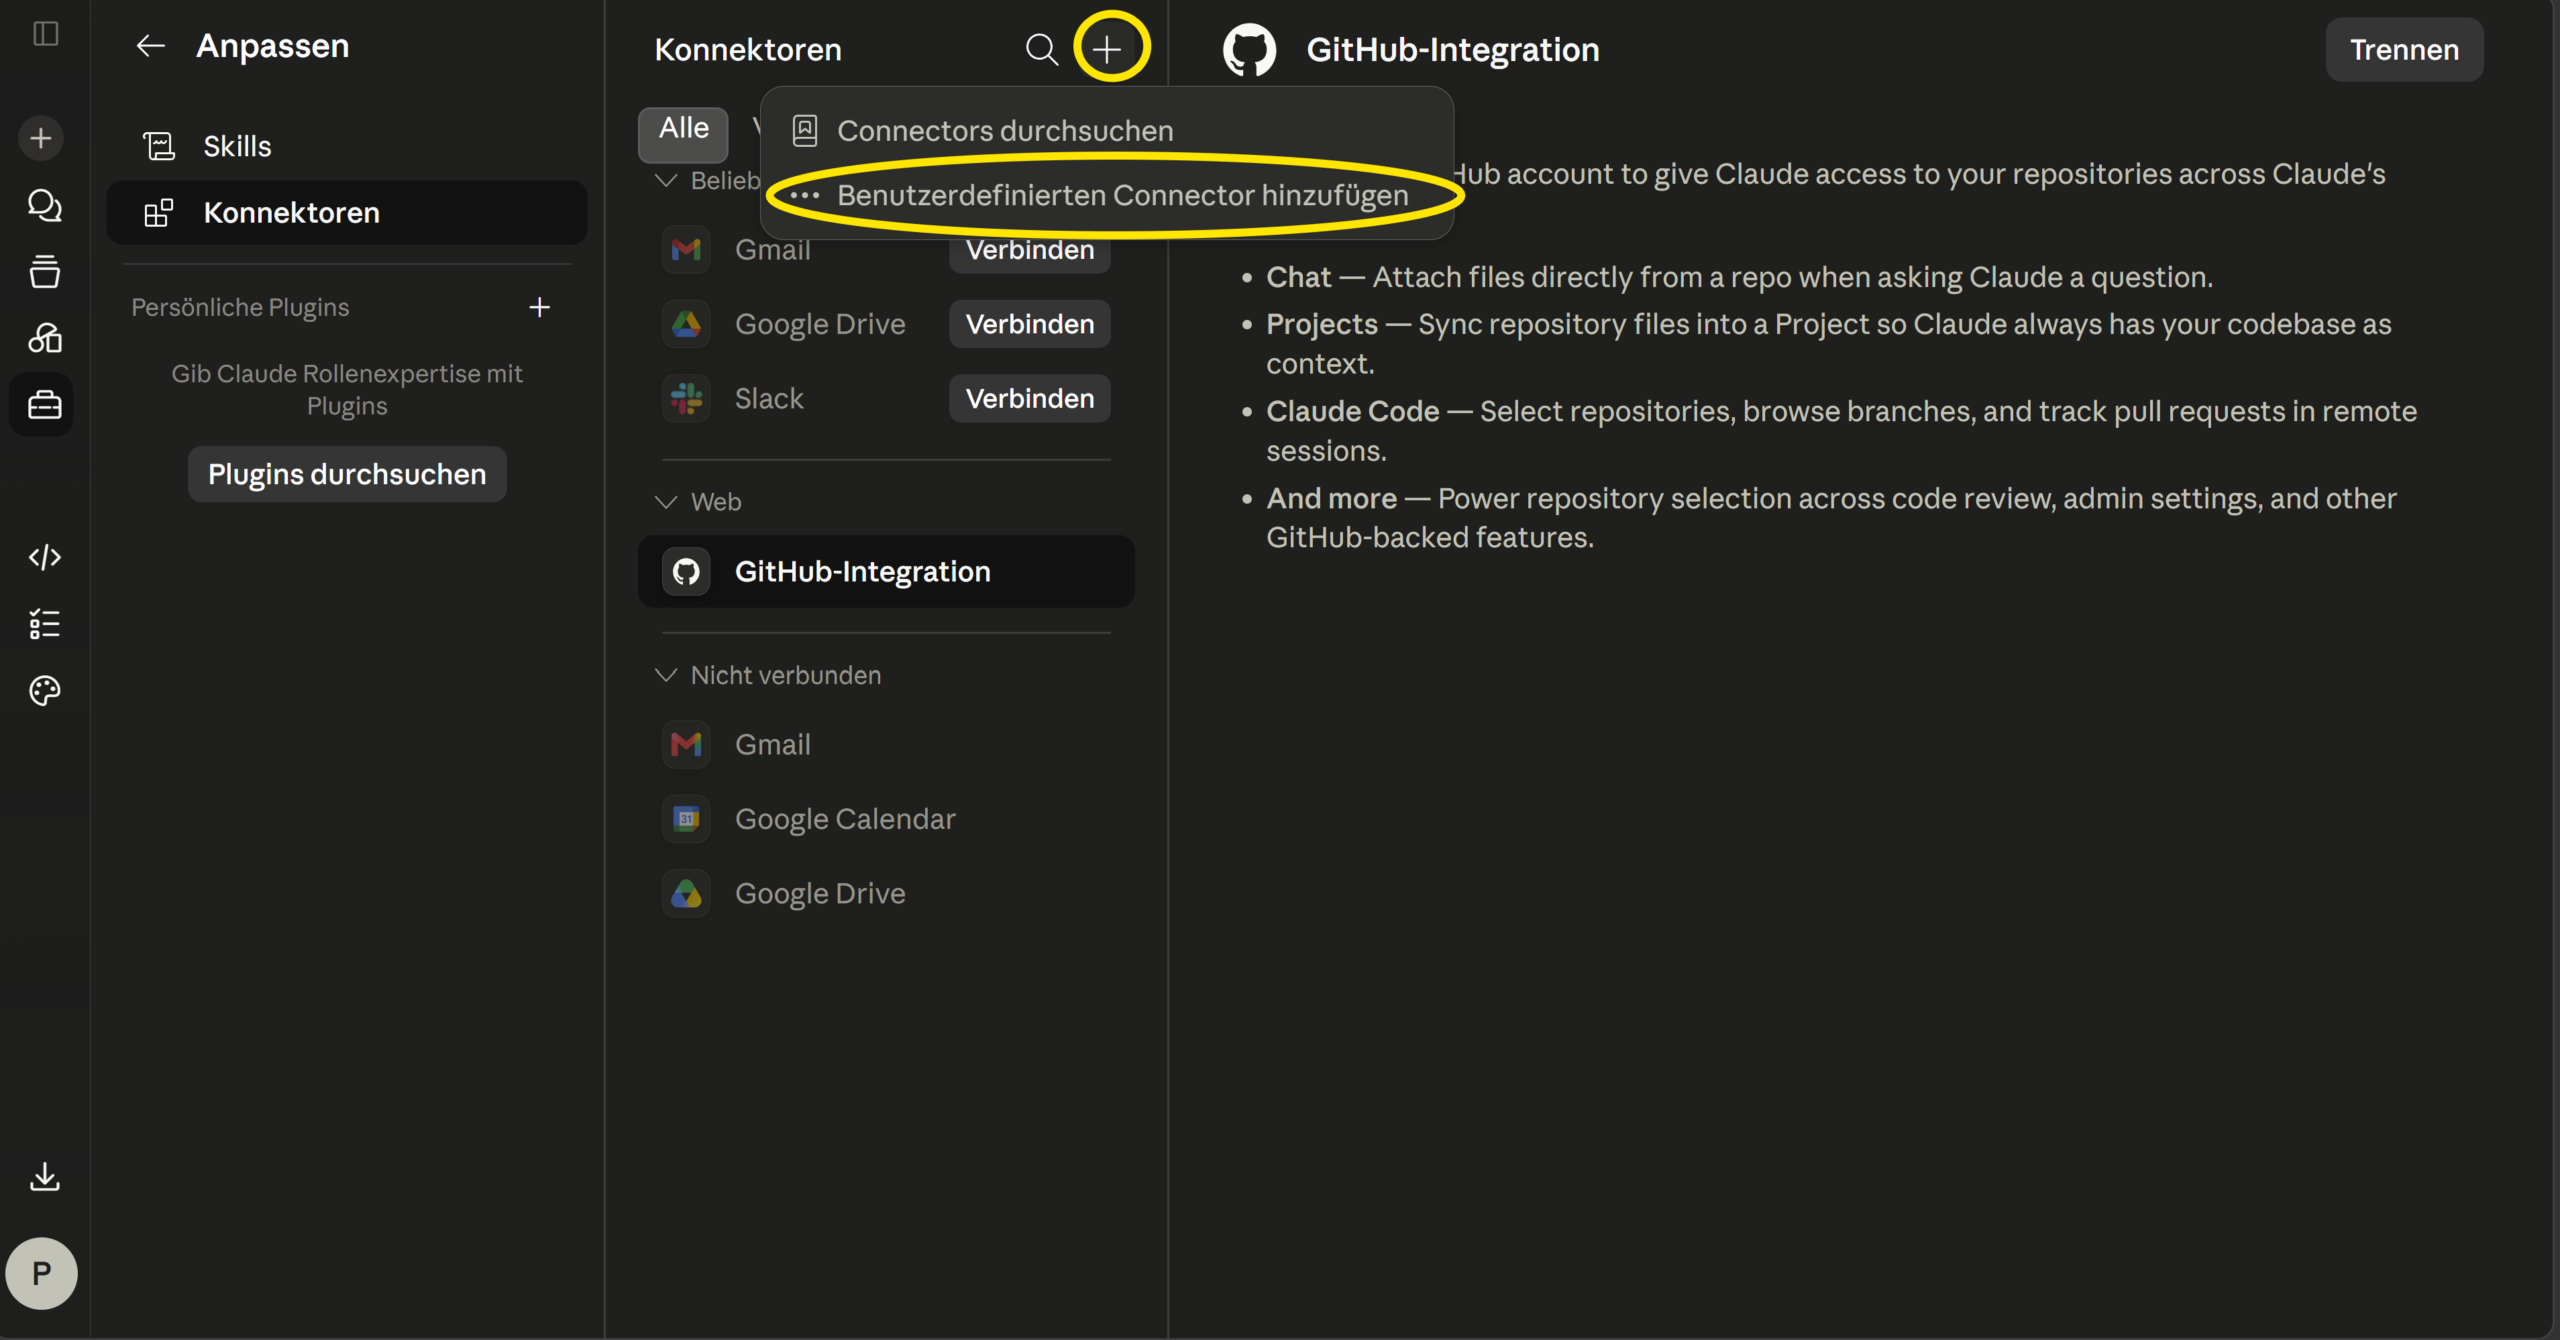
- Enter your remote URL from step 2 and save. If you chose “Home Assistant sign-in”, Claude detects the login on its own: select Connect on the connector’s page and log in with a Home Assistant administrator account.
- For read-only tools you can set “always allow”; for write/delete tools I’d leave confirmation prompts on
Option 2 – Claude Desktop only (fully local). This needs no remote access, but it only works on that one computer and doesn’t sync to your phone. Claude Desktop talks to local MCP servers over stdio (the program’s input and output) rather than a URL, so a small helper called mcp-remote bridges the gap to ha-mcp. Claude Desktop starts it through npx; all you need is Node.js 20.18.1 or newer. These steps work on Windows and macOS:
- Fully quit Claude Desktop – on Windows, also quit it from the system tray
- Install Node.js on that computer – on Windows with winget in a terminal, on macOS with Homebrew:
# Windows
winget install --id=OpenJS.NodeJS.LTS -e

# macOS
brew install node- Open
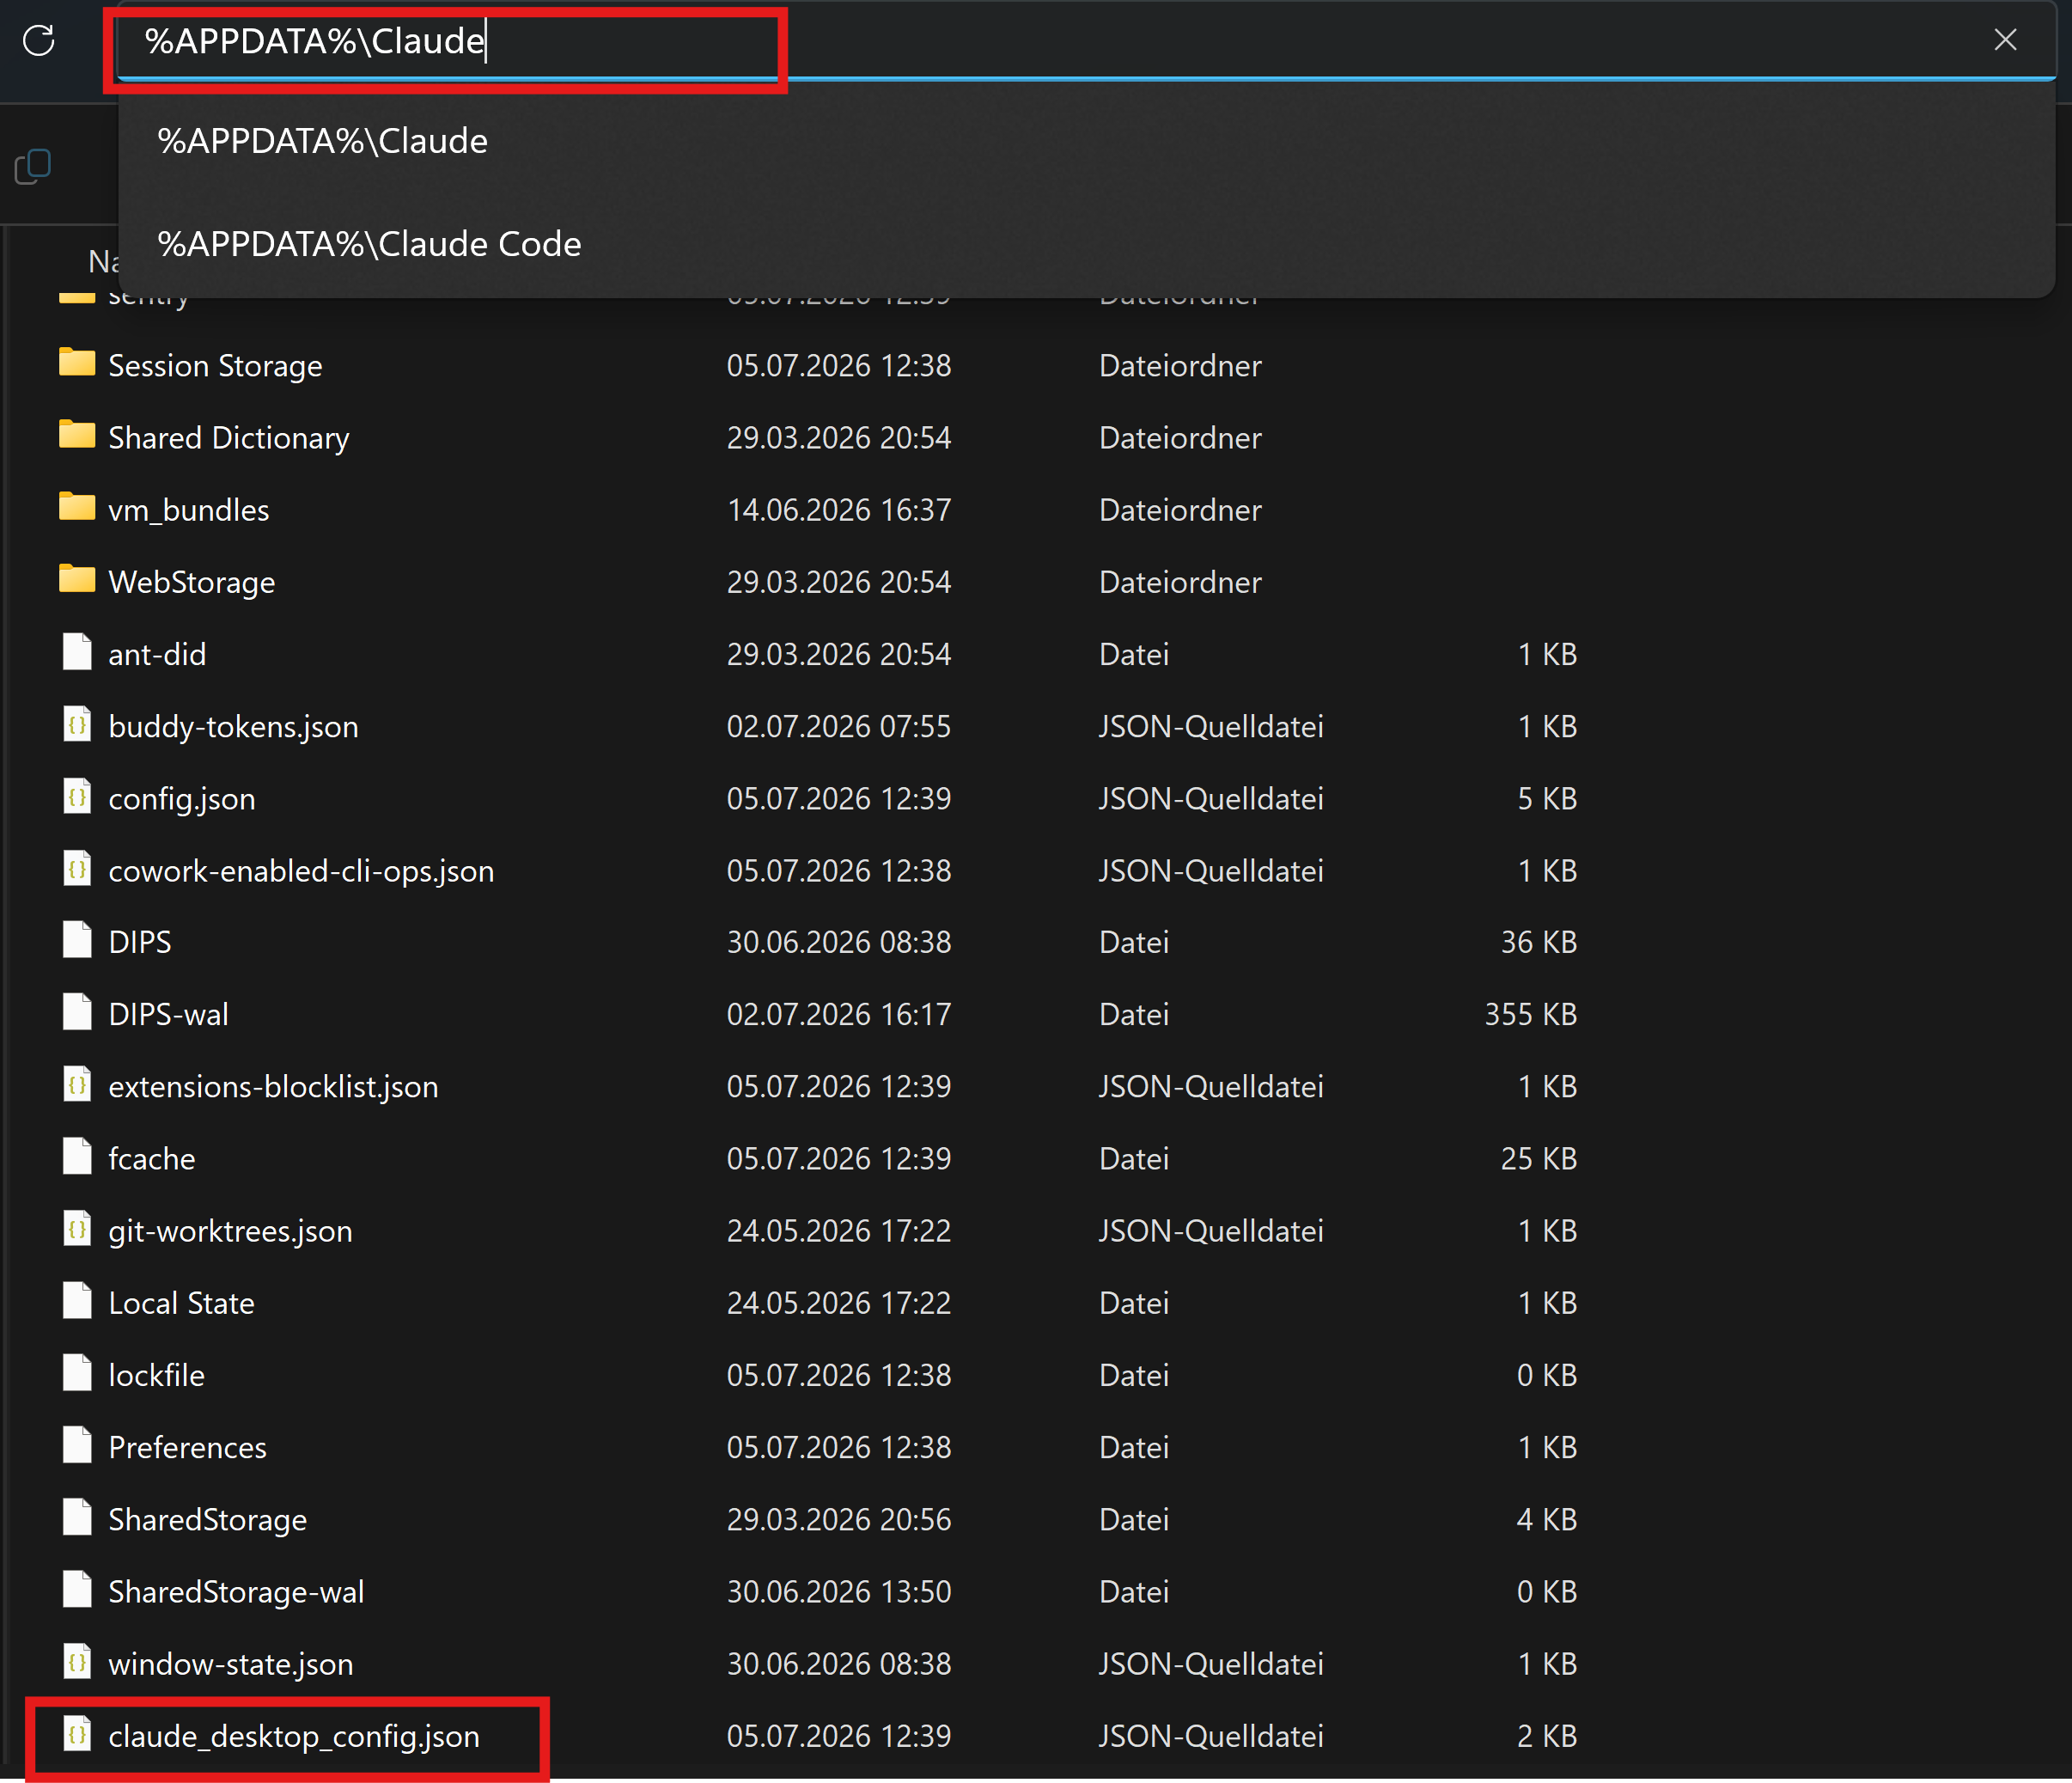
claude_desktop_config.json– on Windows in%APPDATA%\Claude, on macOS in~/Library/Application Support/Claude. If it isn’t there on Windows – for example with the Microsoft Store version – ha-mcp’s Windows guide shows you where to find it.
- Add the entry below. If the file already has content, the
home-assistantblock goes inside the existingmcpServers– ask your AI assistant if you’re unsure. As the target, enter the local URL from step 1 (app: port 9583, custom component: the direct address on port 9584):
{
  "mcpServers": {
    "home-assistant": {
      "command": "npx",
      "args": ["-y", "mcp-remote", "http://homeassistant.local:9583/private_Odhrwersdgh234", "--allow-http"]
    }
  }
}- Start Claude Desktop again. If you set up option 2 earlier with the
mcp-proxyhelper, replace the whole entry with this one – the project no longer recommendsmcp-proxy.
Connecting Claude Code to Home Assistant
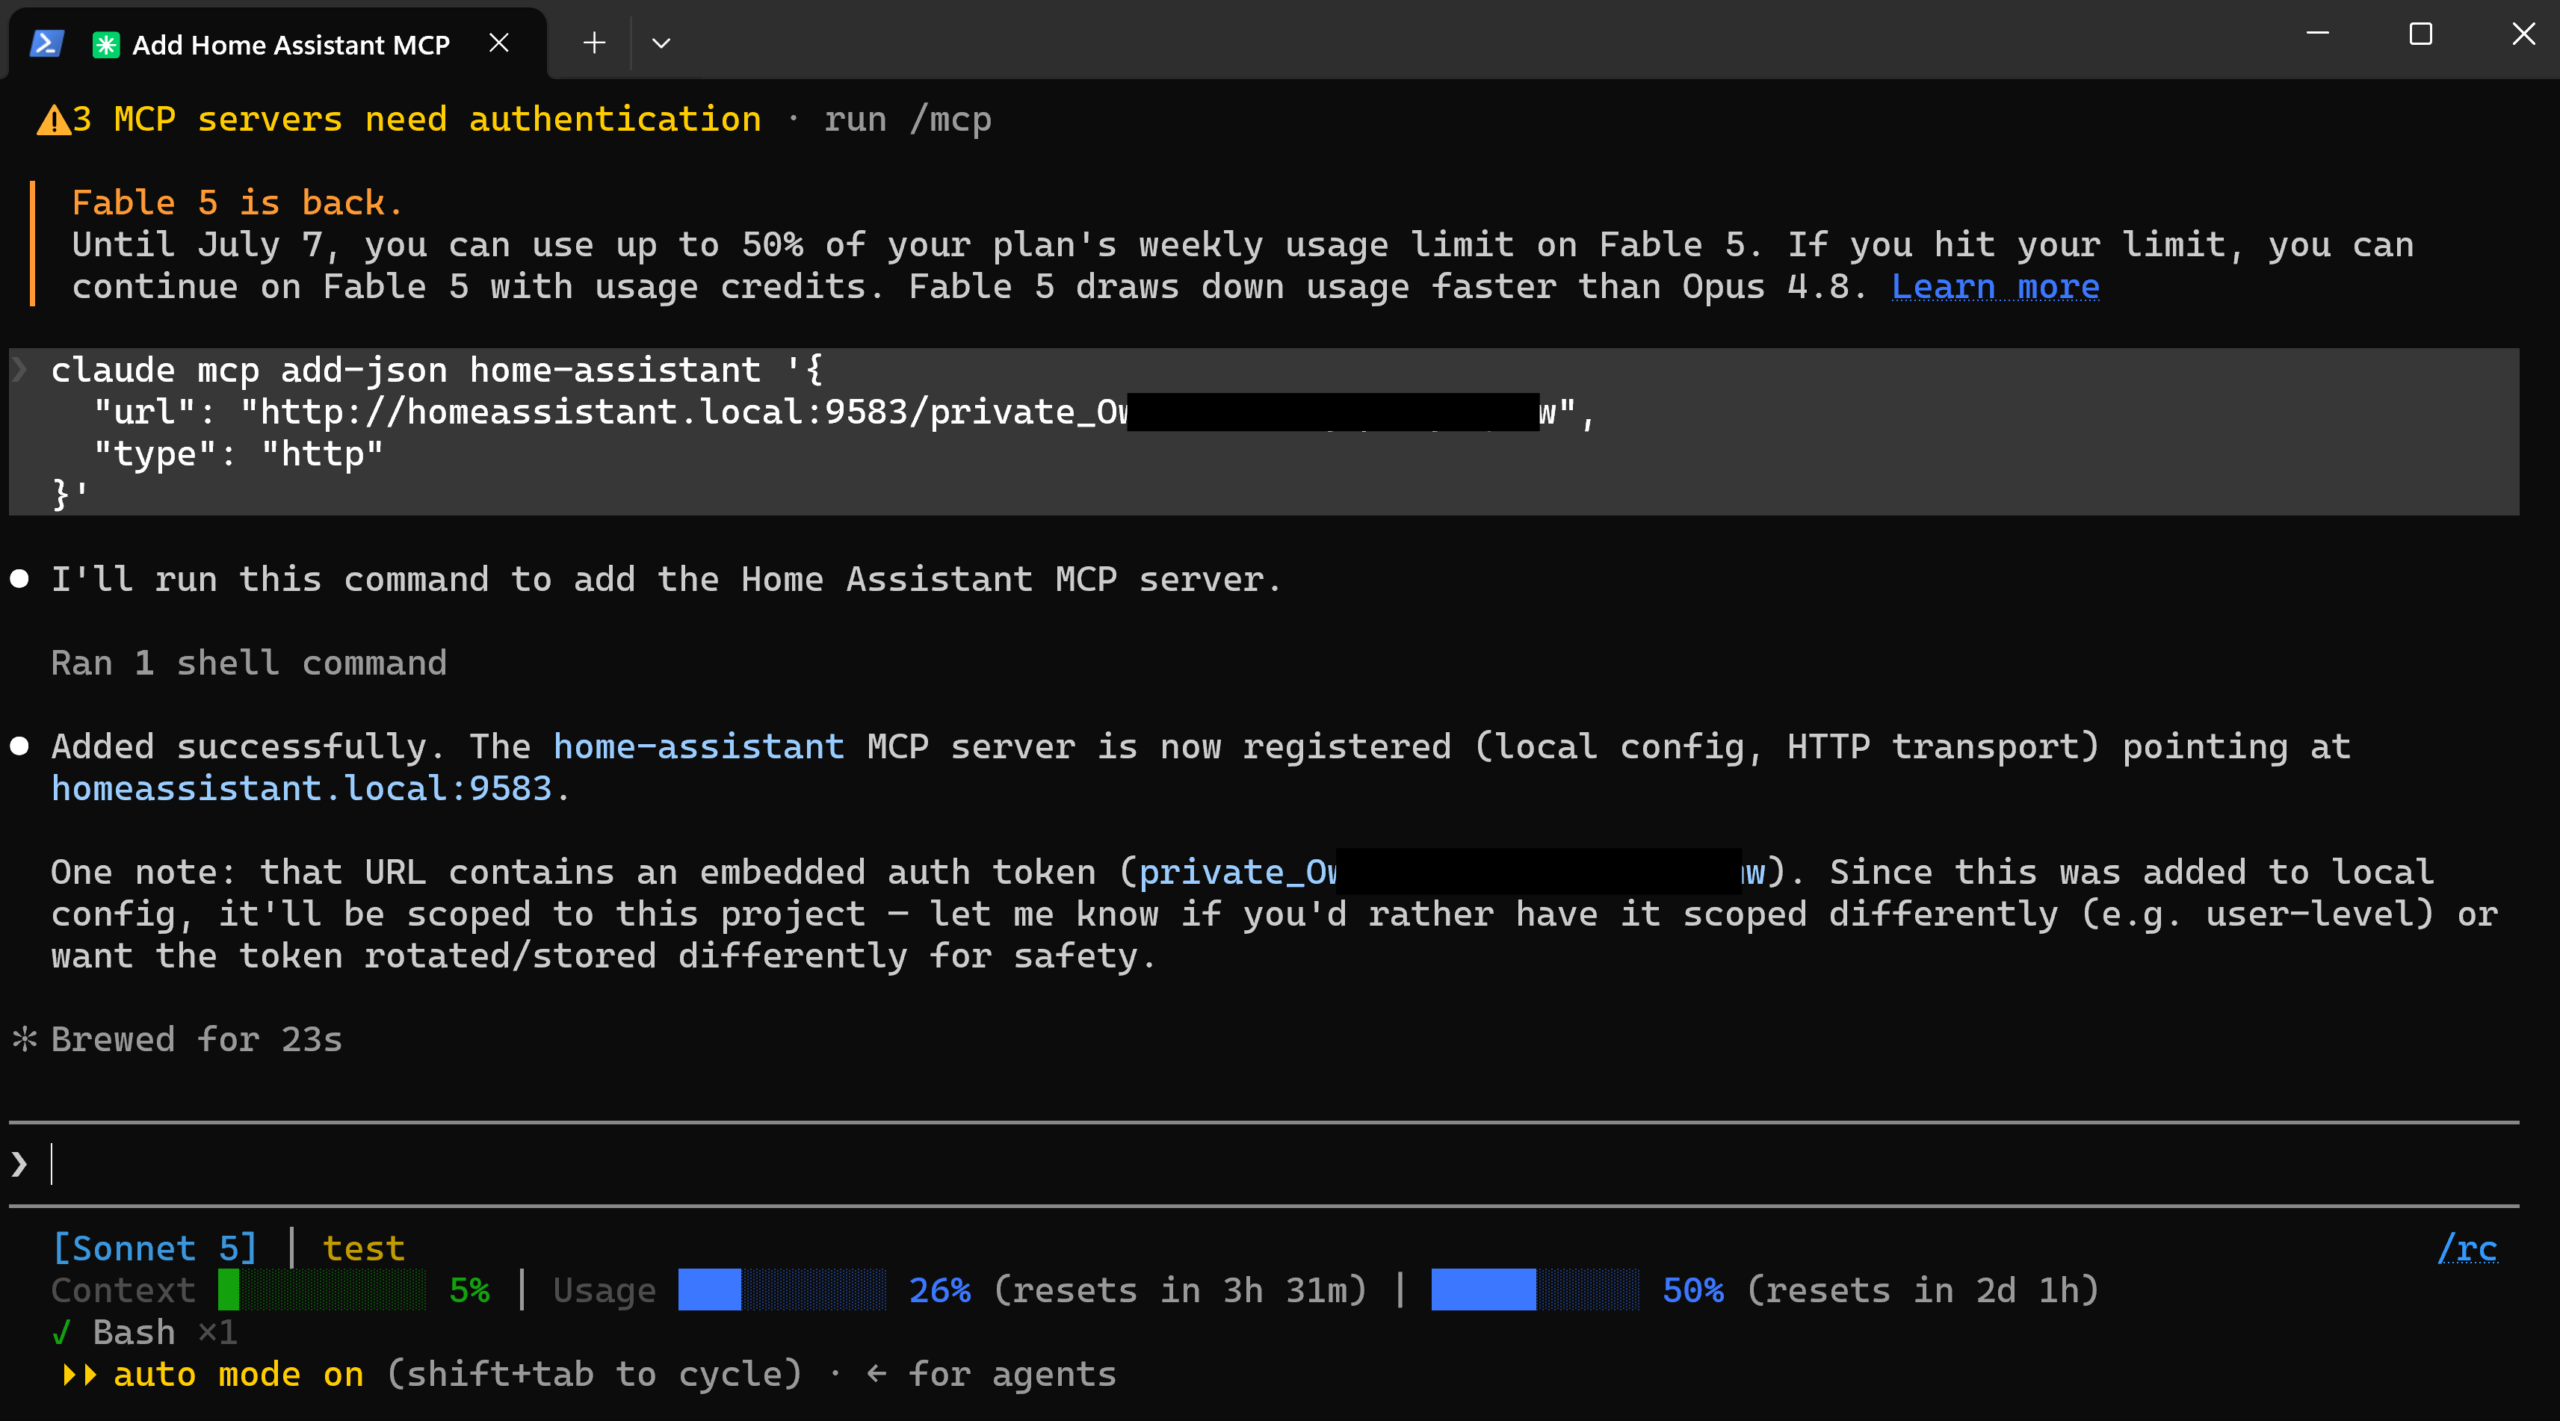
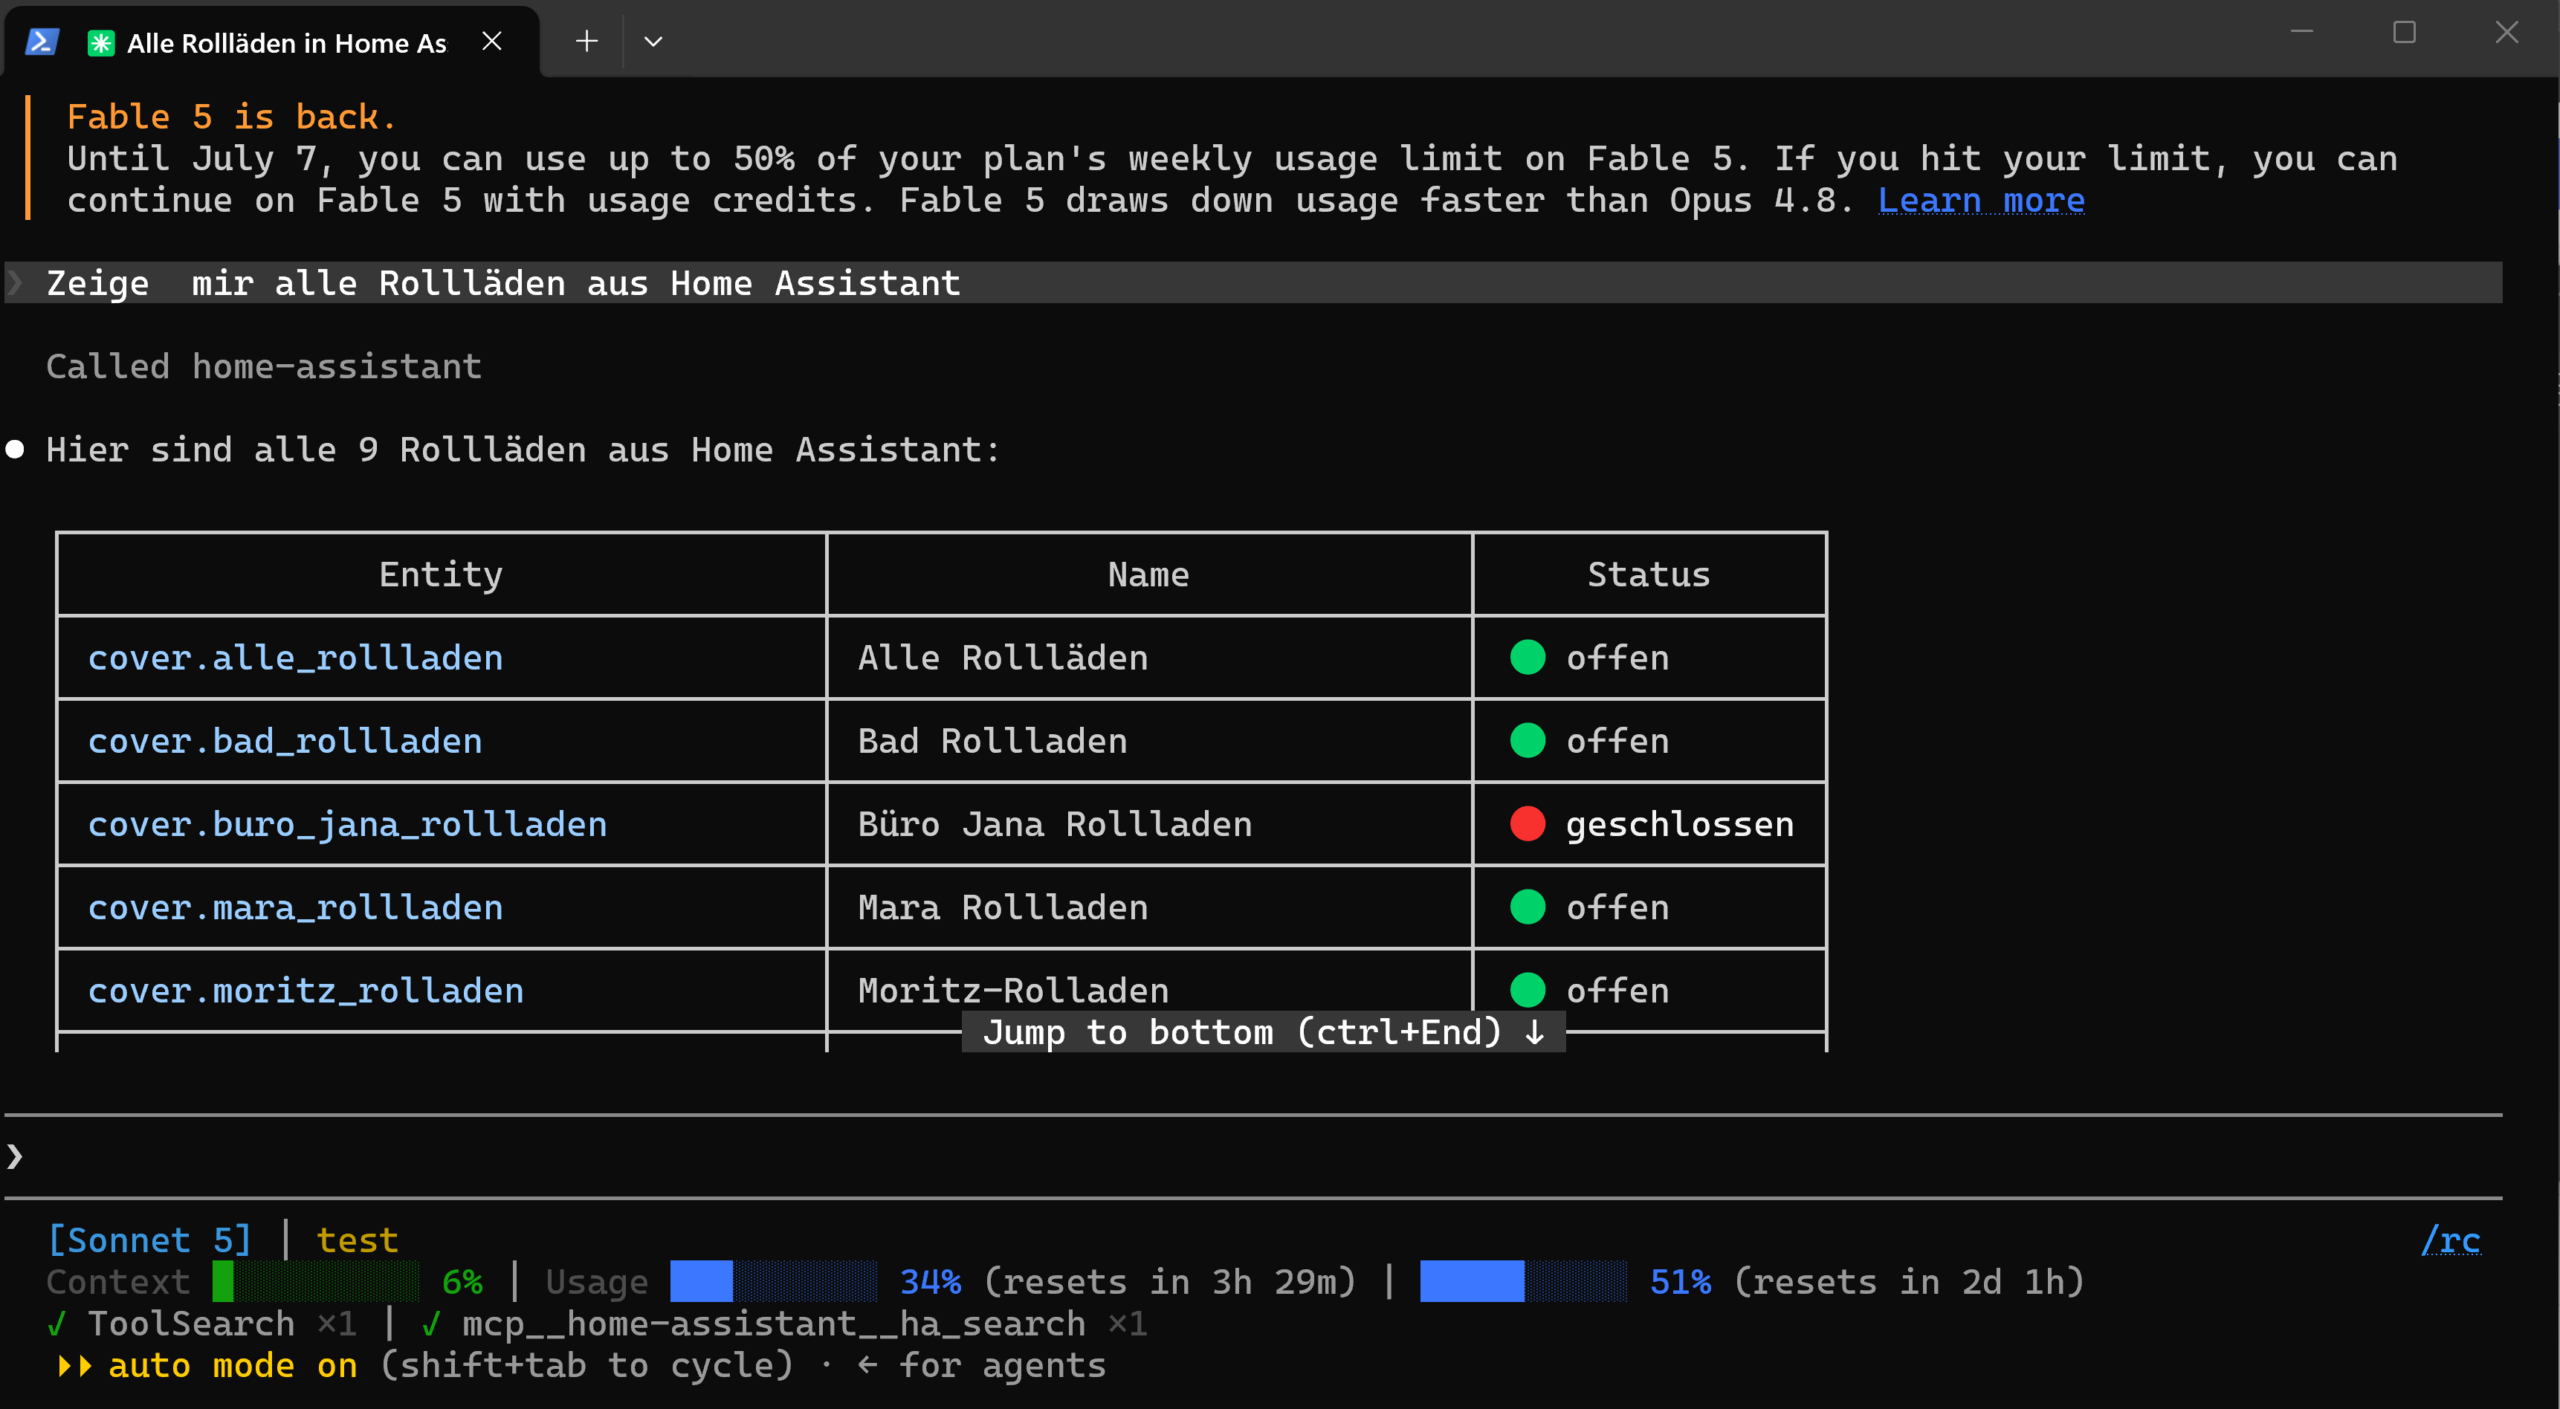
For Claude Code, run one command in a regular terminal, not inside a Claude Code session. Use the local URL from step 1, or the remote URL from step 2 if you also want access on the go. The local address (custom component: port 9584, with Network access set to “Local network”) works in every sign-in mode, so use it instead of the remote URL if you chose “Home Assistant sign-in”:
claude mcp add-json home-assistant '{
  "url": "your-mcp-server-url",
  "type": "http"
}'
Claude Code needs to be restarted once.
Connecting ChatGPT
Before you start: according to OpenAI’s help center, full MCP support, including write access, is limited to Business and Enterprise/Edu plans (as of October 2026), and on Business only admins and owners can add custom MCP servers. Pro users can only connect custom MCP servers with read and fetch permissions, and OpenAI never mentions Plus. For personal use, Claude is the easier route.
- On chatgpt.com, open the Plugins page, click the plus button, and choose Add custom MCP server
- Give it a name such as “Home Assistant” and paste your remote URL from step 2 under Connection
- With “Secret URL”, set authentication to No authentication – the random path in the URL is the secret. With “Home Assistant sign-in” (and for Home Assistant’s official server), pick OAuth and log in with a Home Assistant administrator account.
- Accept the risk warning with I understand and want to continue, choose Create as a plugin, then install the plugin
- In a chat, type
@and pick the plugin
These steps follow OpenAI’s documentation, and you don’t need Developer Mode. If you change ha-mcp’s tools later, refresh the tool list in the plugin’s settings.
Connecting Gemini (Antigravity CLI)
With a personal Google account, you connect Gemini through the free Antigravity CLI (agy). It replaced the Gemini CLI for free accounts and Google AI Pro/Ultra on June 18, 2026; since then, the Gemini CLI has been aimed at organizations with Gemini Code Assist Standard or Enterprise and at people with paid API keys. Without a subscription you get weekly rate limits, and Google AI Pro or Ultra raises them. The Gemini web app does let you add your own MCP servers as “custom apps”, but only if you’re 18 or over and in the US, and only in English.
- Install the Antigravity CLI – on Windows in PowerShell, on macOS and Linux in a terminal:
# Windows (PowerShell)
irm https://antigravity.google/cli/install.ps1 | iex

# macOS/Linux
curl -fsSL https://antigravity.google/cli/install.sh | bash- Open a new terminal – only a new one finds the
agycommand. Startagy, pick a color scheme and display mode, and sign in with your Google account in the browser. Paste the code Google shows you into the terminal. - Add ha-mcp – on your home network with the local URL from step 1, on the go with the remote URL from step 2. With “Home Assistant sign-in”, use the local URL, which works in every sign-in mode:
agy mcp add home-assistant your-mcp-server-url- Run
agy mcp listand check thathome-assistantshows up asenabled. Then startagyand give it a first task, such as “Which lights are on right now?”. The CLI asks for your approval before every tool call.
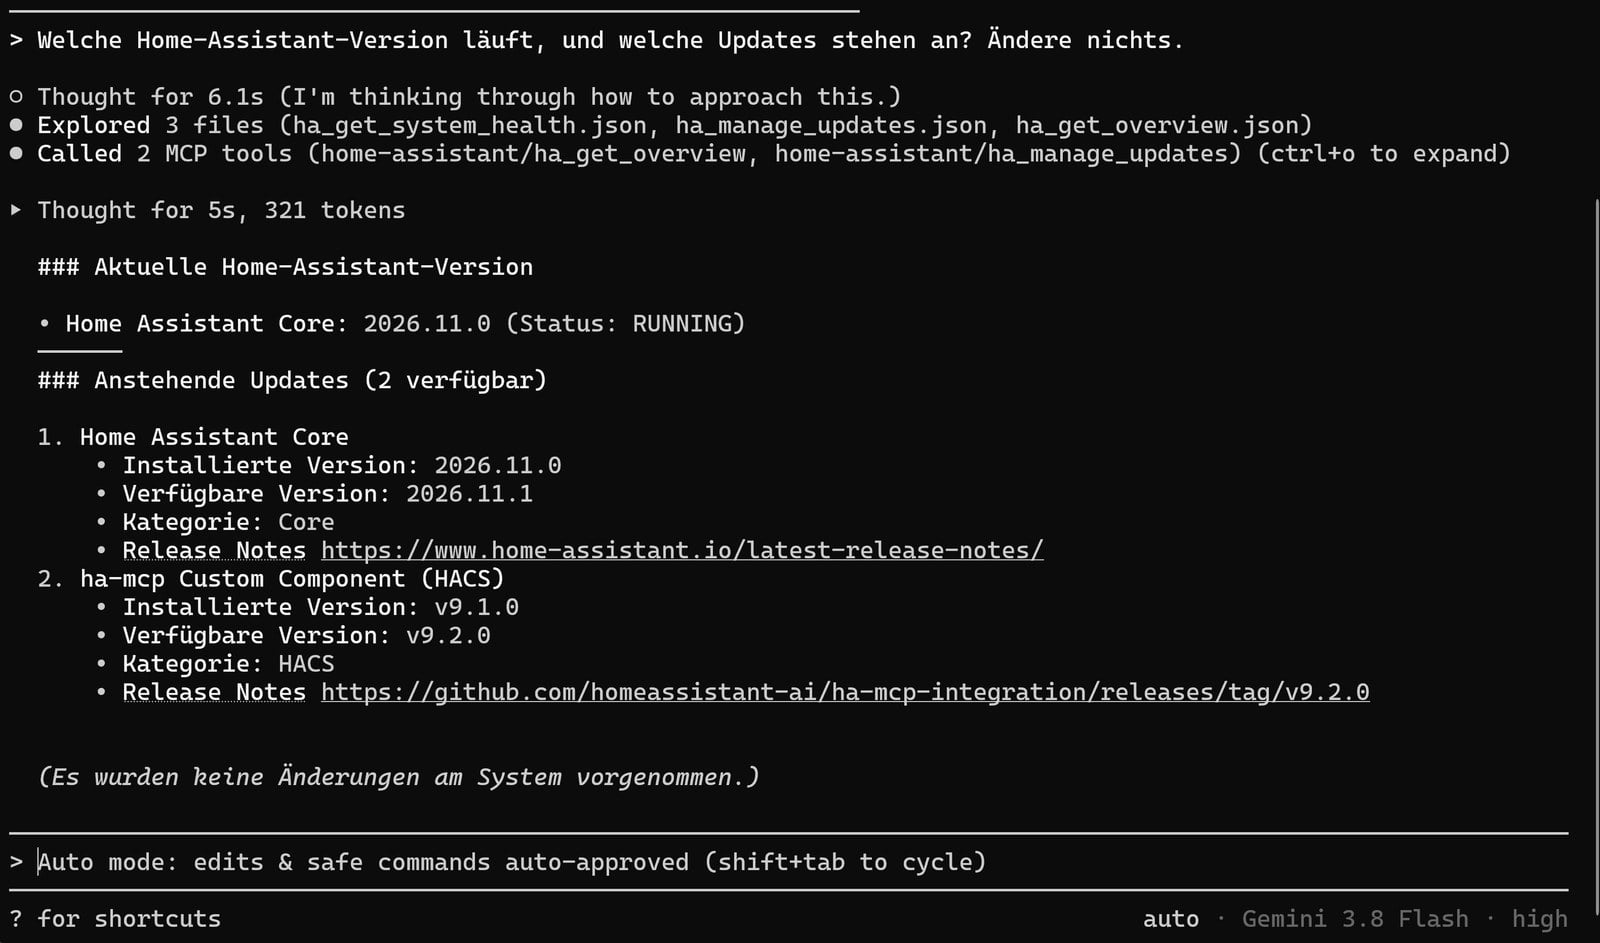
The command writes the entry to ~/.gemini/config/mcp_config.json (on Windows %USERPROFILE%\.gemini\config\mcp_config.json). If you edit the file by hand, the address goes in the serverUrl field – the Antigravity CLI doesn’t understand the old Gemini CLI’s httpUrl field. You don’t need a token; the random path in the URL is the authentication.
Security: MCP access alongside a hardened Cloudflare setup
If you protect Home Assistant with Cloudflare Access and a client certificate (mTLS), MCP access has a catch:
Cloud AI connectors can’t present a client certificate you issued. Neither Claude nor ChatGPT calls your server from your device – both connect from the provider’s own cloud. Your client certificate is tied to a private key that only your device holds, so no AI provider can send it along. According to OpenAI’s documentation, ChatGPT now presents its own OpenAI-managed client certificate. That one isn’t signed by your certificate authority, though, so it won’t get past a Cloudflare rule that requires your certificate.
The fix, an exception for just the /api/webhook/ path, is in step 2 under the Cloudflare pitfalls. Your Home Assistant interface stays protected.
Alternative if you use a dedicated MCP hostname (Option B)
With a dedicated MCP hostname like ha-mcp.yourdomain.com (step 2, option B), you don’t need a path exception – just exempt that hostname from the mTLS requirement. The random path in the URL then protects it, and you can add a Cloudflare firewall rule that only allows Anthropic’s IP ranges, like the skip rule in step 2 (not practical for ChatGPT, as explained there).
What’s coming: tunnels with no public exposure
With a tunnel, a small agent at home opens an outbound connection to the AI provider, so your MCP server needs no public port at all. OpenAI already offers this with its “Secure MCP Tunnel” (open-source tunnel-client on GitHub), for ChatGPT and Codex among others. You set it up in your organization settings on the OpenAI API platform (tunnel management, roles, API keys). Anthropic has “MCP tunnels” as a research preview with access on request, so far only for the Claude API and Console, not for connectors on claude.ai.
Optional and potentially dangerous: letting the AI edit YAML configuration
Some Home Assistant features – REST template sensors, for instance – can only be set up via configuration.yaml, not through the UI. The tools for this (ha_config_set_yaml, file read/write access) are marked as beta features and need the custom component’s second entry, HA-MCP File & YAML Tools. You add it on the integration page via Add entry. If you run ha-mcp as an app, you install the custom component just for this entry. The tools themselves are switched on in ha-mcp’s settings (“HA-MCP” panel or the app’s web UI, a beta master toggle plus individual sub-toggles). See the project documentation for details, as these beta features can still change.
Before you enable this, make a backup. An AI that edits your configuration.yaml and accidentally discards half its content can take down your whole system, so only switch this on if you understand what you’re granting access to.
What you can build with this
- New sensors: “Create a sensor that shows today’s rainfall from my weather station” – the AI finds the right source entity, sets up a utility meter helper, and configures it correctly.
- Dashboard elements: new badges, cards, or entire dashboard sections on request, without writing a single line of card YAML yourself.
- Fixing automations: “The automation in the kids’ room stops dimming correctly after 9pm” – the AI finds the right automation, analyzes traces, explains the proposed fix, and applies it once you confirm. If you’d rather understand the basics of triggers, conditions, and actions yourself first, my Home Assistant automations beginner’s guide covers that.
The AI can only work with what Home Assistant knows about. Zigbee is the easiest way to add window, motion, and presence sensors: Zigbee sensors for Home Assistant covers the ones that have proven themselves, and the Zigbee gateway buying guide helps you choose the stick. If you also want to control Home Assistant by voice without the cloud, see my guide to a local voice assistant.
The AI can also produce broken or nonsensical code, so review anything with real-world consequences, such as heating or safety functions, before it runs permanently.
Troubleshooting
| Problem | Solution |
|---|---|
| AI client can’t connect via Cloudflare, but browser access works fine | Check this first, before you start digging through WAF rules: a common cause is Cloudflare’s AI blocking (Security → Settings → AI Crawler and Agent access policies). Set Agents to “Allow (do not block)”. Also check whether a country WAF rule is blocking the AI’s requests (see “Blocking countries?” in step 2). |
| “Apps” or “Add-ons” missing from the menu | You’re running Home Assistant Container or Core, which has no apps. Use the custom component from step 1. Since 2026.2 the menu item is called “Apps” instead of “Add-ons”. |
| “HA-MCP” doesn’t show up under Add integration | From the Marketplace, setup starts right after you install it. If you used HACS, or a repair asks for it, restart Home Assistant once. |
| Custom component setup fails | The HA-MCP account needs “Allow login” and administrator rights. Never enter your own login there – to use your own account, paste an access token instead. |
| Duplicate tools or connection errors | The app and the custom component are running at the same time, or both are added to your client. Remove one of them. |
| Tool is known, but the call fails with “Unknown tool” | After changing tool settings (Tool Search, Read Only Mode, enabled/disabled tools), your AI client keeps caching the old tool list. Restarting the app/Home Assistant isn’t enough – disconnect and reconnect the connector in the client (e.g. re-add the connector in ChatGPT, fully close and reopen Claude Desktop). |
| Connector can’t find the MCP server | Custom component: is “Remote access via webhook” switched off under Configure (during setup: remote access “Disabled”)? Webhook Proxy app: did you restart Home Assistant after installing it? Without a restart, the connection stays inactive. |
| Can’t create the ChatGPT connector | Full custom MCP support is only available on Business and Enterprise/Edu, where admins and owners (or members they’ve authorized) set it up. On Pro, custom servers are read-only. In a workspace, ask your admin. |
| MCP connection over the mTLS hostname fails | Expected behavior with client certificate enforcement. Use the custom component or the Webhook Proxy app with the /api/webhook/ exception in the WAF rule (see the security section) or a separate hostname without mTLS. |
Only on Home Assistant 2026.10 and older. From 2026.11, you install the ha-mcp custom component through the Marketplace built into Settings. The app/add-on doesn’t need HACS – you install it from the App Store via its repository URL – but it only runs on Home Assistant OS or Supervised. The optional YAML/file-access tools need the custom component either way.
Yes, with the ha-mcp custom component. It runs as an integration inside Home Assistant itself, so it works on every installation type, including Container and Core. The app/add-on, on the other hand, needs the Supervisor.
You don’t need the remote access from step 2 if your client runs on your home network: Claude Desktop via mcp-remote, Claude Code, or editors like VS Code and Cursor talk to the local URL directly. The AI itself still runs in the provider’s cloud, though. It only becomes fully local with a local language model in an MCP-capable client, which this article doesn’t cover.
Yes, if you limit it: disable dangerous individual tools via the “HA-MCP” panel or the app’s Tool Settings web UI, use Read Only Mode or Tool Security Policies for approvals where needed, and never share your MCP server URL with anyone – the random path inside it acts like a password.
Claude currently offers the simplest setup, since a connector configured once syncs automatically to the desktop and smartphone apps. ChatGPT needs a Business or Enterprise/Edu plan for write access. Outside the US, Gemini connects through the free Antigravity CLI.