Meshtastic in Home Assistant: via MQTT or the HACS Integration
A Meshtastic node with a temperature sensor sends its readings over LoRa radio and needs neither Wi-Fi nor a cellular network. That makes it a good fit for places your home network does not reach: the garden shed, the garage, the greenhouse or the basement. To use Meshtastic in Home Assistant, though, you need a bridge: a node that sits on your home network and hands everything it receives over the air to Home Assistant – either directly through an integration or via MQTT.
This guide shows both ways. The quick one uses the Meshtastic integration, which you add as a custom repository in the Marketplace (formerly HACS): Home Assistant connects directly to the Pi node and creates the sensors and message targets on its own. The second one sticks to built-in tools: the Pi forwards every packet to Home Assistant’s MQTT broker, and you create the sensors yourself. Either way, temperature and humidity from a radio sensor end up in Home Assistant, and text messages flow in both directions: from the mesh as a notification on your phone, and from Home Assistant back into the mesh. The Pi node comes from our guide Meshtastic on the Raspberry Pi; how the radio network works is explained in Meshtastic explained. Tested on 5 October 2026 with meshtasticd 2.7.26, web client 2.6.7 and Home Assistant 2026.9.4.
Disclosure: RAKwireless provided the Pi HAT, the radio module, the sensor and the Starter Kit free of charge as test samples. The manufacturer has no influence on the content; measurements and error messages come from our own setup.
Preparation: plug the sensor into the remote node and turn on environment metrics in the app.
Way 1, integration: install the Meshtastic integration through the Marketplace (formerly HACS), restart Home Assistant, connect to the Pi node over TCP/IP and pick your nodes. Send messages with
notify.send_message, receive them through the meshtastic_api_text_message event.Way 2, MQTT: create a user for MQTT, enable MQTT with “JSON Enabled” on the Pi node, turn on “Uplink Enabled” in the default channel (“Primary” in the web client) and restart, then use “Add MQTT device” in Home Assistant to create one sensor entity per reading with topic and value template. Receive messages with an MQTT-triggered automation, send them through a channel called
mqtt with downlink.
What you need
- A Meshtastic node with a network connection to act as the bridge. Ours is a Raspberry Pi 5* with the 27 W power supply*, the WisMesh Pi HAT RAK6421 and the RAK13300 radio module, already set up with
meshtasticd. - A node to act as the radio sensor, set up and paired with the Meshtastic app as described in the Pi node guide. Ours is the WisMesh RAK4631 Starter Kit with the RAK1901 temperature and humidity sensor. Pick the radio variant for your region: 868 MHz in Europe, 915 MHz in North America.
- Home Assistant, plus – depending on the way you choose – the Marketplace (HACS on 2026.10 and older) or the “Mosquitto broker” app (formerly add-on) with the MQTT integration.
- A smartphone with the Meshtastic app; for the MQTT way, the MQTT Explorer on your PC to check what arrives.
The RAK parts are sold in the manufacturer’s store; these links are not affiliate links.
Which way suits you?
Both ways need the same setup: a radio sensor and a Pi node that receives its packets. They differ in how the data gets from the Pi to Home Assistant and in how much you have to configure.
| Way 1: integration | Way 2: MQTT | |
|---|---|---|
| Requirement | Marketplace or HACS, node reachable via network, Bluetooth or USB | MQTT broker in Home Assistant |
| Settings on the node | none | MQTT module, uplink, restart |
| Entities | created automatically | one form with a value template per reading |
| Message into the mesh | action notify.send_message | channel mqtt, downlink, JSON |
| Message from the mesh | automation with an event trigger | automation with an MQTT trigger and a condition |
| Data for other programs | no | yes, everything sits on the broker |
| Maintenance | maintained by the Meshtastic organization outside Home Assistant, version 0.7.0 from November 2026 | built into Home Assistant |
| Limitation | uses the node’s only connection of this kind | all packets sit unencrypted on the broker |
If you already use the Marketplace, the integration gets you there much faster and gives you more readings, but you depend on the project keeping up. MQTT is worth it if you want to avoid a third-party integration or need the data outside Home Assistant as well, for example in Node-RED. The two are not mutually exclusive: in our setup both ran side by side and showed the same values.
Preparation: plug the sensor into the radio node
The sensor belongs on the remote node, not on the Pi: the node is supposed to go where you want to measure, and next to a warm Pi 5 the readings are off. On the Pi HAT, our RAK1901 read 34 to 36 °C; on the base board of the Starter Kit, in the same room, it read 23 °C. With the node switched off, plug the sensor into a free sensor slot on the underside of the base board and screw it down; ours sits in slot D.
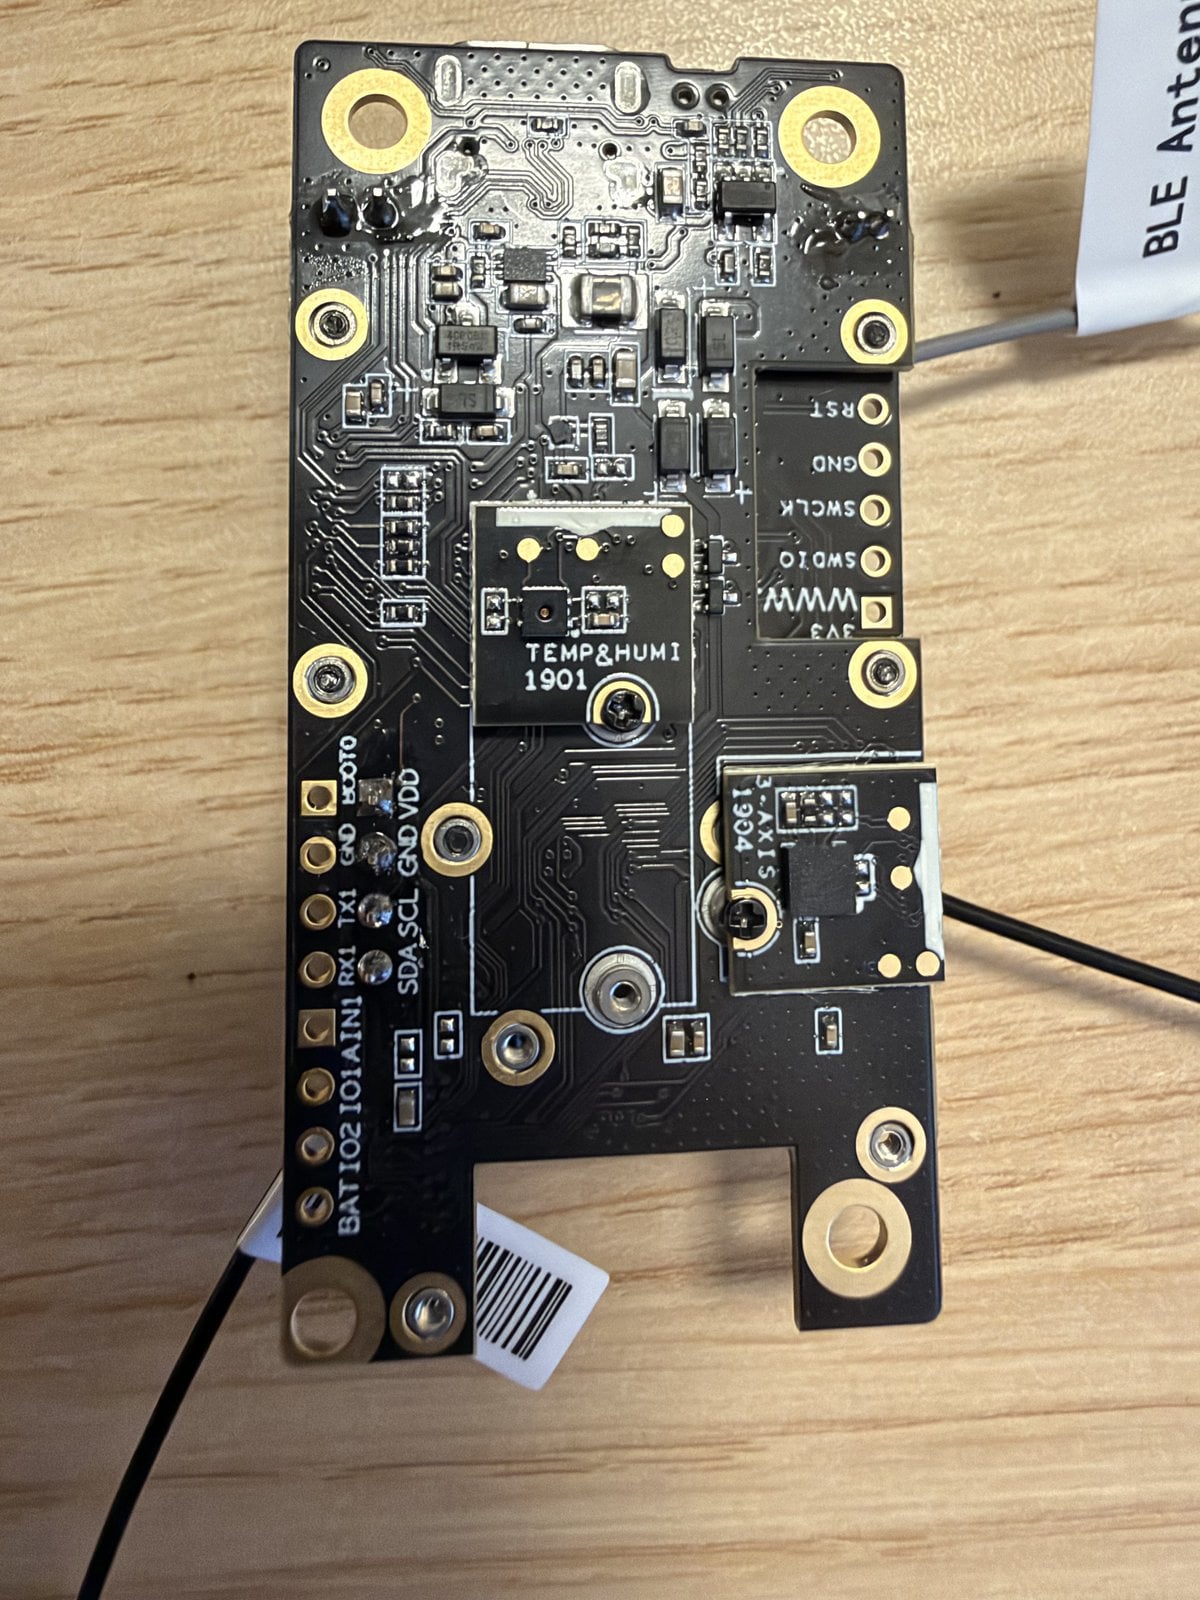
The readings are only sent once you switch them on in the Meshtastic app. Connect the app to the radio sensor, not to the Pi, and enable two switches under Settings → Telemetry:
- Environment Metrics Enabled sends temperature and humidity.
- Broadcast Device Metrics sends battery level and voltage into the mesh. This only matters for a battery-powered node; without the switch, only the connected app sees the battery level, Home Assistant does not.
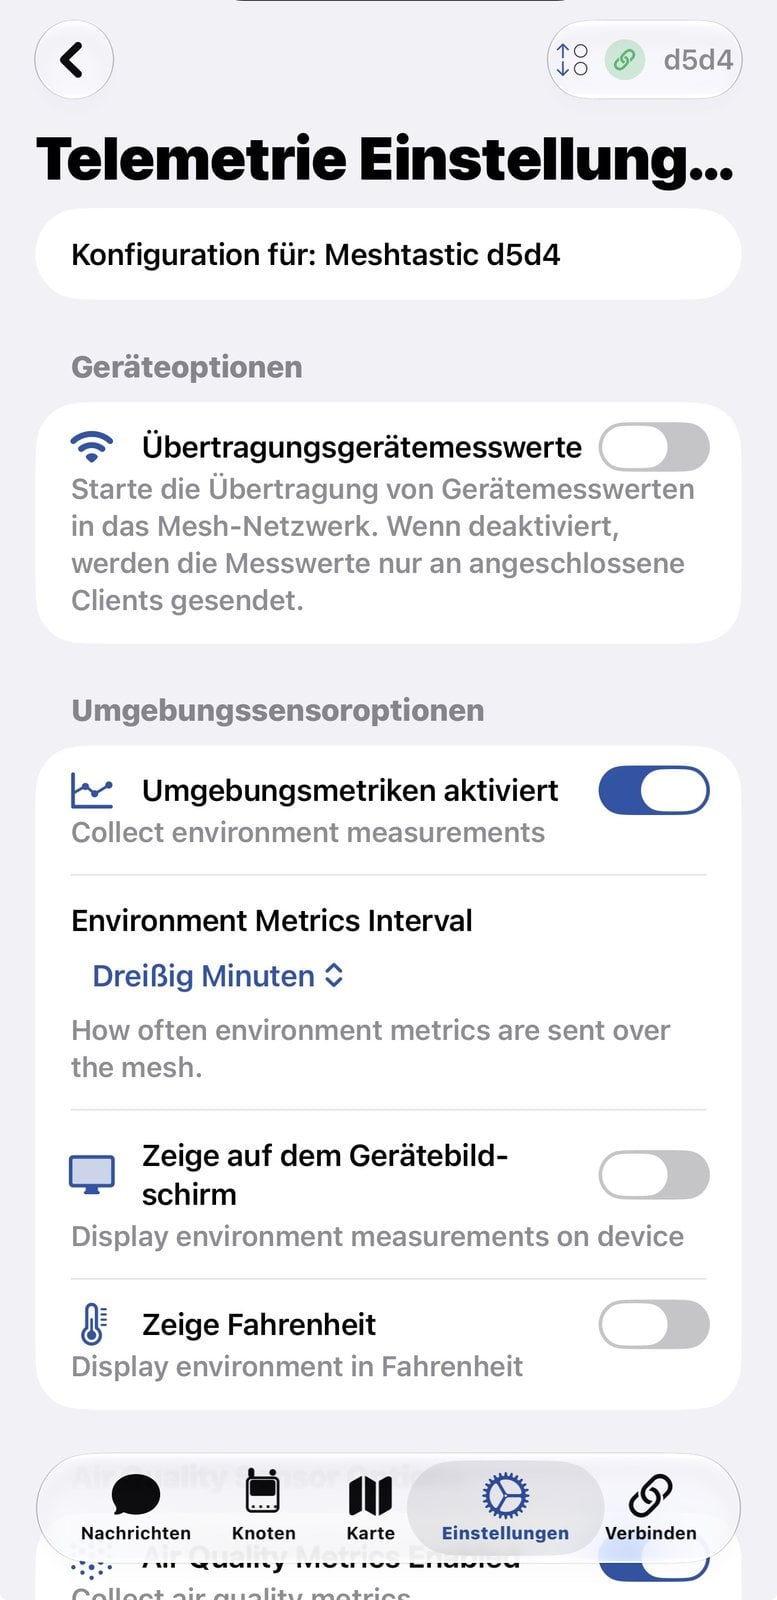
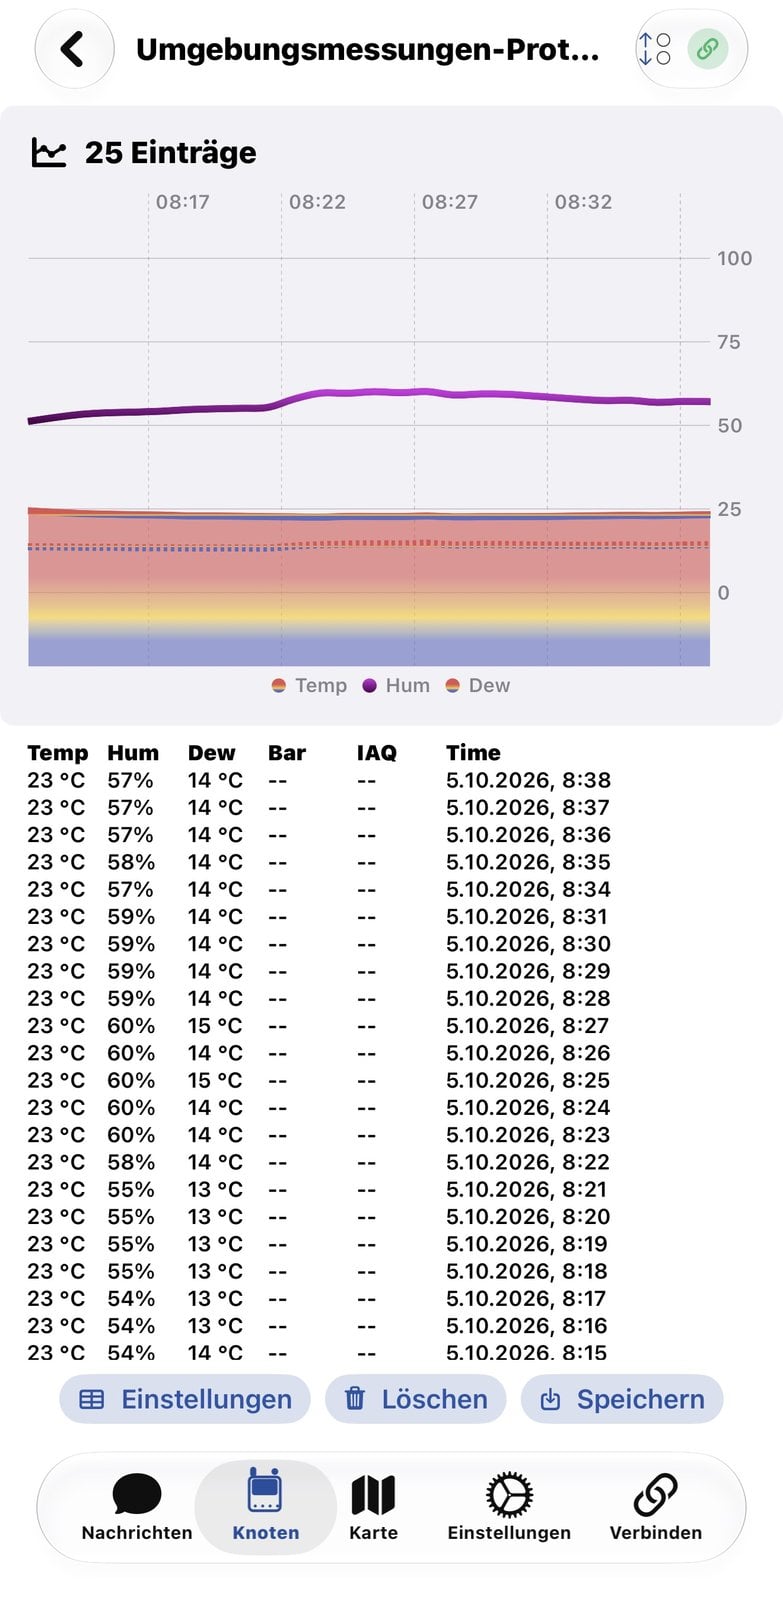
In the iOS app, the interval for environment readings could not be set below thirty minutes. The radio sensor therefore delivers two readings per hour. That is enough for room climate or a frost warning, not for fast control loops. Whether the sensor was detected is shown in the app’s node details under the environment metrics log – the node overview does not show the values.
Way 1: the Meshtastic integration from HACS
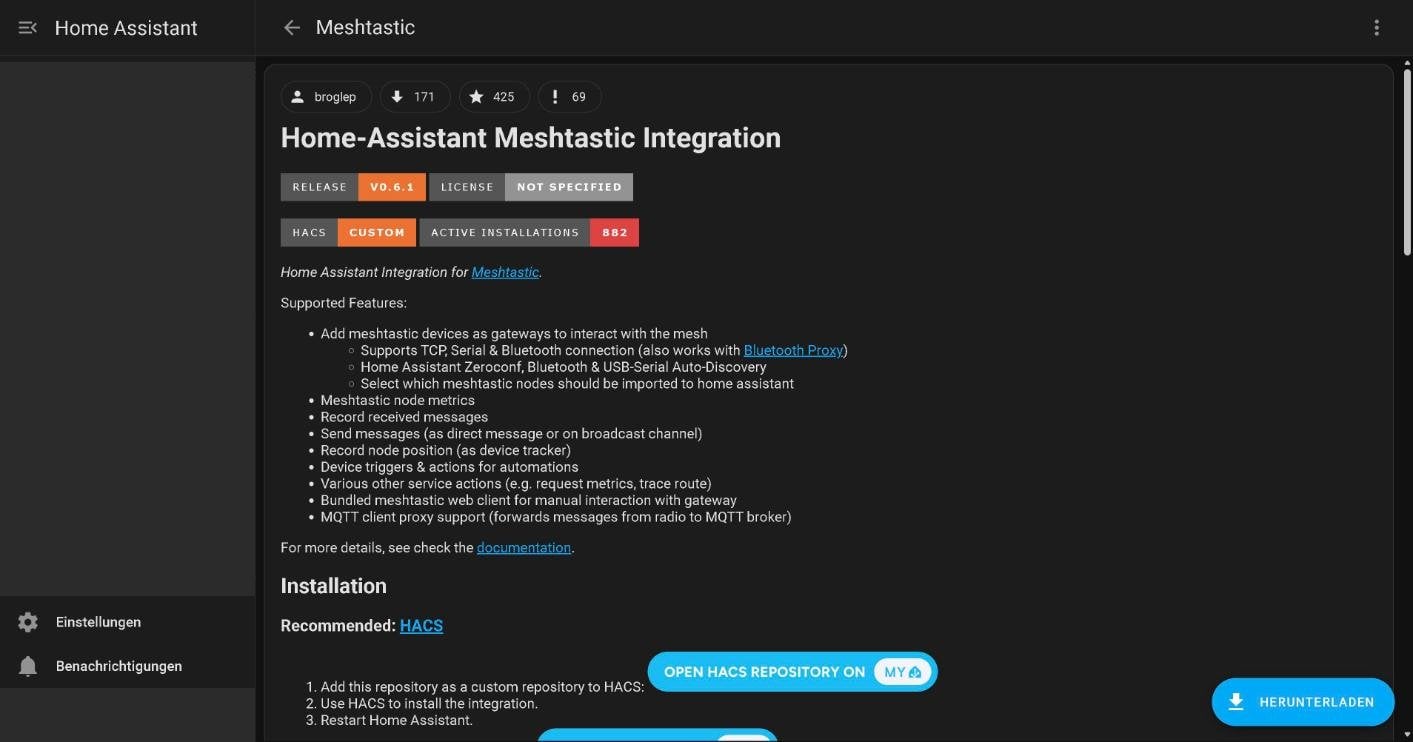
The integration connects Home Assistant directly to the Pi node: no broker, no value templates and no settings on the node. It comes from the Meshtastic project as meshtastic/home-assistant and is installed through the Marketplace, or HACS up to Home Assistant 2026.10. We tested version 0.6.1, the current release at the time, from April 2025. It ran on Home Assistant 2026.9.4 but left several warnings in the Home Assistant log: the integration used functions that Home Assistant switches off with versions 2027.7 and 2027.8. Version 0.7.0 came out on 10 November 2026, the first release maintained by the Meshtastic organization itself. It needs Home Assistant 2026.8 or newer and, according to the release notes, prepares the integration for the change in 2027.8.
Versions up to 0.6.x wrote the node’s private key, passwords such as the MQTT one and the channel keys into their entities’ attributes – and with that into Home Assistant’s history and your backups. Update to 0.7.0, then change the node’s MQTT password, regenerate its key pair and purge the old history of the Meshtastic entities with the
recorder.purge_entities action.
Install the integration
The integration is not in the catalog; searching for “Meshtastic” only turned up a different project for us. You add it as a custom repository instead:
- Under Settings → Marketplace, select “Add from link” and enter
https://github.com/meshtastic/home-assistant. Home Assistant asks for two things along the way. The first time you open the Marketplace, it shows a warning about community content; you have to accept it before you can install anything. Adding a repository from a link also needs a connection to your GitHub account: the Marketplace shows a code and a link to GitHub, where you sign in, enter the code and approve. The connection only reads public information and gets no access to private repositories. In HACS, use “Custom repositories” from the three-dot menu with the type “Integration”. - Open the “Meshtastic” repository and select “Install”, or “Download” in HACS.
- Restart Home Assistant if a repair asks you to. With HACS, you always need to restart.
Connect to the Pi node
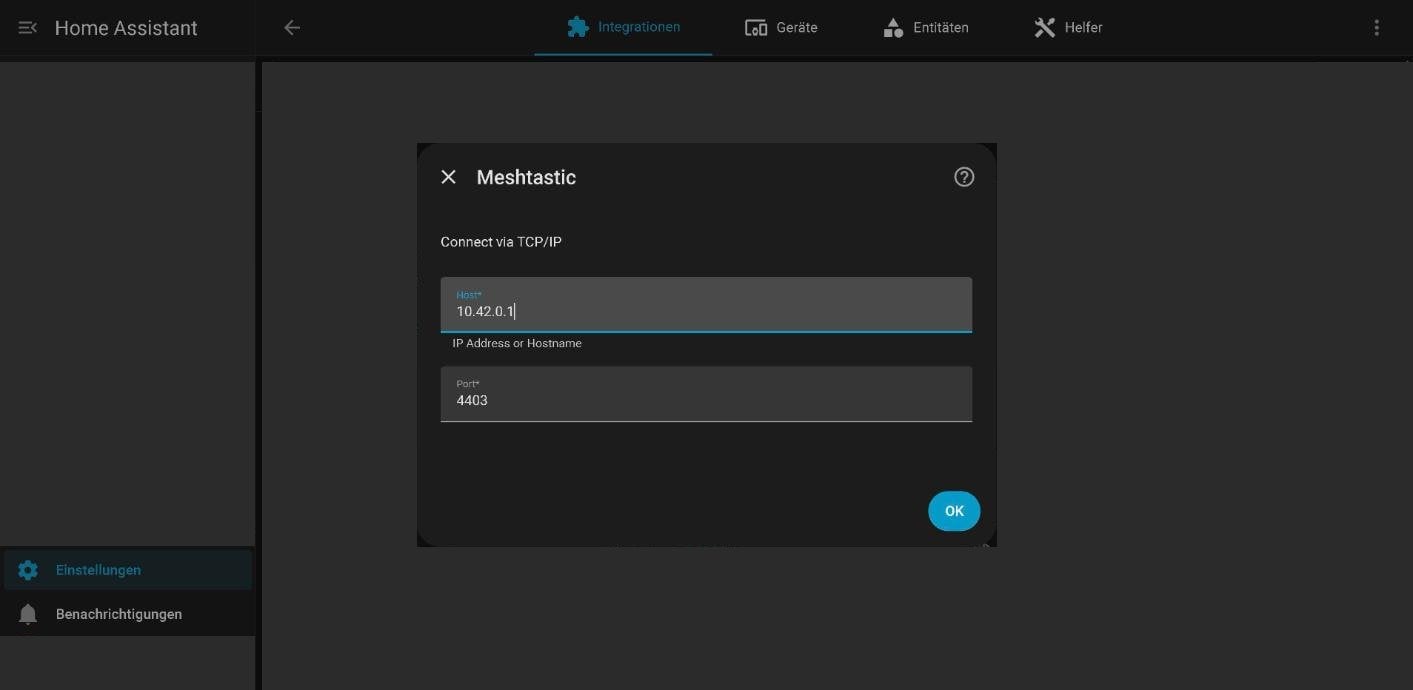
After the restart, add “Meshtastic” under Settings → Devices & services → Add integration. First the integration asks for the connection type: TCP/IP, Bluetooth or Serial. For a Pi running meshtasticd, it is TCP/IP.
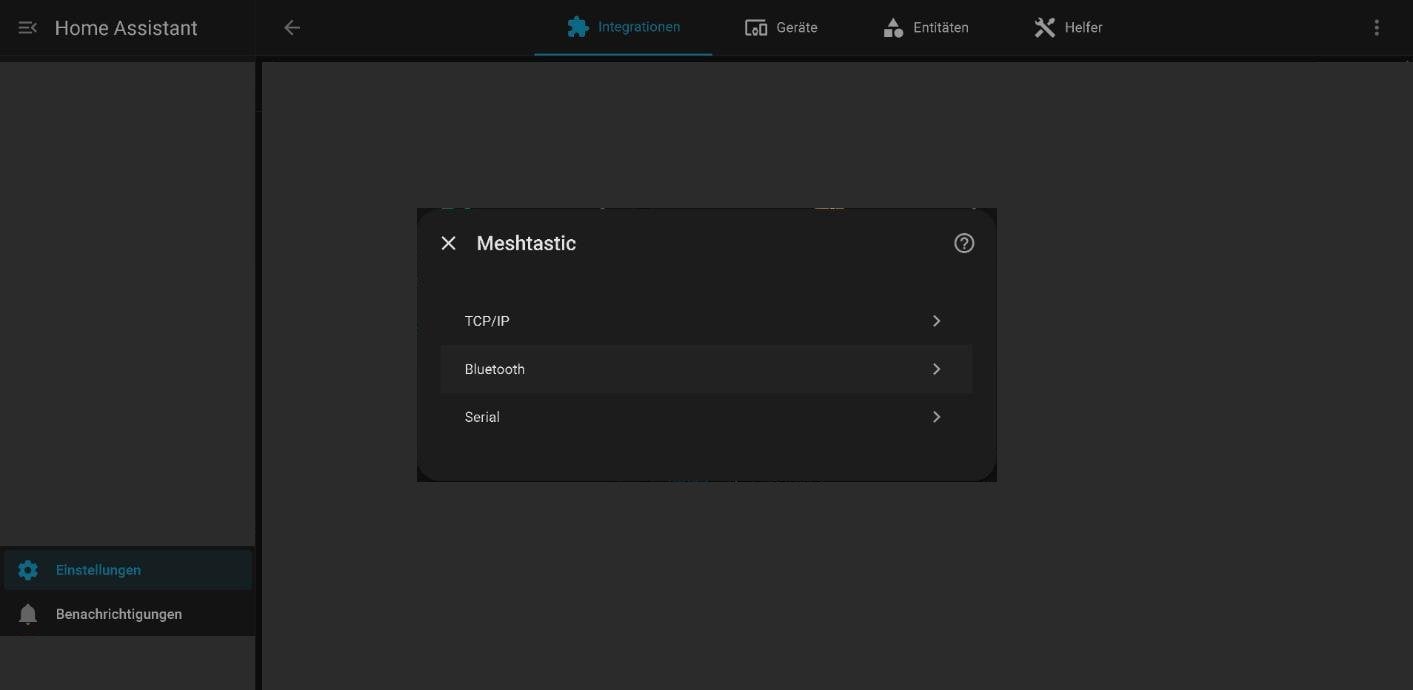
Enter the Pi’s IP address as the host; port 4403 is pre-filled. This is the same interface the command line uses to talk to the node.
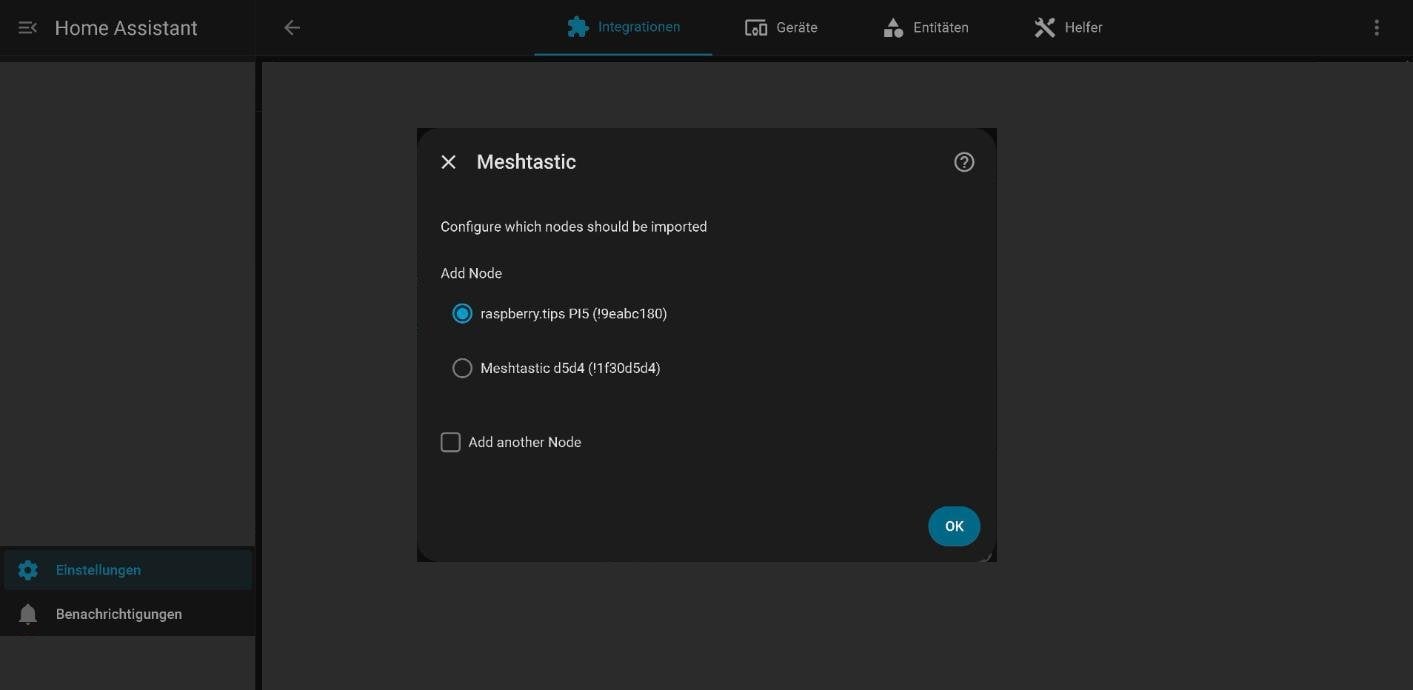
Next you pick the nodes that should become devices in Home Assistant. The list contains every node the Pi knows. You select one at a time; with “Add another Node” ticked, the selection appears again afterwards. Pick the Pi node and then your radio sensor.
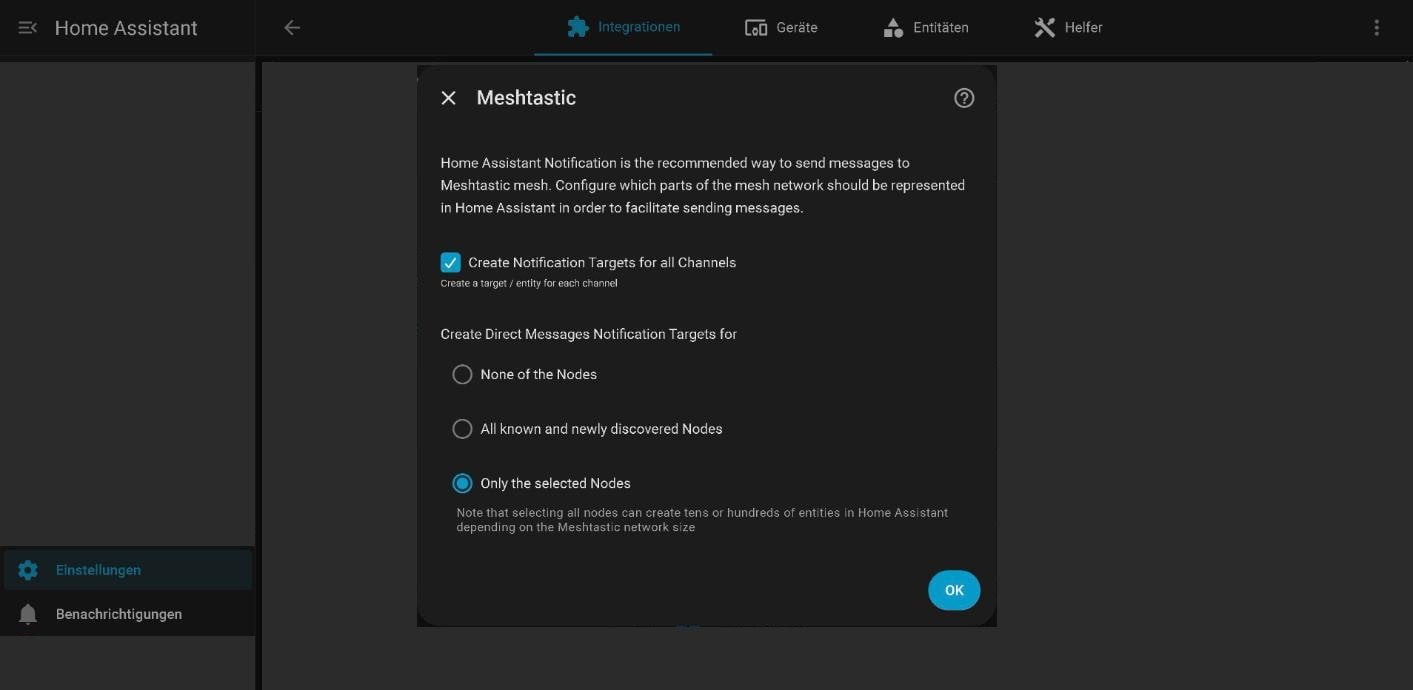
Then it is about sending messages. The integration creates notification targets: one per channel and, depending on your choice, one per node for direct messages. In a large mesh, “All known and newly discovered Nodes” quickly creates dozens of entities, which the dialog itself warns about. So choose “Only the selected Nodes”.
Two more dialogs offer a bundled web client and a TCP proxy, both marked as experimental. Leave both off. The web client controls the node with full admin rights: up to version 0.6.x, anyone who could open your Home Assistant address could reach it without a login; since 0.7.0, only Home Assistant admins can open it. The TCP proxy still has no authentication. Finally, you can name the new devices and assign them to an area.
What the integration creates
Right after setup, the integration reported two devices with 37 entities in total: 21 for the Pi node, including counters for sent and received packets and the number of known nodes, 12 for the Starter Kit and four more, including the notification targets.
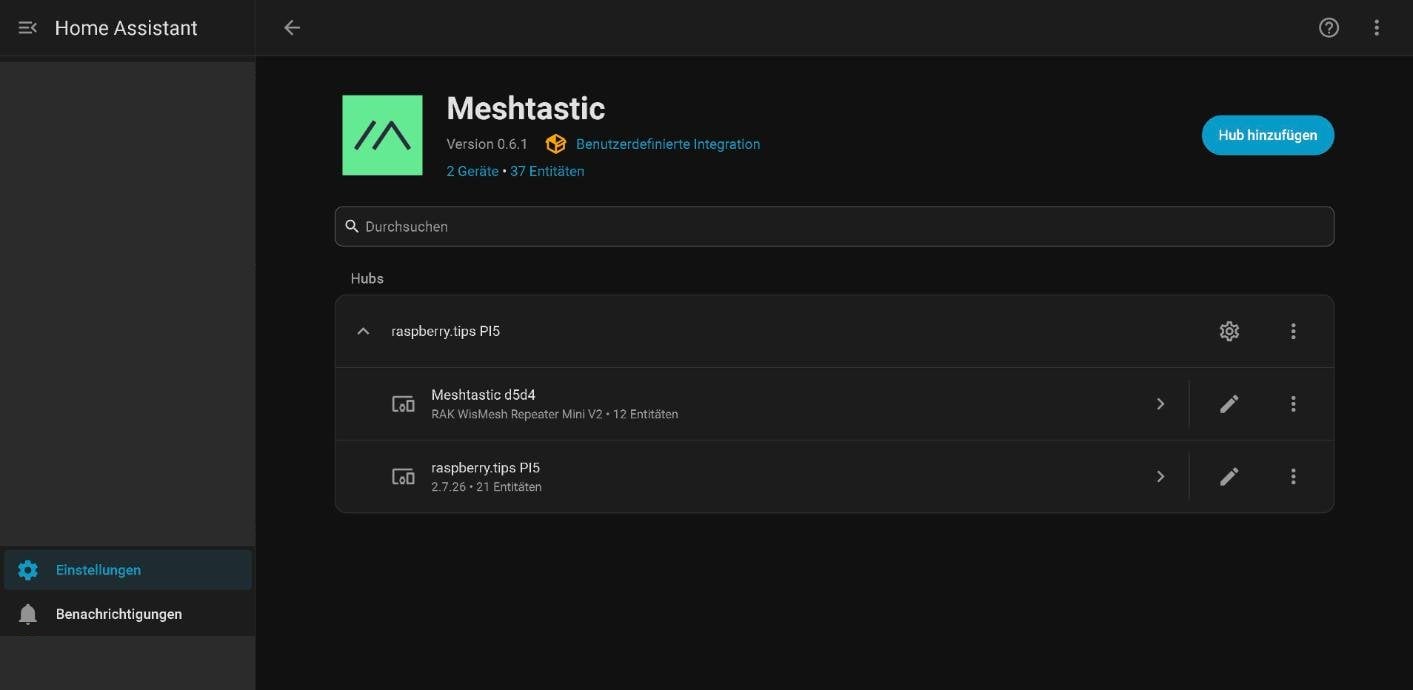
Temperature and humidity only appear once the sensor’s first reading arrives after connecting – with a thirty-minute interval, that can take up to thirty minutes. For the Starter Kit we then had these sensors, among others: temperature, humidity, signal to noise ratio, battery level, voltage, uptime, channel utilization, airtime, hops away and last heard.
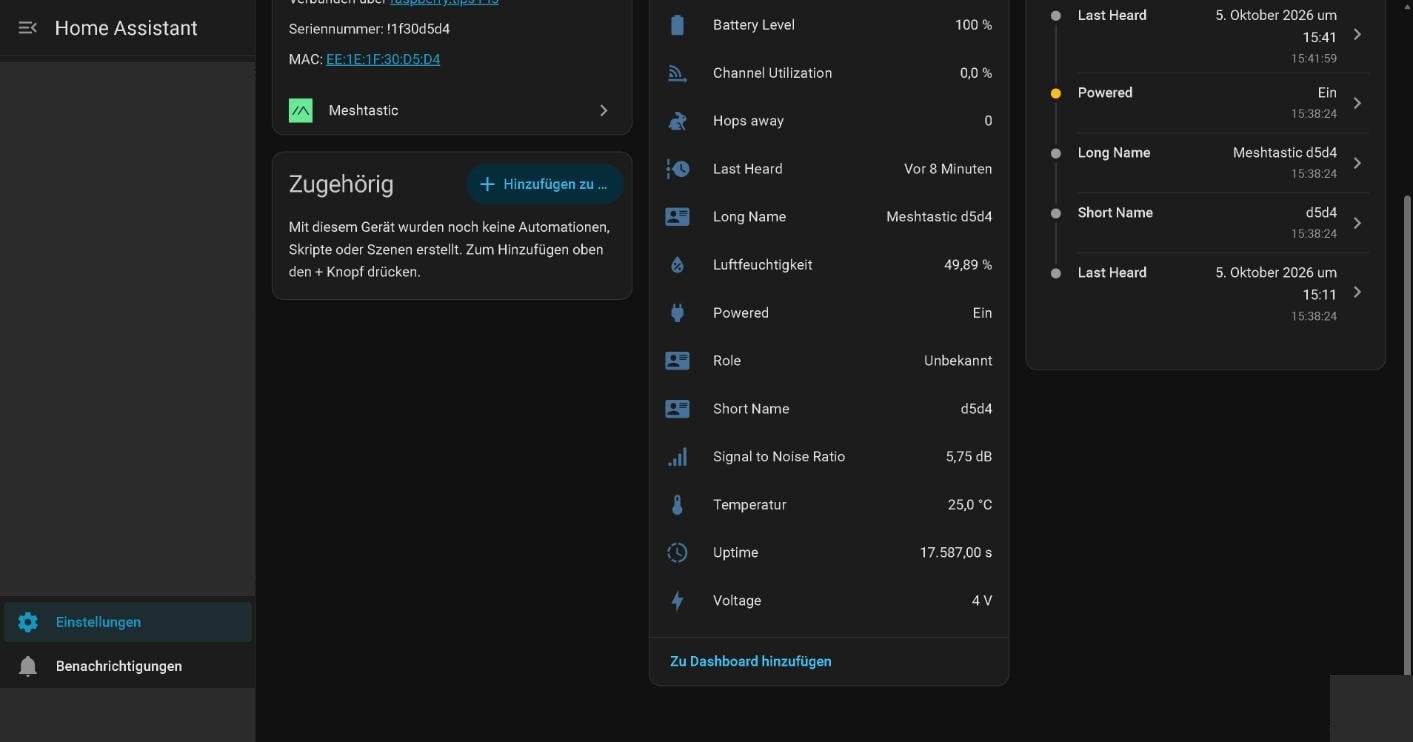
Two details did not match our hardware. The integration lists the model as “RAK WisMesh Repeater Mini V2 (RAK4631)”, although it is the Starter Kit; both use the same radio module. And “Battery Level” shows 100 percent although no battery is connected. The “Powered” sensor next to it, which reports “On”, is correct.
Send messages into the mesh
Every selected node and every channel gets an entity of the type “notify”. A direct message to the Starter Kit is therefore an ordinary action that you call under Settings → Tools → Actions (formerly Developer tools) or from an automation:
action: notify.send_message
target:
  entity_id: notify.mesh_node_meshtastic_d5d4
data:
  message: Hello from the HACS integration
The entity is named notify.mesh_node_ plus the node name. In our test the message reached the Starter Kit; the Pi’s log showed the recipient’s acknowledgement two seconds after sending.
Messages from the mesh to your phone
For every text message it receives, the integration fires the meshtastic_api_text_message event in Home Assistant. An automation turns it into a notification from the Home Assistant companion app. Create a new automation under Settings → Automations & scenes, switch to “Edit in YAML” from the three-dot menu and paste this block:
alias: Meshtastic message to phone
description: Forward text messages from the mesh as a notification
triggers:
  - trigger: event
    event_type: meshtastic_api_text_message
actions:
  - action: notify.mobile_app_your_phone
    data:
      title: Meshtastic
      message: "{{ trigger.event.data.data.message }}"
mode: queued
All you have to change is the name of your notify action. The automation reports direct messages to the Pi node as well as channel messages; in our test both arrived as notifications on the phone. According to the project description, the event also carries sender, recipient and channel besides the text, in case you only want to forward certain messages.
Only one connection: the integration states one limitation itself during setup. A Meshtastic node allows only one connection of this kind. While Home Assistant is connected, any other access through the same port – such as meshtastic --host localhost on the Pi – kicks Home Assistant off.
Way 2: connect Meshtastic via MQTT
The MQTT way takes more steps but works without a third-party integration. Afterwards, every packet sits on the broker, where other programs can read it too.
How the data reaches Home Assistant via MQTT
The path has four stations. The radio sensor sends its readings over LoRa into the default channel. The Pi node receives them like any other packet in the mesh. Because its MQTT module is running, it also publishes every packet it receives to the broker, in readable JSON. Home Assistant subscribes to the same topic and picks the right value out of each packet.
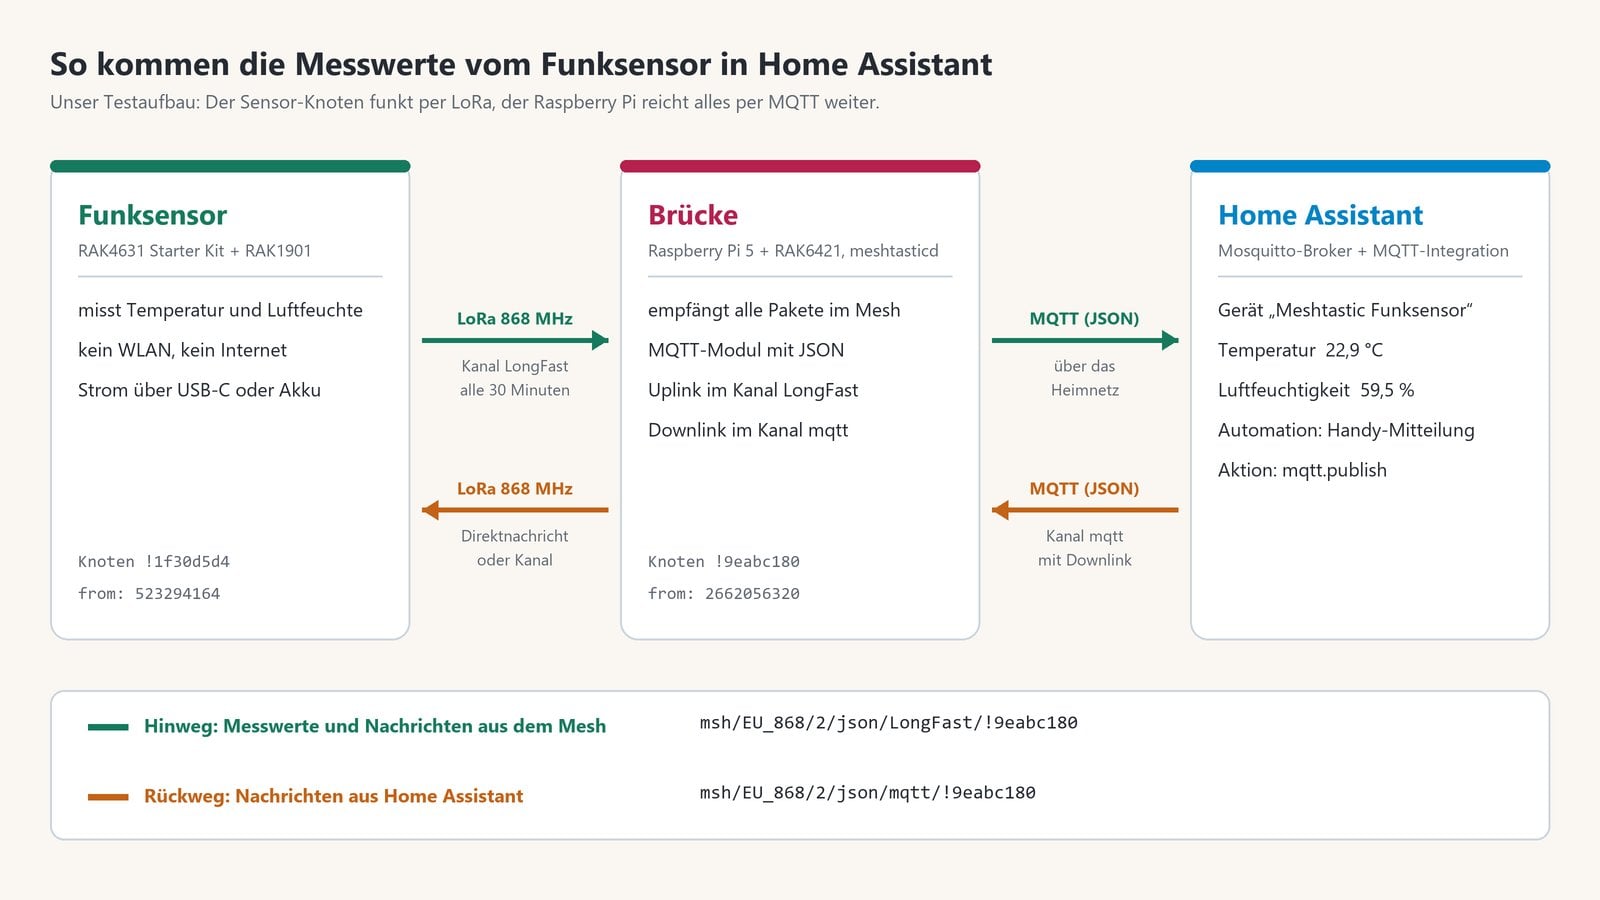
Two things follow from this. The sensor node itself needs no network and no MQTT settings; it only has to be within radio range of the Pi. And the Pi acts as a bridge for the whole mesh: packets from other nodes also end up on the broker, each with the number of its sender.
According to the Meshtastic documentation, not all hardware can output JSON: nodes with the nRF52 chip – the Starter Kit is one of them – cannot. That only affects the node connected to the broker, though. The Pi with meshtasticd delivered JSON in our test, including the Starter Kit’s packets.
Your own broker instead of the public server
Without a server address of your own, the MQTT module connects to the Meshtastic project’s public server. For Home Assistant that is the wrong choice: your readings would sit unencrypted on someone else’s server, and the Pi would depend on an internet connection. So you enter the broker on your own home network.
The documentation does, however, advise against running the default channel on a private broker. The reason: the public server makes sure packets from the internet are not passed on in the radio network; a private broker does not. Nodes that accept packets from the broker can therefore flood the public channel with traffic. This only concerns the direction from the broker into the mesh, the downlink. For the sensor readings you only need the uplink, the direction from the mesh to the broker. So the downlink stays off in the default channel. How channels and their keys fit together is explained in Meshtastic explained.
Step 1: create a user for MQTT in Home Assistant
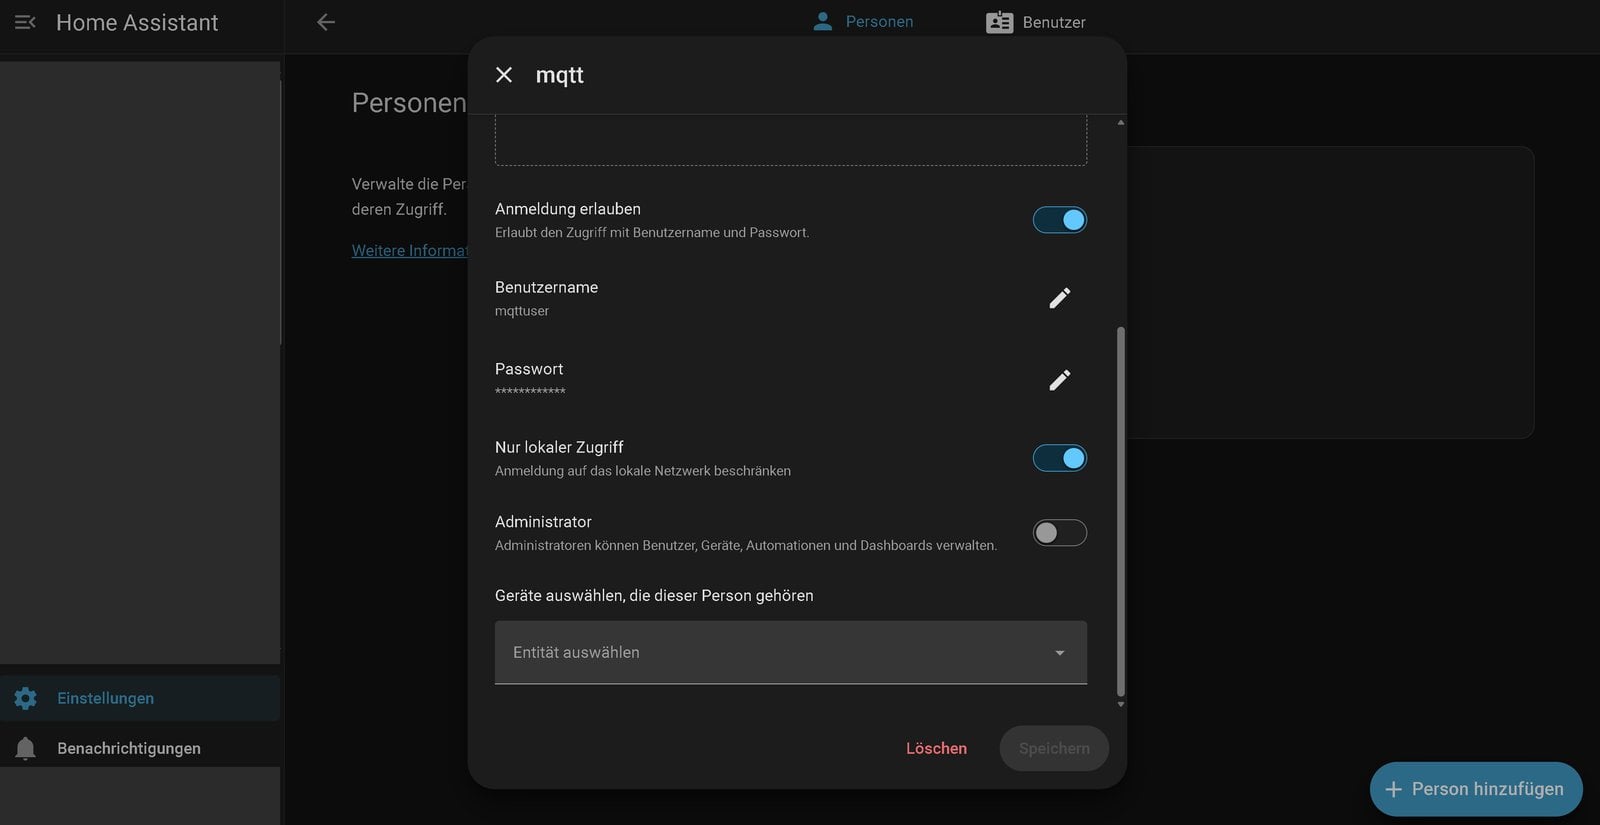
Home Assistant’s Mosquitto broker accepts the users created in Home Assistant. Give the node its own: under Settings → People, add a person, turn on “Allow login”, set a username and password and enable “Local access only”. The user does not need administrator rights.
Step 2: enable MQTT on the Pi node
Open the Pi node’s web client at https://IP-ADDRESS:9443 and go to Settings → Module Config → MQTT. Enter these values:
| Field | Value |
|---|---|
| Enabled | on |
| MQTT Server Address | IP address of Home Assistant |
| MQTT Username / Password | the user from step 1 |
| Encryption Enabled | off |
| JSON Enabled | on |
| TLS Enabled | off |
| Root topic | msh/EU_868 (in North America msh/US) |
| MQTT Client Proxy Enabled | off |
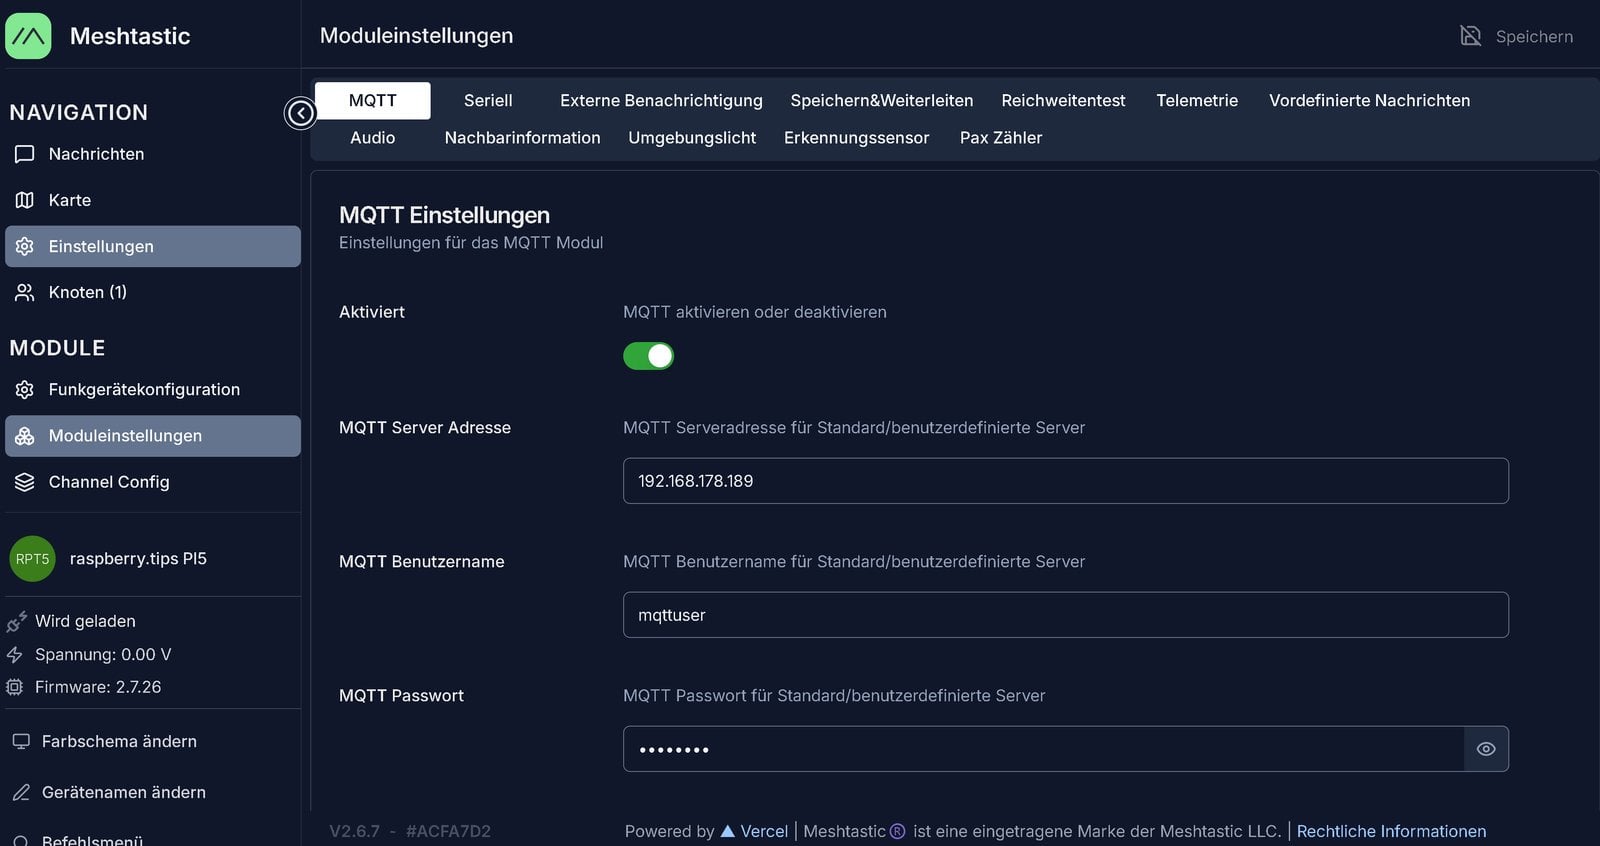
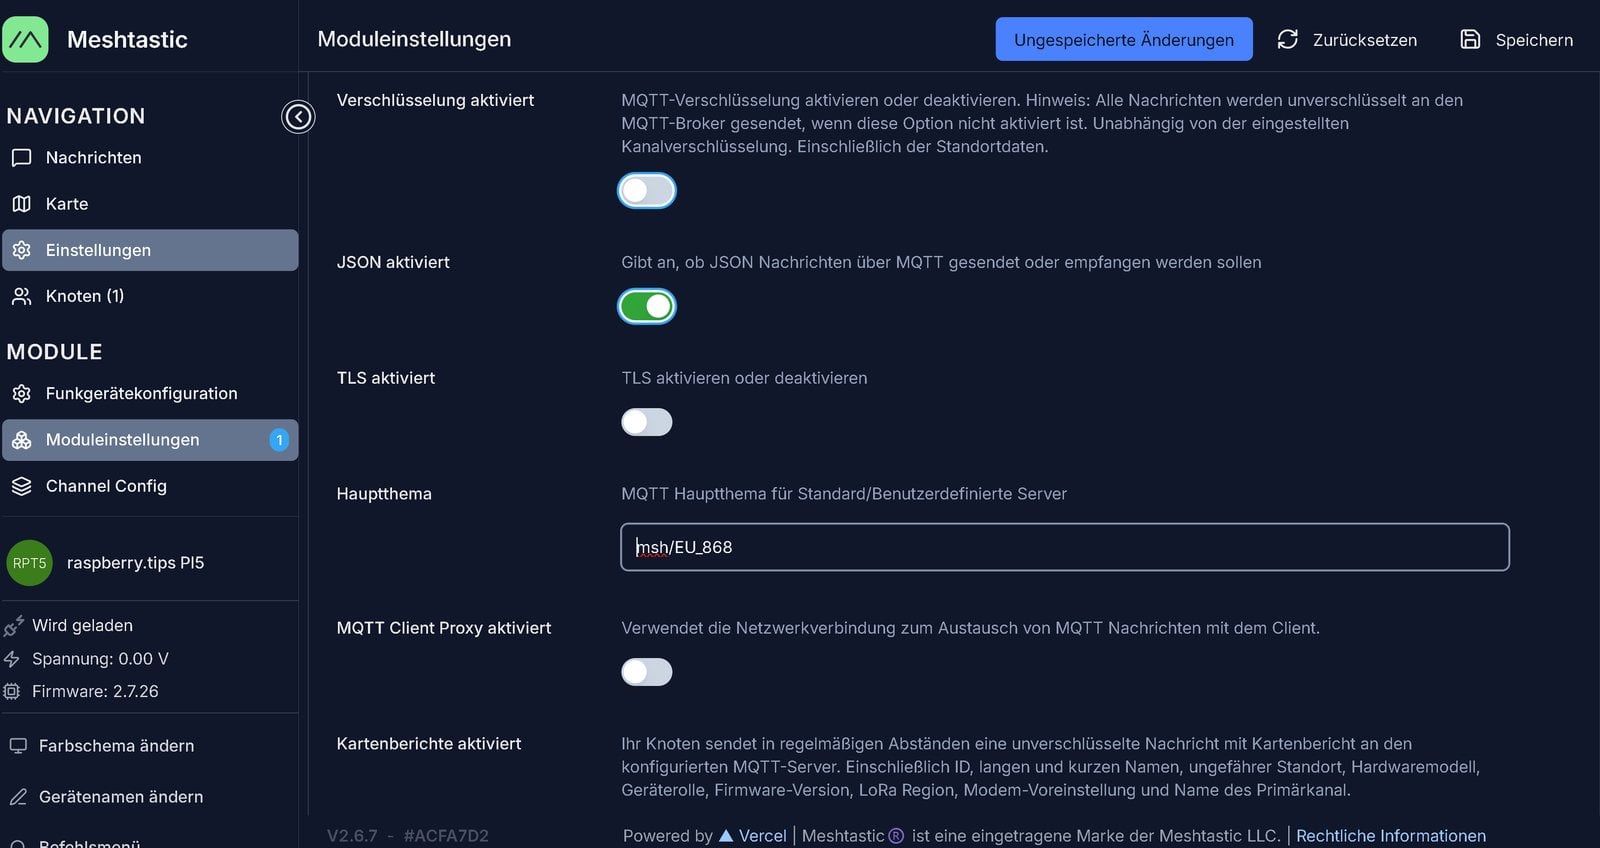
Encryption and TLS stay off so that Home Assistant can read the packets; what that means is explained in the box after step 3. The “Root topic” field must not be empty, otherwise the web client will not save. Keep the pre-filled value: it is the start of every topic the node publishes to and follows the region, so msh/EU_868 in Europe and msh/US in North America. After you click “Save”, the node restarts. In our test the “Unsaved changes” notice stayed visible even though the values had been applied – reload the page once.
Step 3: enable the uplink and restart
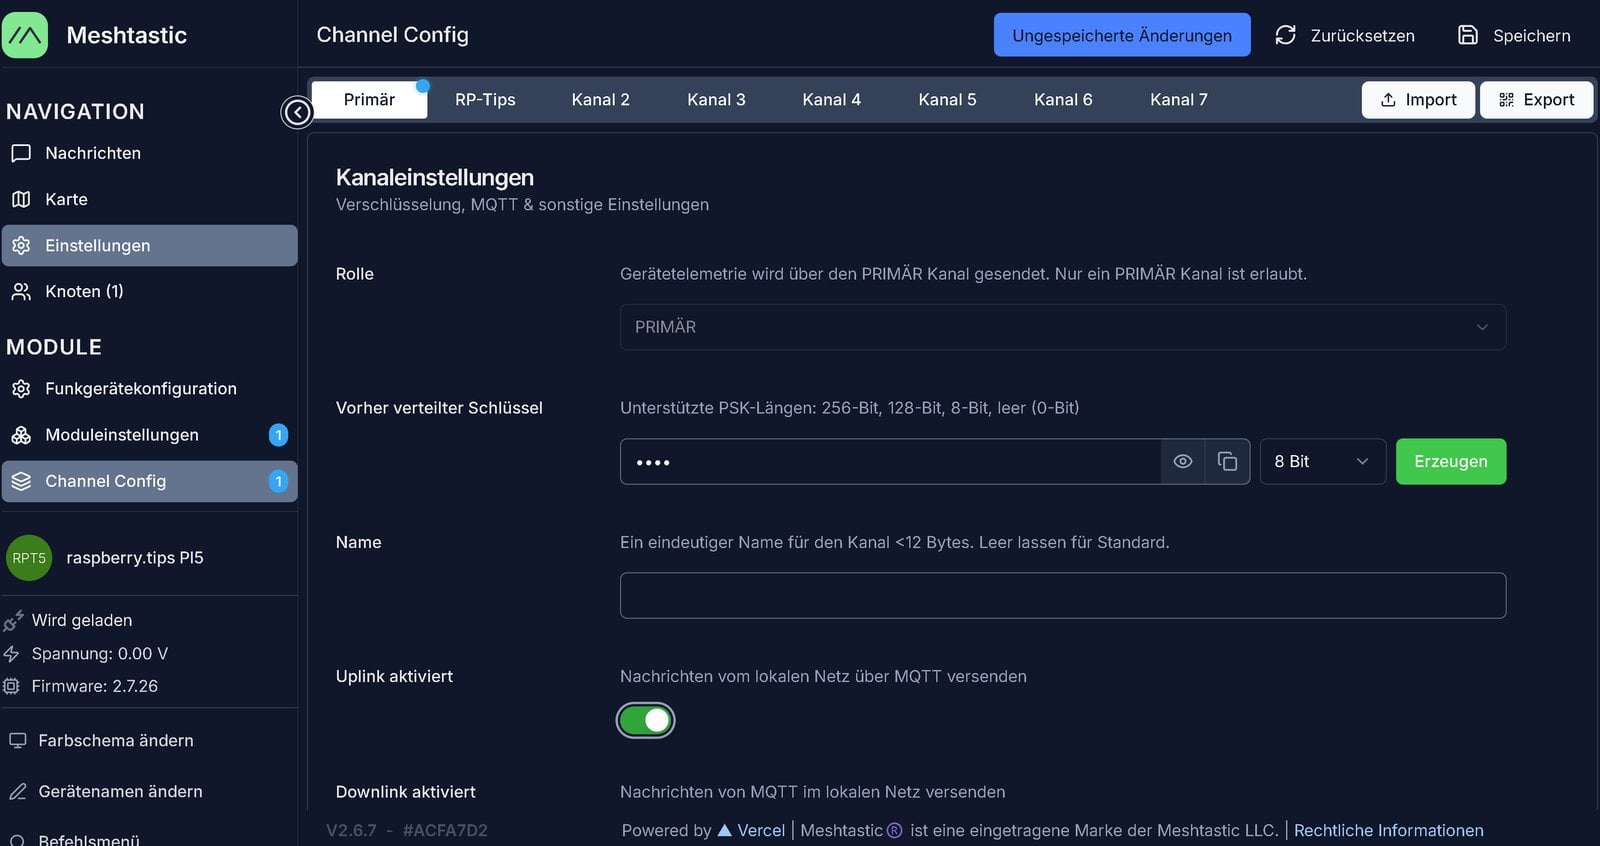
Which channels the node passes on to the broker is set per channel. Under Settings → Channel Config → Primary, turn on “Uplink Enabled”, leave “Downlink Enabled” off and save.
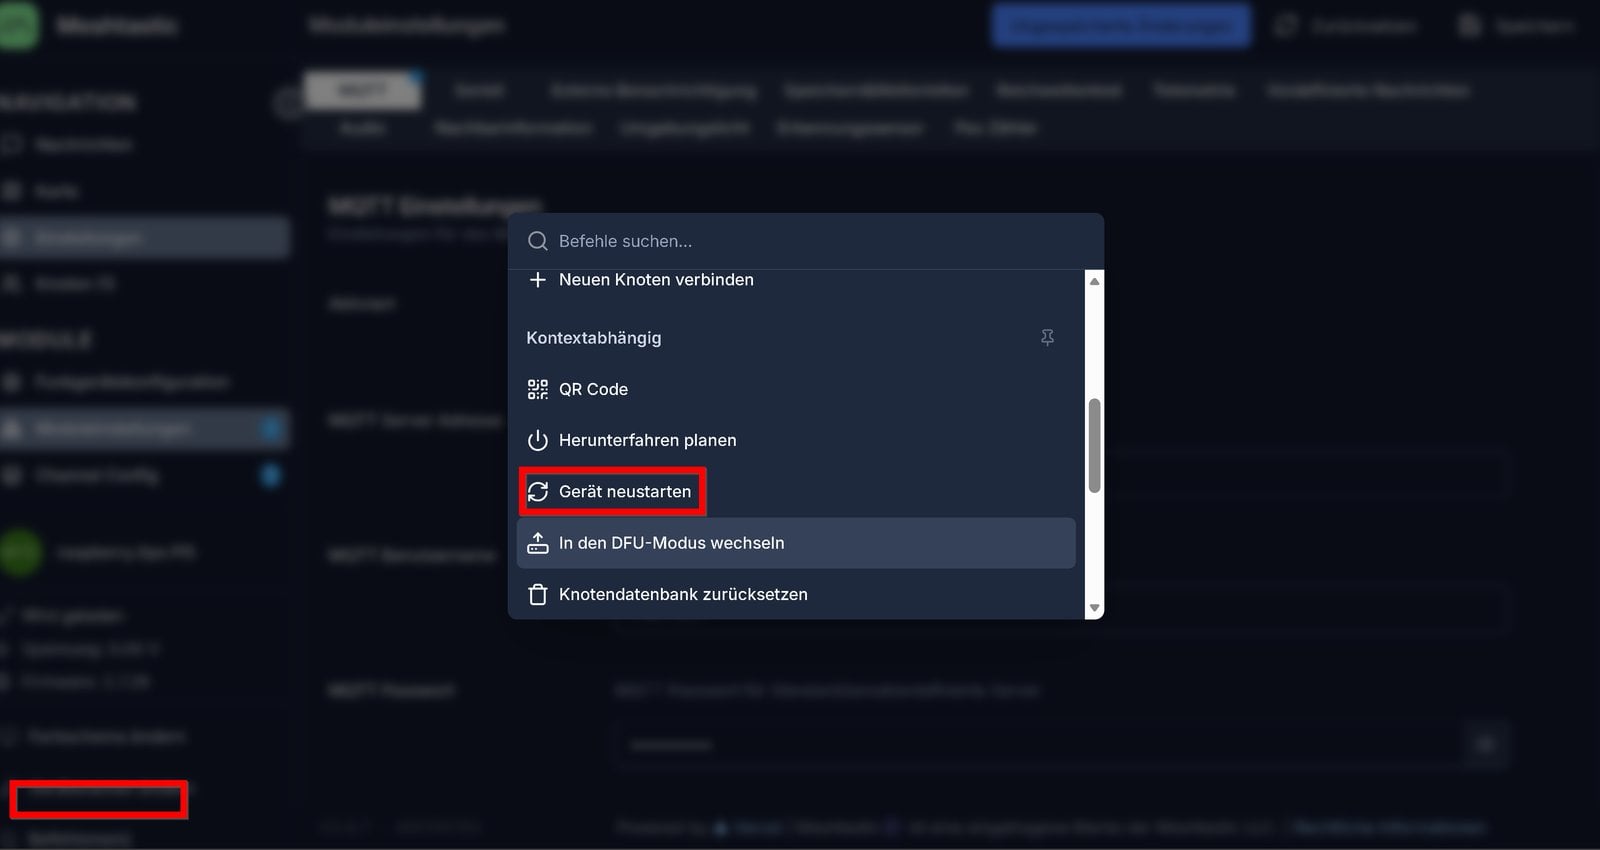
Then restart the node by hand. Without this restart, our node did not connect to the broker. Presumably the MQTT module only checks at startup whether a channel has uplink or downlink enabled. You find the restart in the command menu at the bottom of the sidebar, in the “Contextual” section, as “Reboot Device”; on the command line, sudo systemctl restart meshtasticd does the same.
Whether the login works is shown in the service log, via SSH on the Pi. If a line with “MQTT connected” appears, the connection is up; if the output stays empty, see the troubleshooting section below.
journalctl -u meshtasticd -b --no-pager | grep "MQTT connected"With encryption off and JSON on, every packet sits readable on the broker – Home Assistant needs that, but it also means anyone with access to the broker can read along. That includes direct messages to the Pi node, which are encrypted over the air; in our test their text was in plain text under a separate topic. On top of that,
meshtasticd writes the broker’s username and password unencrypted into its log when it connects. So never share journalctl excerpts unchecked, and use a password for the node that is not used anywhere else.
Step 4: check what arrives with MQTT Explorer
Connect MQTT Explorer to the broker (IP address of Home Assistant, port 1883, user from step 1) and leave it open. The broker does not keep the Meshtastic packets, so the msh branch only appears once a packet arrives after you connect. With a sensor on a thirty-minute interval that can take a while; a text message from the remote node into the default channel triggers a packet right away.
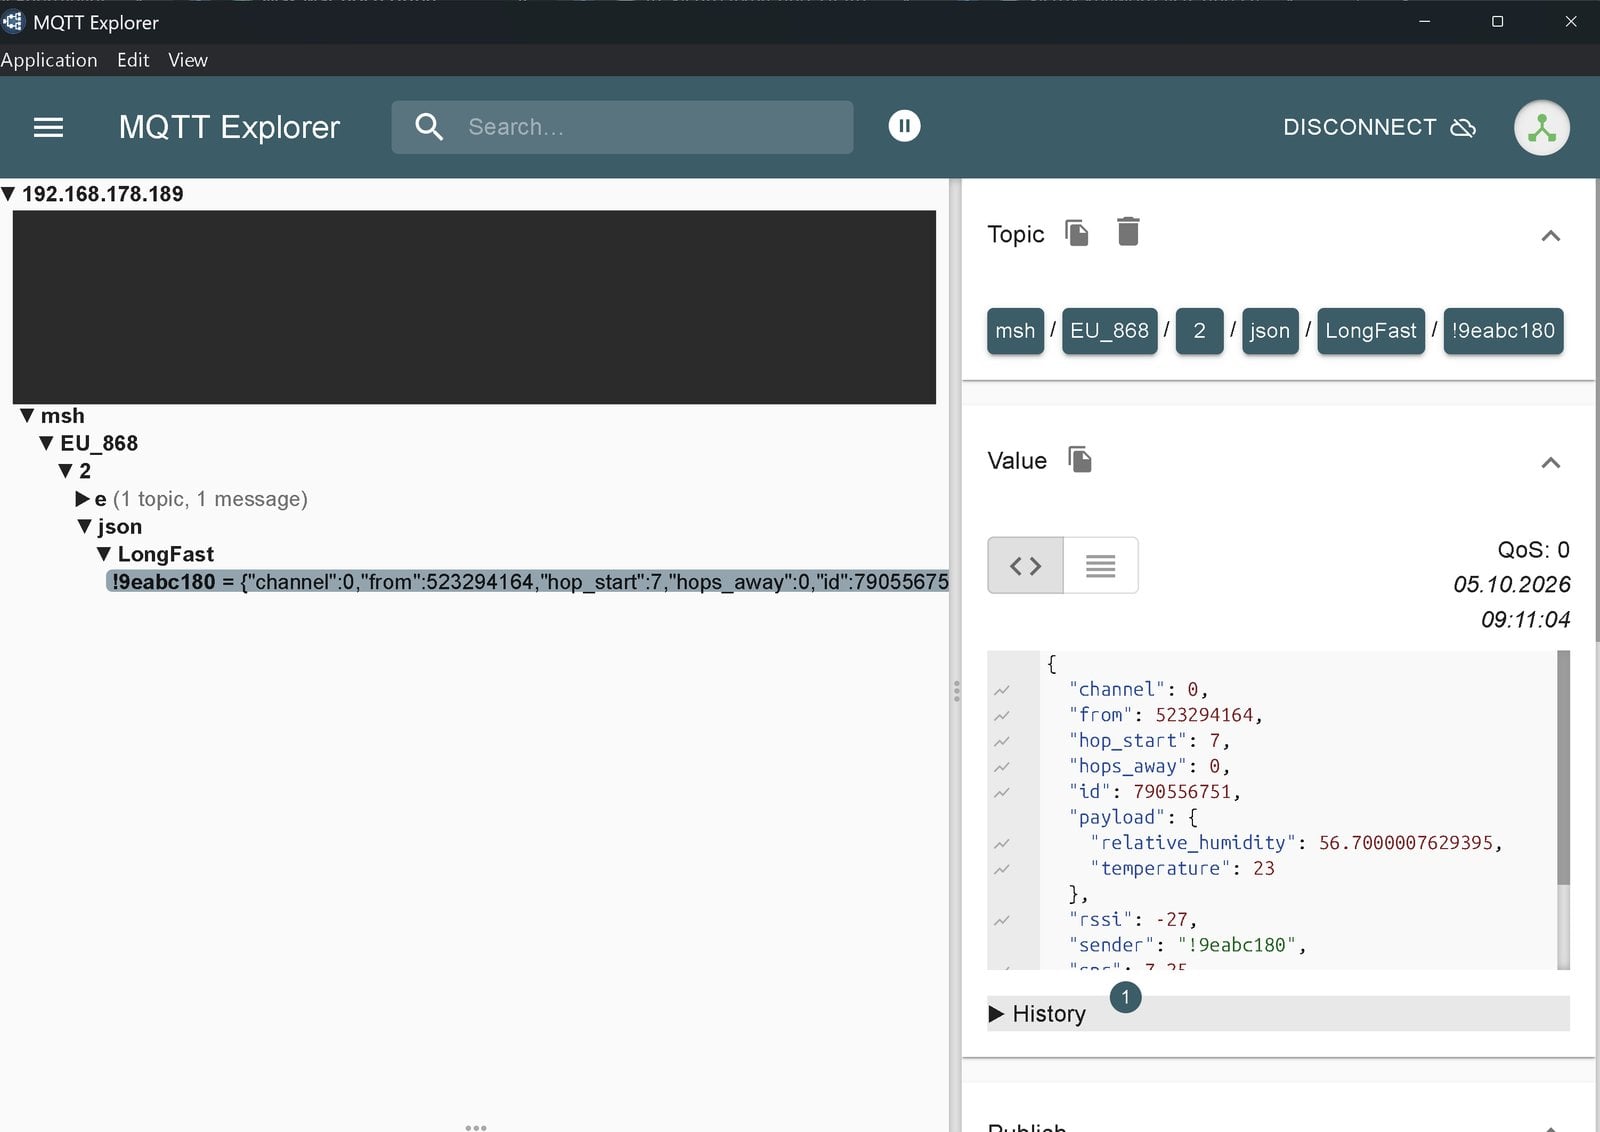
Under msh/EU_868/2 there are two branches: e with the raw data and json with the readable version. Our full topic was msh/EU_868/2/json/LongFast/!9eabc180. LongFast is the name of the default channel, !9eabc180 the ID of the Pi node – the bridge, not the sensor. A reading looks like this:
{
  "channel": 0,
  "from": 523294164,
  "payload": {
    "relative_humidity": 56.7,
    "temperature": 23
  },
  "rssi": -27,
  "sender": "!9eabc180",
  "snr": 7.25,
  "to": 4294967295,
  "type": "telemetry"
}
Write down three things: the topic, the number after from and the number of the bridge. from is the number of the node that took the reading, here the Starter Kit. sender, on the other hand, names the bridge, but as an ID. Its number is the same ID without the exclamation mark, converted from hexadecimal to decimal: !9eabc180 becomes 2662056320. The Windows calculator in “Programmer” mode does the conversion, or on the Pi the command printf "%d\n" 0x9eabc180. You will need this number later for messages. Home Assistant tells the nodes apart by from, because every packet from every node runs through the same topic. Battery level and voltage come in a separate, less frequent packet with the fields battery_level and voltage.
Step 5: create the radio sensor as an MQTT device
Home Assistant creates MQTT devices in the user interface; you do not have to touch configuration.yaml. To get the terms straight: the device is the radio sensor as a whole, each entity below it a single reading. So you create one device with two entities, not two devices.
- Under Settings → Devices & services → MQTT, click “Add MQTT device” and give it a name, for example “Meshtastic radio sensor”. The other fields can stay empty.
- Choose “Sensor” as the “Type of entity” and enter the reading as the “Entity name”, so “Temperature”. Home Assistant puts the device name in front by itself. Choose the name carefully: in our test it could not be changed later in the MQTT device dialog.
- Choose device class, the state class “Measurement” and the unit of measurement according to the table below.
- Enter your topic from step 4 as the “State topic” and paste the matching value template.
- For humidity, click the gear icon next to the device in the MQTT integration, choose “Add another entity to …” and repeat steps 2 to 4.
- Finish with “Save changes” in the same menu.
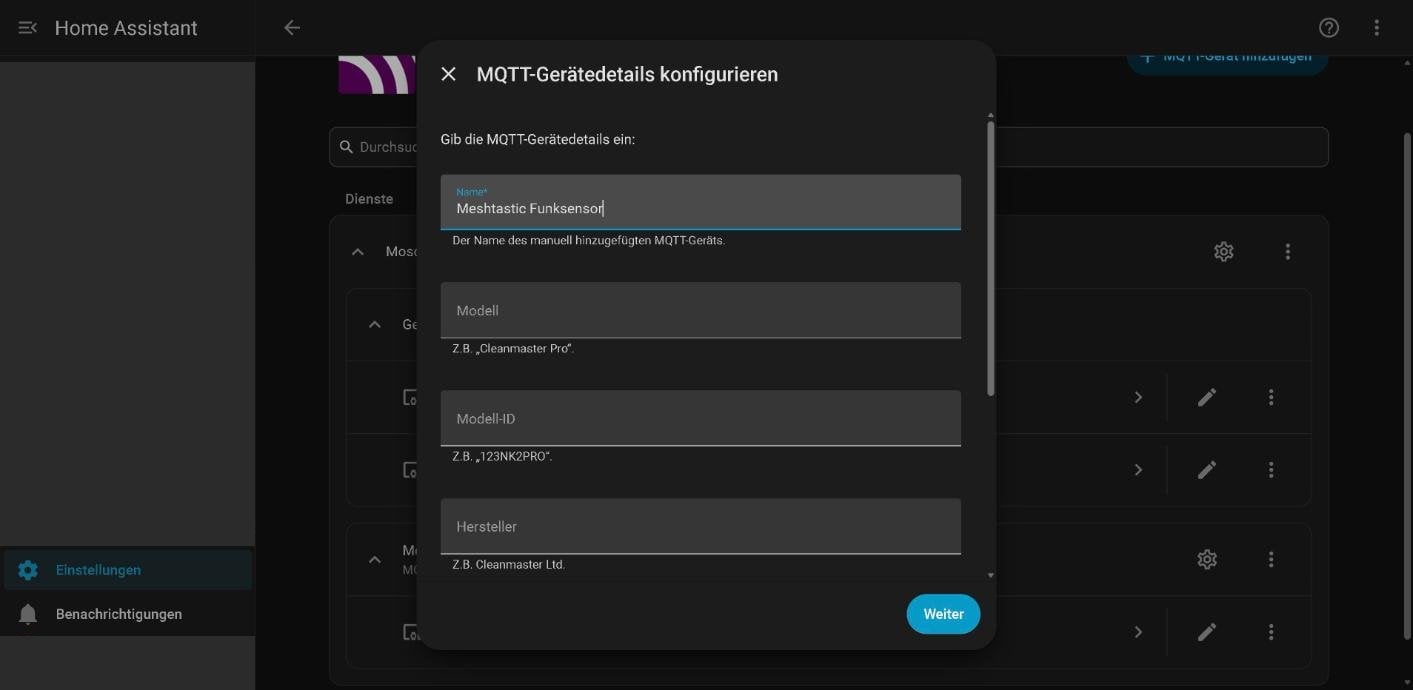
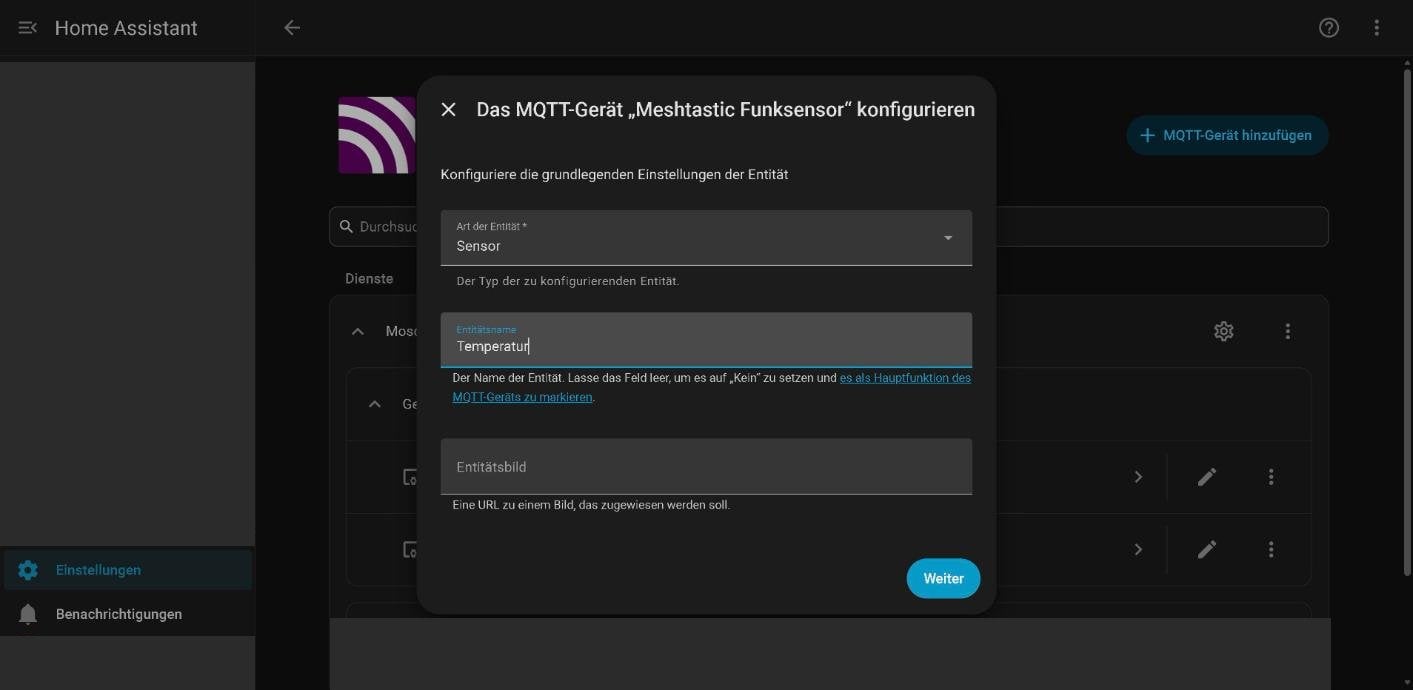
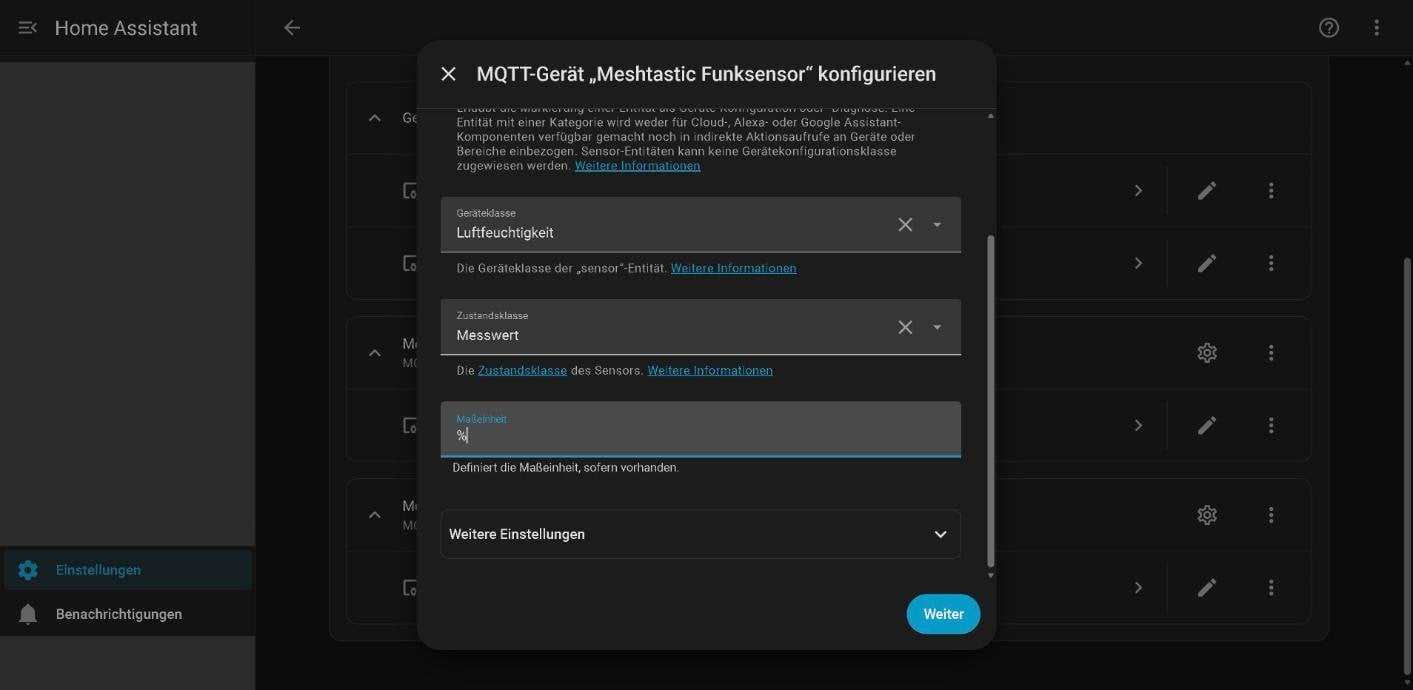
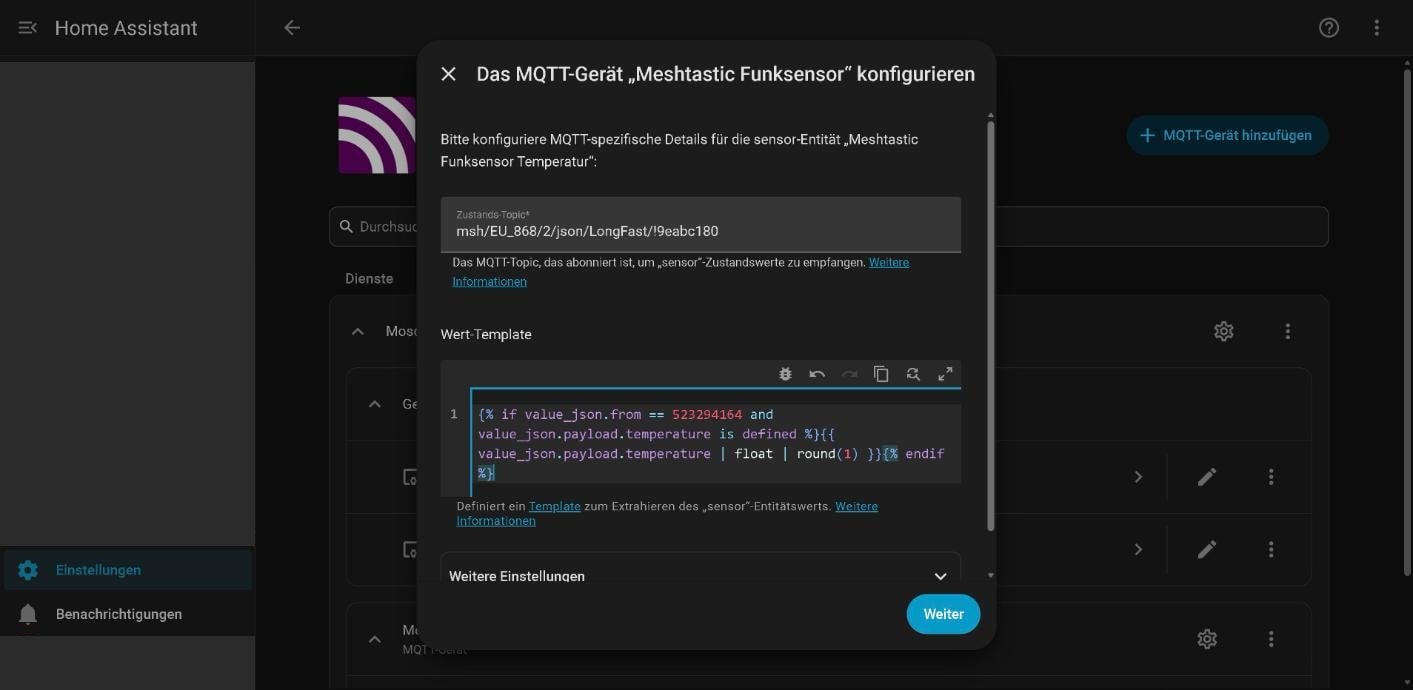
| Entity name | Device class | Unit of measurement |
|---|---|---|
| Temperature | Temperature | °C |
| Humidity | Humidity | % |
The value template for temperature:
{% if value_json.from == 523294164 and value_json.payload.temperature is defined %}{{ value_json.payload.temperature | float | round(1) }}{% endif %}For humidity:
{% if value_json.from == 523294164 and value_json.payload.relative_humidity is defined %}{{ value_json.payload.relative_humidity | float | round(1) }}{% endif %}If your sensor node runs on a battery, add the battery level as a third entity (device class battery, unit %):
{% if value_json.from == 523294164 and value_json.payload.battery_level is defined %}{{ [value_json.payload.battery_level | int, 100] | min }}{% endif %}In every template, replace 523294164 with the from number of your sensor node. The template first checks whether the packet comes from that node and contains the value in question. For all other packets it returns nothing, and the entity keeps its last value. Keep °C as the unit even if your Home Assistant uses Fahrenheit: Meshtastic reports degrees Celsius, and Home Assistant converts the value for display. We could only partly test the battery level: our Starter Kit has no battery and runs on USB-C. It then reports 101 percent, which is why the template caps the value at 100. The device readings also came less often than the environment readings, every two hours in our test.
Further entities are added through the gear icon next to the device, not through “Add MQTT device” – that would create a second device.
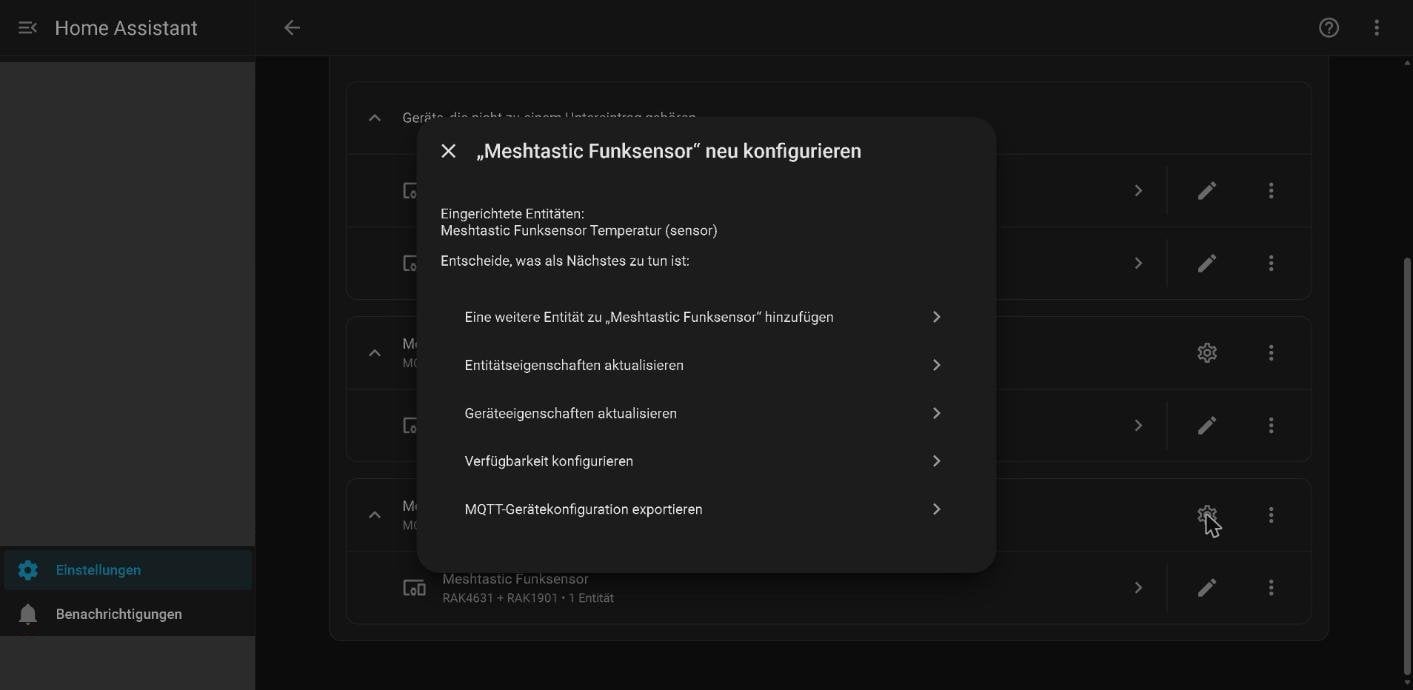
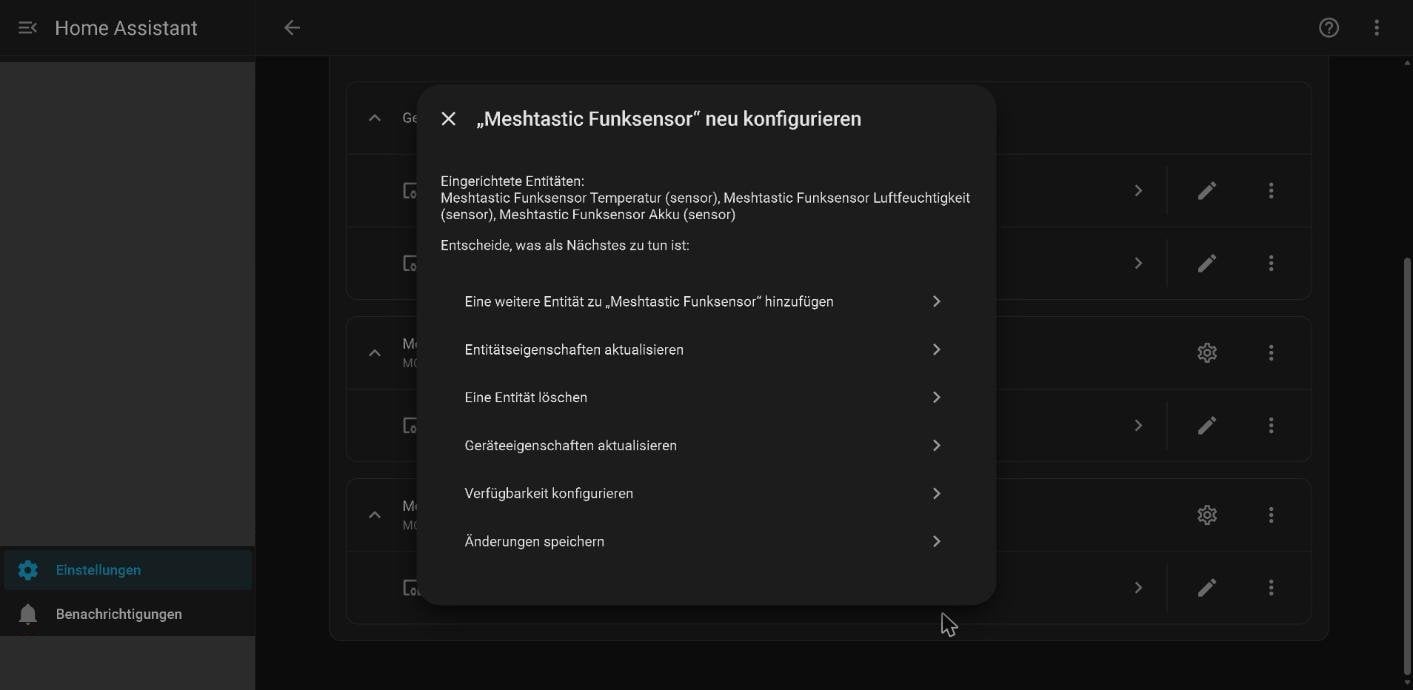
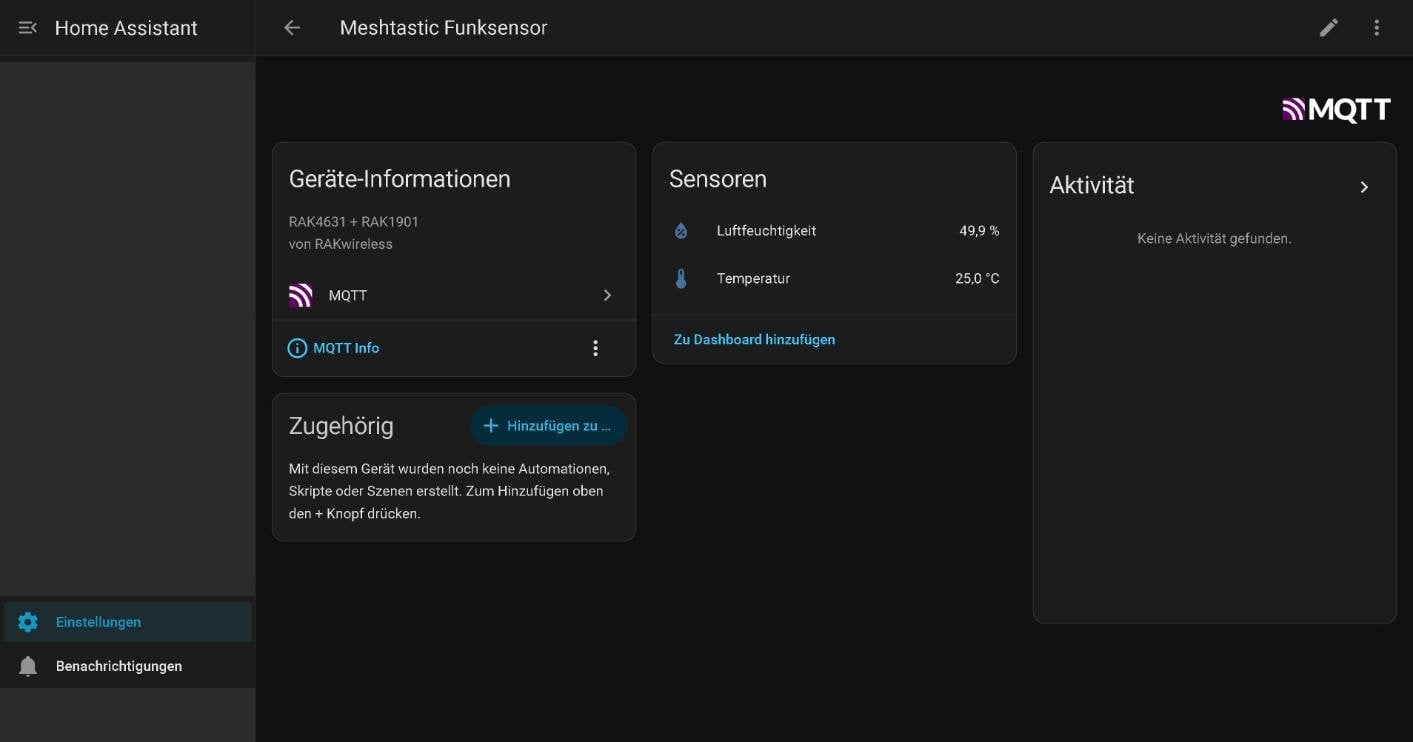
Right after you create them, the entities show “Unknown”. That changes with the sensor’s next packet, so after half an hour at most. Restarting the sensor node does not speed this up: in our test it only triggered a node info packet, not a reading.
The same happens after every later change to an MQTT device. When you save or delete, Home Assistant reloads the MQTT integration, and because the broker does not keep the Meshtastic packets, all Meshtastic entities fall back to “Unknown” until the next packet.
Messages from the mesh to your phone
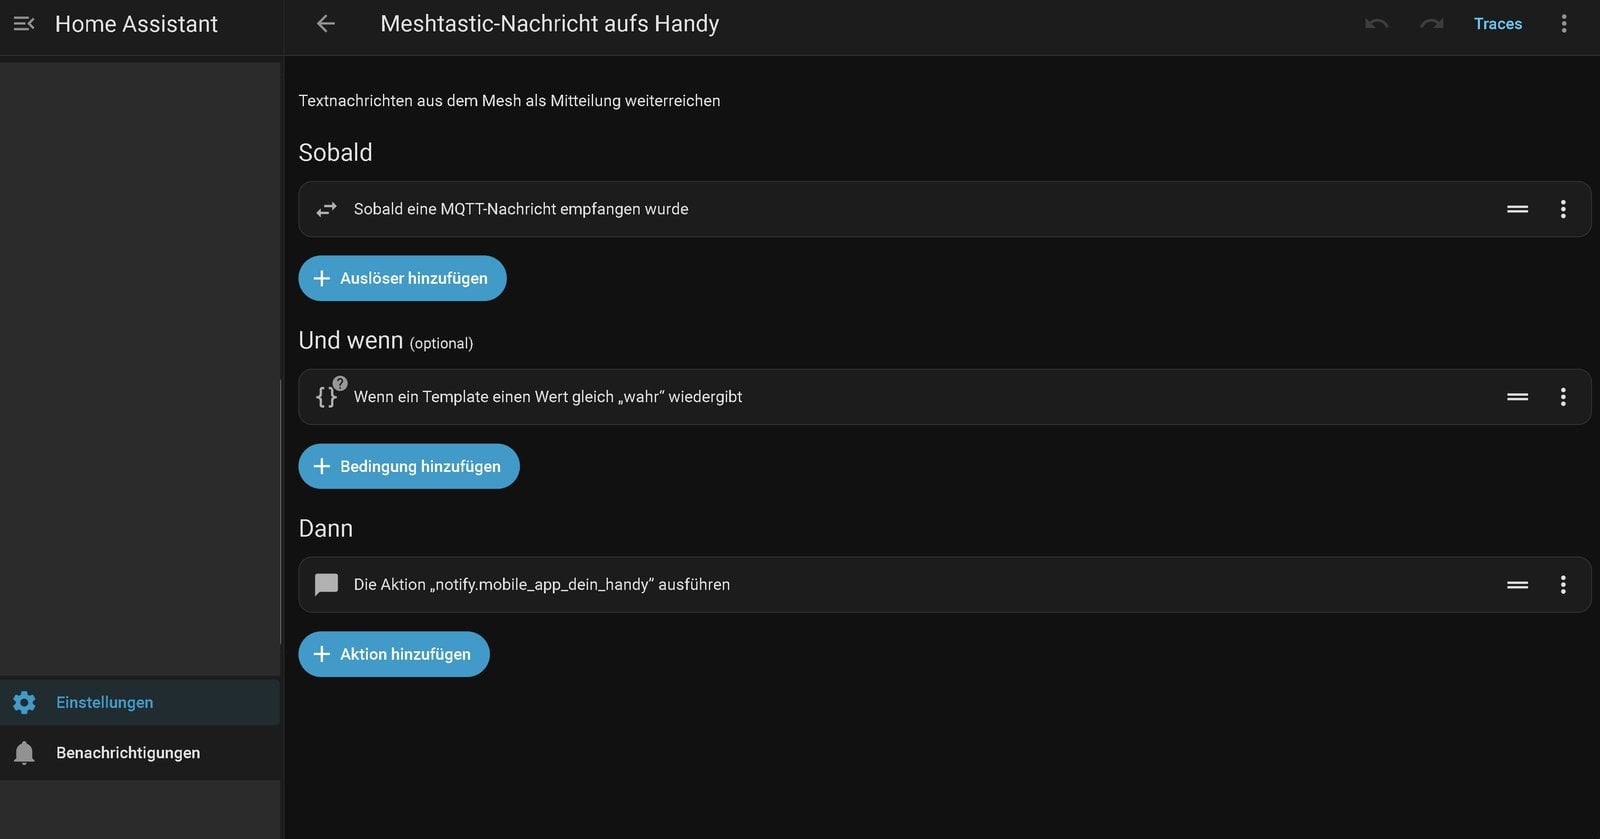
Text messages take the same path as the readings and carry "type": "text". An automation turns them into a notification from the Home Assistant companion app. Create a new automation under Settings → Automations & scenes, switch to “Edit in YAML” from the three-dot menu and paste this block:
alias: Meshtastic message to phone
description: Forward text messages from the mesh as a notification
triggers:
  - trigger: mqtt
    topic: msh/EU_868/2/json/+/!9eabc180
    value_template: "{{ value_json.type }}"
    payload: text
conditions:
  - condition: template
    value_template: "{{ trigger.payload_json['from'] != 2662056320 }}"
actions:
  - action: notify.mobile_app_your_phone
    data:
      title: Meshtastic
      message: "{{ trigger.payload_json.payload.text }}"
mode: queued
Change three things: your bridge’s ID in the topic, its number in the condition and the name of your notify action. You wrote down the bridge’s number in step 4. The + in the topic stands for any channel name: channel messages arrive under LongFast, direct messages to the bridge under PKI. The condition skips texts sent by the bridge itself – otherwise every message from Home Assistant would come back as a notification.
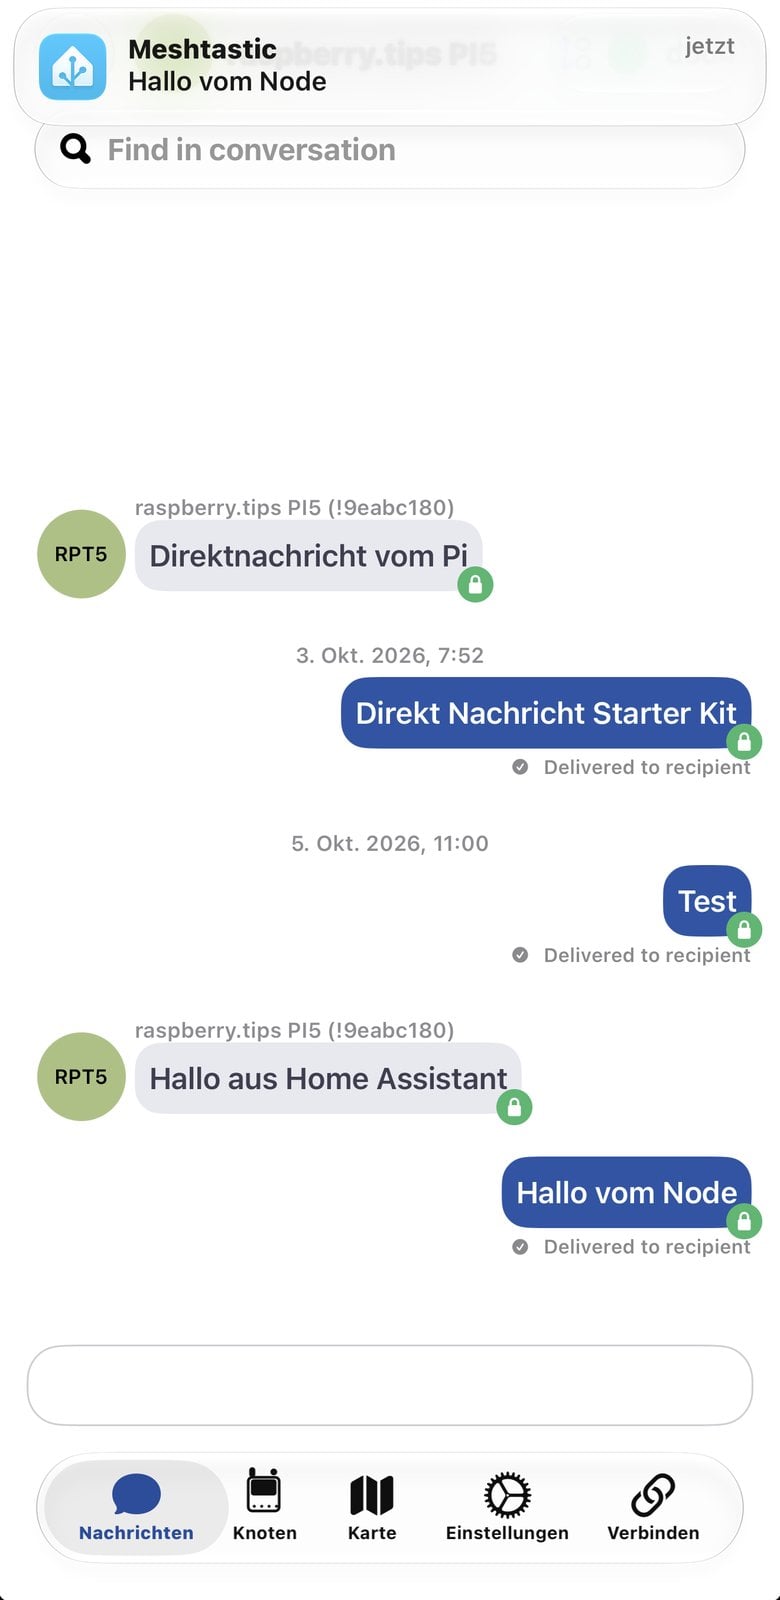
Send messages from Home Assistant into the mesh
For the way back, Meshtastic uses a separate channel that must be called exactly mqtt. Create it in the web client under Settings → Channel Config in the next free tab: name mqtt in lower case, “Downlink Enabled” on, “Uplink Enabled” off. The default channel stays unchanged, with its downlink still off. Leave the channel’s role as it is; ours was set to “DISABLED”, and the way back worked with that.
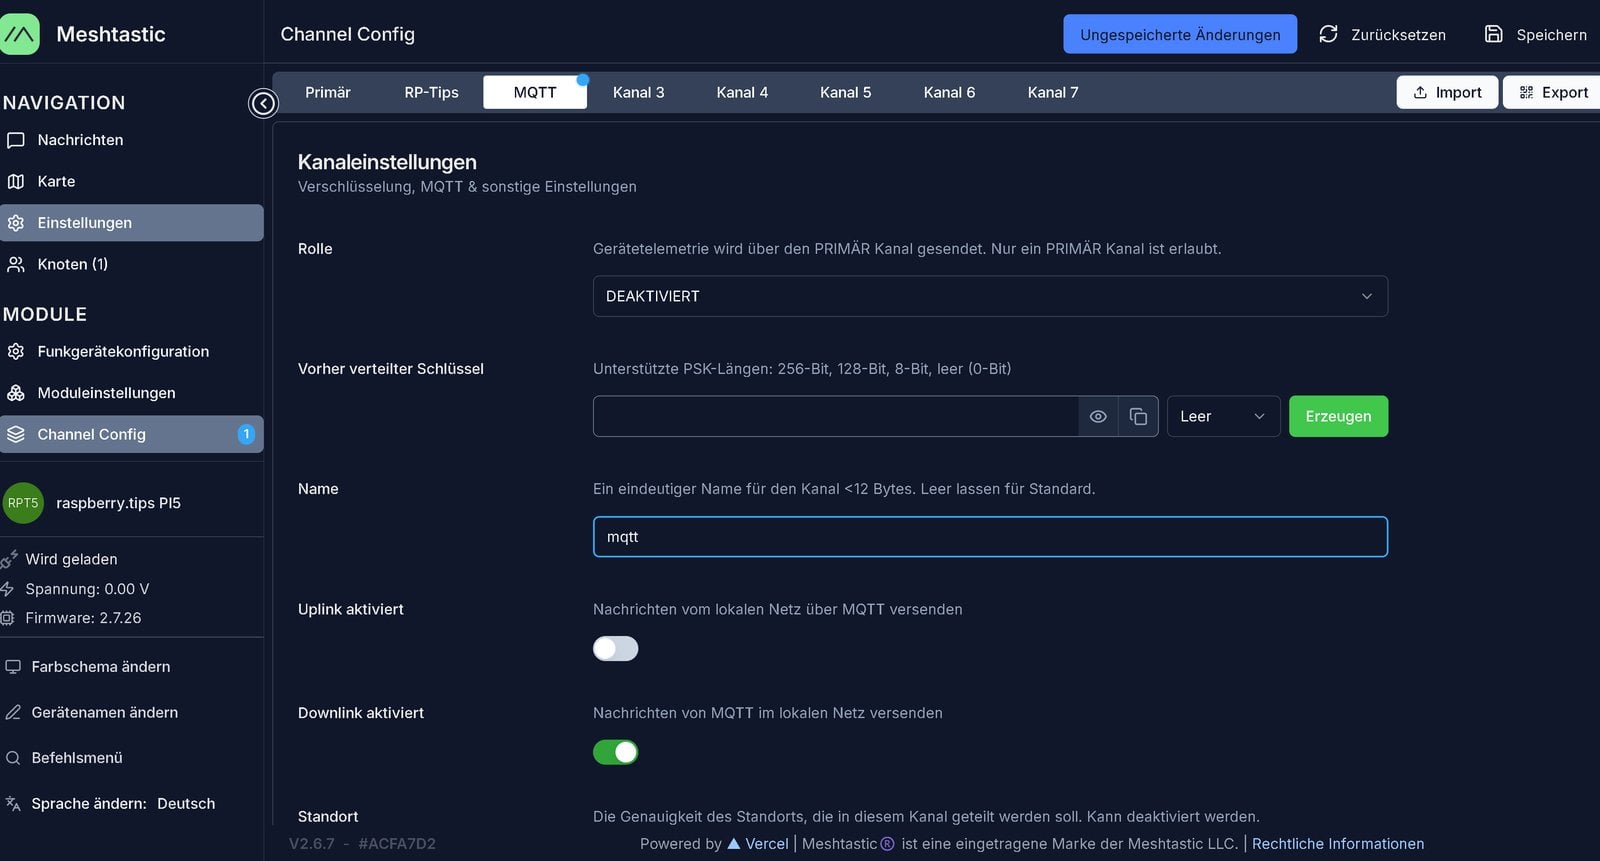
This also needs a restart of the node afterwards. Spelling matters: the channel name ends up in the topic exactly as written. If the channel is called MQTT in upper case, the node listens on msh/EU_868/2/json/MQTT/, and the example below goes nowhere.
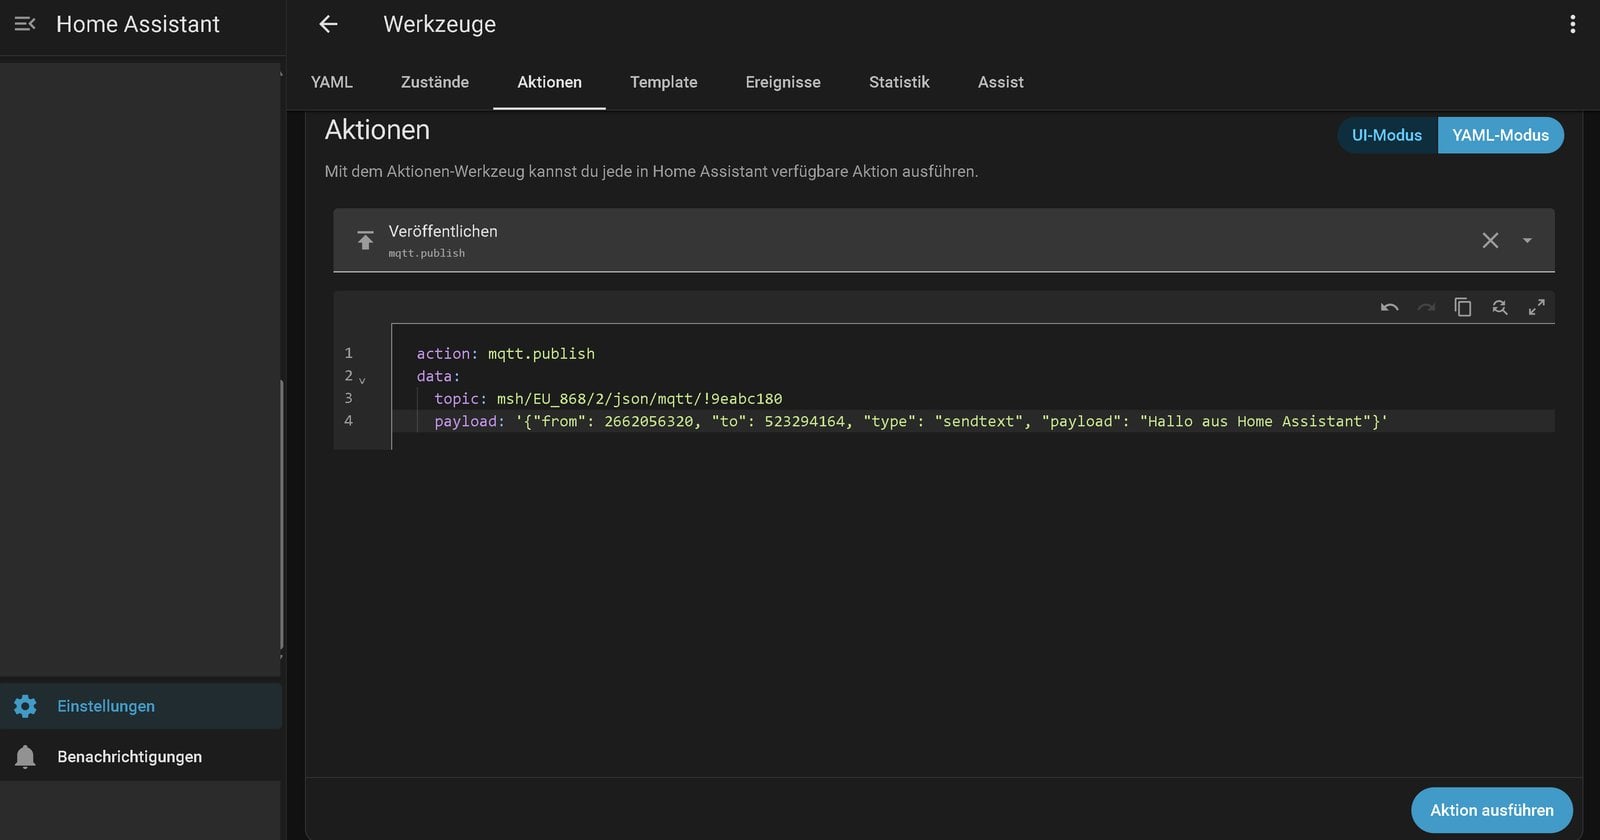
To test it, open Settings → Tools → Actions in Home Assistant, switch to YAML mode and paste:
action: mqtt.publish
data:
  topic: msh/EU_868/2/json/mqtt/!9eabc180
  payload: '{"from": 2662056320, "to": 523294164, "type": "sendtext", "payload": "Hello from Home Assistant"}'
The mqtt channel is only the inbox for such send requests: the bridge takes the request from the broker and then transmits the text itself. from is the bridge’s number, to the recipient’s number. With to, the text goes to one node as a direct message. If you leave the field out, the bridge sends into the default channel, where every node in range can read along. The documentation recommends keeping texts to 190 characters.
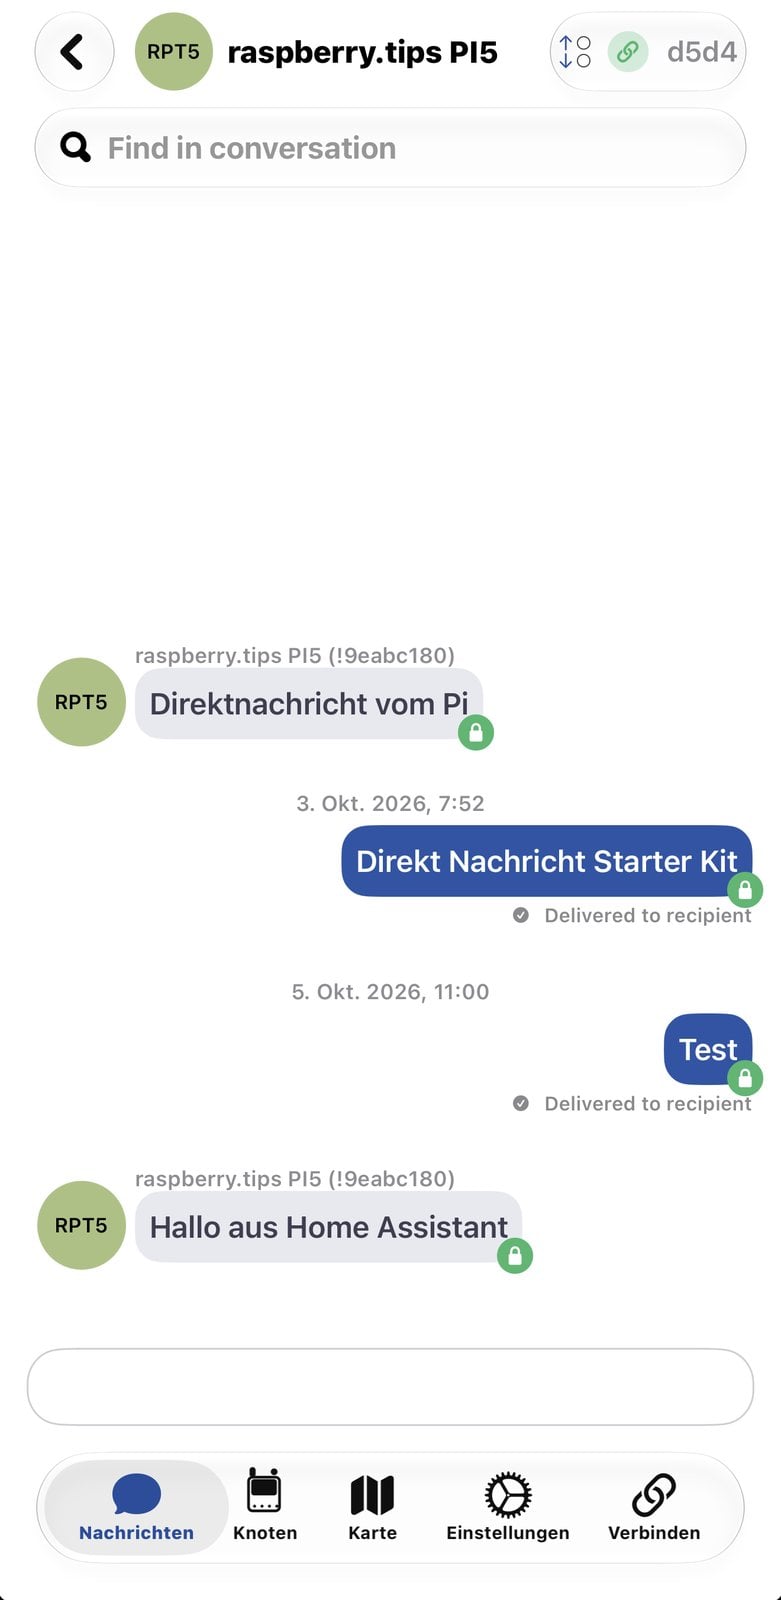
The same action fits into any automation, for example as an alert into the mesh when the power fails at home or a sensor raises an alarm.
Troubleshooting
| Message or symptom | Cause | Fix |
|---|---|---|
| Web client does not save the MQTT settings | “Root topic” field is empty | Enter msh/EU_868 or the topic for your region |
| “Unsaved changes” stays visible | The node restarts after saving and the page does not notice | Reload the page |
| No connection attempt to the broker in the log | Uplink was only set after the last start | Restart the node |
Failed to connect to MQTT server, not authorised in the Mosquitto log | Wrong username or password | Compare the credentials with the Home Assistant user |
MQTT Explorer shows no msh branch | No packet since connecting | Wait or send a text message |
| Entity stays “Unknown” | No matching packet since it was created | Wait up to 30 minutes; otherwise check topic and from number |
| All Meshtastic entities suddenly “Unknown” again | An MQTT device was changed or deleted and the integration reloaded | Wait for the next packet |
| Integration shows no temperature for the sensor node | No reading since connecting | Wait up to 30 minutes |
not a valid option at 'sequence[0].payload' when running mqtt.publish | topic and payload are not under data:, or the payload is not quoted | Paste the block as shown above, payload in single quotes |
| Message from Home Assistant does not arrive in the mesh | Channel is not called exactly mqtt, or the node was not restarted afterwards | Match name and topic, restart |
Frequently asked questions
No. The sensor node only transmits over LoRa radio. Only the node acting as the bridge at home needs a network connection, in our case the Raspberry Pi with meshtasticd.
In our setup every thirty minutes for temperature and humidity. The iOS app did not allow a shorter interval.
According to the Meshtastic documentation, any node with Wi-Fi or Ethernet can use the MQTT module, and all platforms except nRF52 deliver JSON. We only tested it with a Raspberry Pi and meshtasticd.
Over the air, yes, if the sensor sends in the default channel: its key is publicly known, so every Meshtastic node in range can read the values. On the broker they also sit unencrypted for anyone with access to it.
No. MQTT devices and their entities can be created in the MQTT integration’s user interface, one form with topic and value template per reading. With the Meshtastic integration from HACS, the entities are created automatically.
Conclusion
A Pi node as the bridge turns a Meshtastic node into a radio sensor for Home Assistant that works without Wi-Fi. With the integration from HACS, that takes a few minutes. The MQTT way takes more steps, but sticks to built-in tools and makes the data available to other programs as well. Either way, the thirty-minute interval limits it to things that change slowly, and either way Home Assistant can send alerts into the mesh that reach the nodes without internet.
Sources: MQTT module, MQTT integration and Home Assistant in the Meshtastic documentation, plus the integration’s project page. Have fun building!