Shelly Wall Display X2i: Building a Home Assistant Dashboard
In the first article, I wired up the Shelly Wall Display X2i* as a replacement for a classic light switch. This time it gets a full Home Assistant dashboard instead of Shelly’s own tiles: one control panel for the lights, blinds and heating in the room.


Two extensions make the dashboard usable on the small touchscreen: Kiosk Mode hides the header and sidebar for one specific user, and Browser Mod provides large popup buttons for the blinds.
As of November 2026. Built with Home Assistant 2026.7; the Browser Mod install via the Marketplace and the blinds popup were re-checked with Home Assistant 2026.11 and Browser Mod 3.4.2.
In short
With a dedicated user, Kiosk Mode and Browser Mod, the Shelly Wall Display X2i shows a full Home Assistant dashboard without the header and sidebar.
- You need: a Shelly Wall Display X2i* that’s already set up, and Home Assistant with admin access, ideally 2026.11 or later with the built-in Marketplace (otherwise HACS)
- Time: under an hour
- Good to know: Open the large blind popups with
fire-dom-event. They then only appear on the display, and the display doesn’t need to be registered in Browser Mod.
Requirements
- Shelly Wall Display (X2i) already set up as a smart switch – see wiring & initial setup
- A running Home Assistant installation with admin access
- The Marketplace under Settings, built in from Home Assistant 2026.11. For older versions, our HACS guide covers the install. The screenshots here still show HACS.
Step 1: Create a Restricted “walldisplay” User
Don’t let the display log in with your admin account. With a dedicated user, Kiosk Mode and the default dashboard only apply to the display, and it sees nothing but its own dashboard. Create the user under Settings > People > “Users” tab > Add User; only the Users tab, not People, has the login fields. Use “walldisplay” as both the display name and the username, set a password, enable “Local only” (the display stays on your Wi-Fi) and leave the “Administrator” toggle off.

Step 2: Install Browser Mod
Browser Mod is a Home Assistant integration that adds popups, notifications and other browser actions – we use it for the large blind buttons. Install it via Settings → Marketplace → search for “Browser Mod” → Install. The first time you open the Marketplace, you have to accept a notice that community projects aren’t reviewed by the Home Assistant team; until then, nothing installs. After installing, the Marketplace takes you straight to the integration setup. There are no fields to fill in, you just confirm. I didn’t need a restart on Home Assistant 2026.11, and a new “Browser Mod” item then appears in the sidebar.

With HACS (before Home Assistant 2026.11), installing only downloads Browser Mod. Restart Home Assistant, then add the integration under Settings → Devices & Services → Add Integration by searching for “Browser Mod”. There are no fields to fill in, just confirm.
You don’t need the “Register” toggle in the Browser Mod panel for this dashboard. The popups are triggered right in the browser you tap in (more on that in the blinds section), and that also works on a device that isn’t registered. You only need to register a browser if you want to target it from automations or scripts, for example to send a notification to the Wall Display.

Home Assistant drops the connection of windows running in the background after 5 minutes. If that causes problems, turn off the option that suspends background connections in the walldisplay user’s profile. Do this on the display itself, as the setting applies per device.
Step 3: Build the “walldisplay” Dashboard
Build the dashboard on a computer with your admin account, not on the touchscreen: go to Settings → Dashboards → Add Dashboard → “New dashboard from scratch”, give it a name (e.g. “walldisplay”) and an icon, and click Create.
Open the new dashboard and click the edit button in the top right. The three-dot menu then takes you to the raw configuration editor, where you edit the whole view as YAML. That’s where the following code blocks go, and later the Kiosk Mode block from Step 4.
Prefer not to copy every block by hand? The complete dashboard YAML (Kiosk Mode block and all tiles in one file) is in our GitHub repo raspberry.tips-Resources. Adjust the username and entity IDs to match your setup. You can also build the dashboard in the UI instead.
The view type is sections, Home Assistant’s grid-based layout and the default for new views. My dashboard has one section with tiles for the lights, blinds and heating. Each tile in the code blocks below is an entry in that section’s cards: list; the “Layout Fine-Tuning” section shows the full structure.
Lights: Direct Tap to Toggle
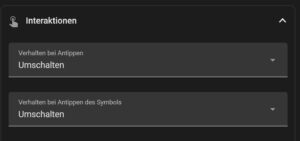
Set both tap_action and icon_tap_action to toggle, and add a toggle feature along the bottom of the tile:
type: tile
entity: switch.wohnzimmer_licht
tap_action:
  action: toggle
icon_tap_action:
  action: toggle
features:
  - type: toggle
features_position: bottom
In the dashboard editor, you can do the same by setting the behavior to “Toggle” under “Interactions” in the light tile’s settings.
Blinds: Small Icons + Large Popup on Every Tap
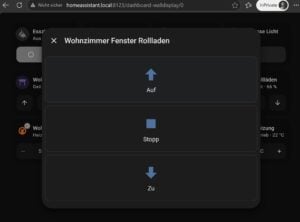
The standard cover-open-close icons on the tile are too small to tap reliably on this display. That’s why both tap_action and icon_tap_action open a Browser Mod popup with three large buttons (Up/Stop/Down, icon_height: 48px). Only the small open/stop/close icons along the bottom of the tile still move the blind directly:
Copy this block for each blind and change only the title and entity_id. I have four: living room window, living room door, bathroom, and a cover group “All Blinds”.
Open the popup with action: fire-dom-event and a browser_mod key underneath. Browser Mod then shows it right in the browser you tap in, so only on the Wall Display. With perform-action, the call would go through the Home Assistant server instead. Without a target browser, the popup then appears on every browser registered in Browser Mod, and not at all on a display that isn’t registered.
The buttons inside the popup move the blind with perform-action/perform_action, the current syntax. Older tutorials use call-service/service for the same thing.
type: tile
entity: cover.wohnzimmer_fenster_rollladen
features:
  - type: cover-open-close
tap_action:
  action: fire-dom-event
  browser_mod:
    service: browser_mod.popup
    data:
      title: Wohnzimmer Fenster Rollladen
      content:
        type: vertical-stack
        cards:
          - type: button
            name: Auf
            icon: mdi:arrow-up-bold
            icon_height: 48px
            tap_action:
              action: perform-action
              perform_action: cover.open_cover
              target:
                entity_id: cover.wohnzimmer_fenster_rollladen
          - type: button
            name: Stopp
            icon: mdi:stop
            icon_height: 48px
            tap_action:
              action: perform-action
              perform_action: cover.stop_cover
              target:
                entity_id: cover.wohnzimmer_fenster_rollladen
          - type: button
            name: Zu
            icon: mdi:arrow-down-bold
            icon_height: 48px
            tap_action:
              action: perform-action
              perform_action: cover.close_cover
              target:
                entity_id: cover.wohnzimmer_fenster_rollladen
icon_tap_action:
  action: fire-dom-event
  browser_mod:
    service: browser_mod.popup
    data:
      title: Wohnzimmer Fenster Rollladen
      content:
        type: vertical-stack
        cards:
          - type: button
            name: Auf
            icon: mdi:arrow-up-bold
            icon_height: 48px
            tap_action:
              action: perform-action
              perform_action: cover.open_cover
              target:
                entity_id: cover.wohnzimmer_fenster_rollladen
          - type: button
            name: Stopp
            icon: mdi:stop
            icon_height: 48px
            tap_action:
              action: perform-action
              perform_action: cover.stop_cover
              target:
                entity_id: cover.wohnzimmer_fenster_rollladen
          - type: button
            name: Zu
            icon: mdi:arrow-down-bold
            icon_height: 48px
            tap_action:
              action: perform-action
              perform_action: cover.close_cover
              target:
                entity_id: cover.wohnzimmer_fenster_rollladen
The labels in the code are German, as in my own setup (“Wohnzimmer Fenster Rollladen” = living room window blind, “Auf”/”Stopp”/”Zu” = Up/Stop/Down). Rename them as you like; only the entity_id values have to match your Home Assistant instance. The same goes for the file on GitHub.
Heating: The Built-in Feature Is Enough
For the radiators, the built-in target-temperature feature on the tile card is enough.
Layout Fine-Tuning
The section gets column_span: 2 (it spans two columns, so it’s wider) and the theme ios-dark-mode-light-blue; the view gets a responsive header (not the Home Assistant header that Kiosk Mode hides). The theme comes from the iOS Themes pack in the Marketplace. Leave out the theme line and the dashboard runs with the default theme. In the raw configuration editor, the lines go here:
views:
  - type: sections
    header:
      layout: responsive
      badges_position: top
      badges_wrap: wrap
    sections:
      - type: grid
        column_span: 2
        theme: ios-dark-mode-light-blue
        cards:
          # your tiles go here
Step 4: Install Kiosk Mode and Activate It for the User
Kiosk Mode hides the header, the sidebar or both, set per user. Install it via Settings → Marketplace → search for “Kiosk Mode” → Install. The Marketplace adds the dashboard resource for you. If the Kiosk Mode configuration below has no effect, check under Settings → Dashboards → three-dot menu top right → Resources whether there’s an entry with the URL /local/community/kiosk-mode/kiosk-mode.js (with HACS, /hacsfiles/kiosk-mode/kiosk-mode.js) of type “JavaScript Module”, and add it manually if not. Reload the page after installing and after every change to the Kiosk Mode config, otherwise it won’t take effect.

Paste these lines at the very top of the dashboard’s raw configuration editor, without indentation, in the dashboard you created in Step 3. If your user has a different name, enter its display name. Kiosk Mode matches the display name, not the login name.
kiosk_mode:
  user_settings:
  - users:
    - walldisplay
    kiosk: true
kiosk: true hides both the header and the sidebar for the “walldisplay” user. To control them separately, use hide_header: true and/or hide_sidebar: true instead. This is where you open a dashboard’s YAML:

Step 5: Test and Set as Default Dashboard
To test it, log in as “walldisplay” in an incognito window, hide all other dashboards in that user’s profile and set “walldisplay” as the default dashboard. The header and sidebar are gone.

On the Real Display
To make the dashboard the home screen of the Wall Display X2i, connect the display to your Home Assistant instance. You do that on the display itself, not in Home Assistant (a similar flow is described in the guide by Australian Shelly retailer SmartHome, written for the first-generation Wall Display):
- On the Wall Display itself: select Settings → Network → Home Assistant. If “Home Assistant” doesn’t show up there yet, install a firmware update first.
- The display automatically searches for Home Assistant servers on your local network. If your instance isn’t found, enter the full URL manually, e.g.
http://192.168.1.182:8123/– since Home Assistant 2026.8 new HAOS installations run on port 80, in which case you can drop the port. - Set the toggle to On and Save – a new Home Assistant icon then appears in the display’s bottom bar.
- Log in via this icon with exactly the “walldisplay” user from Step 1 (username and password) – not your admin account.


The display then loads your walldisplay dashboard directly, with Kiosk Mode and the Browser Mod popups. The SmartHome guide recommends the same approach: a local user without admin rights, Kiosk Mode and a simple dedicated dashboard.
Troubleshooting
| Problem | Solution |
|---|---|
| Blind popup doesn’t open at all | Check that the tile uses action: fire-dom-event rather than perform-action, and that Browser Mod is set up under Settings → Devices & Services |
| Sidebar/header doesn’t disappear | List the user’s display name in kiosk_mode.user_settings.users, not the login name (if they differ). Case doesn’t matter |
| Blind popup doesn’t open when tapping the icon | Set icon_tap_action in addition to tap_action – otherwise tapping the tile icon moves the blind straight away instead of opening the popup |
| Dashboard doesn’t appear automatically after login | In the “walldisplay” user’s profile, explicitly select the “walldisplay” dashboard as the default dashboard and hide all other dashboards |
No. Kiosk Mode, Browser Mod and the dashboard configuration all run inside your own Home Assistant instance, whether you reach it locally or through Nabu Casa. The walldisplay user is limited to local access, though; if the display should log in via Nabu Casa, you’ll need to turn that restriction off.
Not for the popups in this dashboard. They’re triggered with fire-dom-event right in the display’s browser and work without registration. You only need to register the display if you want to target it from automations. With Kiosk Mode active, you can still reach the Browser Mod panel at /browser-mod on your Home Assistant instance, or add ?disable_km to the URL.
Yes. List the user by display name in the user_settings block; everyone else keeps the normal interface with header and sidebar.
The cover-open-close feature only shows small icons directly on the tile, which are hard to tap accurately on a small touchscreen. Browser Mod instead opens a popup with much larger, easier-to-tap buttons.
Conclusion
The dashboard has been running reliably on the Wall Display every day since I set it up in July 2026. The display’s WebView is less powerful than a desktop browser, though, as the SmartHome guide also points out: dashboards with lots of animations or live camera feeds can load noticeably slower or behave unpredictably. A lean dashboard with tile cards like this one isn’t affected.
Kiosk Mode keeps the screen clean, and Browser Mod makes the blinds easy to control even with clumsy fingers.
If you want to add Shellys behind more switches, plugs or blinds, my overview Shelly in Home Assistant: Which Shelly for Which Job? helps you pick the right one.
Prefer a bigger panel with a Raspberry Pi behind it? Our Raspberry Pi display comparison shows which touchscreens work well for that.