Mount a FritzBox NAS on the Raspberry Pi
Plug a USB drive or stick into your FritzBox and you’ve got a FritzBox NAS, a small network storage on your home network. Many models even have some internal storage built in. Your Raspberry Pi can mount that storage like a local folder and use it for backups, photos or sensor logs. In this guide you’ll share the storage over SMB on the FritzBox, create a dedicated user for the Pi and mount the share on Raspberry Pi OS so it comes back after every reboot. You don’t need the Pi to stream music and video to the TV, by the way, since the FritzBox has its own media server. And for large amounts of data, a router like the FritzBox is a bit underpowered.
In short
Turn on access via network drive (SMB) on the FritzBox and add a user with access to NAS contents. On the Pi, install cifs-utils and add the share //192.168.178.1/FRITZ.NAS to /etc/fstab.
- Share: it’s called FRITZ.NAS by default, and each USB drive shows up as a subfolder
- Credentials: keep them in a file only root can read, never in fstab itself
- SMB version: the Pi negotiates it on its own, so leave SMBv1 switched off on the FritzBox
- Time: about 15 minutes
We tested this with a FRITZ!Box 6670 Cable on FRITZ!OS 8.25 and a Raspberry Pi running Raspberry Pi OS (November 2026). The screenshots show the German interface; the English menu names are given in the text. Older FRITZ!OS versions label some menus slightly differently.
What you need
- a FritzBox with a USB port or internal storage, such as the 7590, 7530 or 6670 Cable
- optionally a USB hard drive or stick plugged into the FritzBox if the internal storage isn’t enough, for example the WD Elements Portable. It runs off USB power, so you don’t need a separate power supply.
- a Raspberry Pi running Raspberry Pi OS on the same home network
- access to the FritzBox interface at
http://fritz.box. The commands below use the default address192.168.178.1; if your FritzBox uses a different one, put that in instead.
Plug in the drive and check it
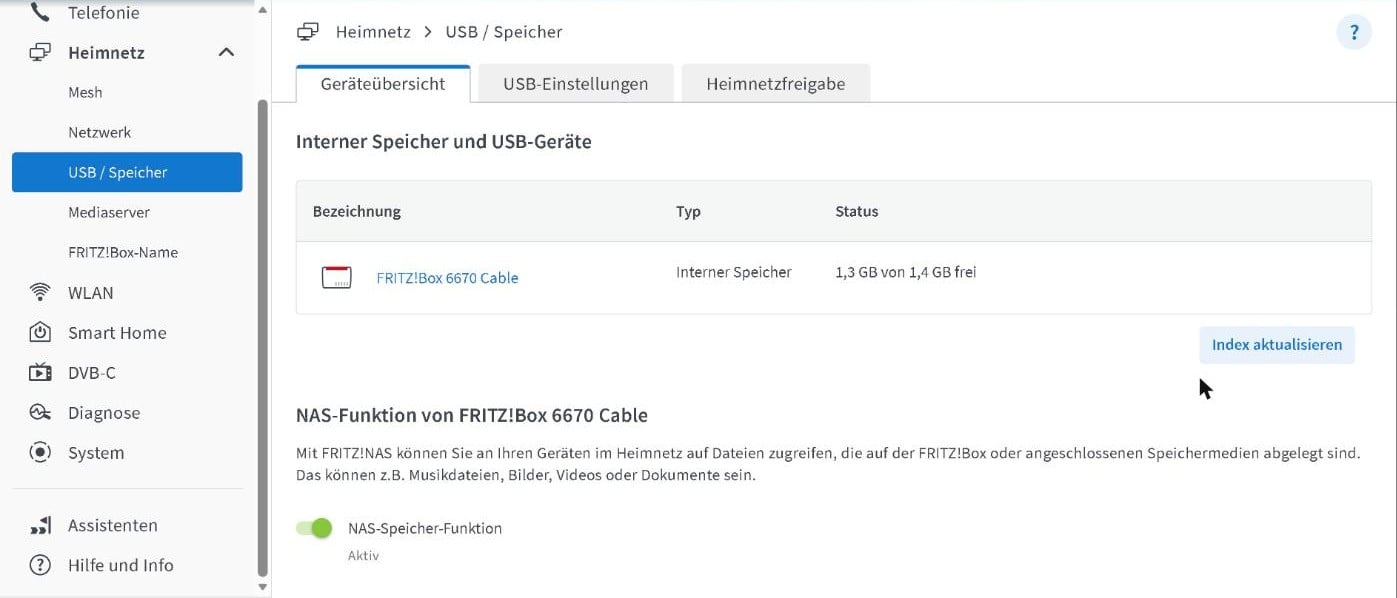
Connect the drive to a USB port on the FritzBox and open Home Network → USB / Storage. The device overview tab lists it next to the internal storage, and the NAS storage function below must be switched on; use the toggle on the same page if it isn’t. The FritzBox reads NTFS, FAT32 and ext4, among others, so a drive that already holds data doesn’t need reformatting.
Turn on SMB sharing
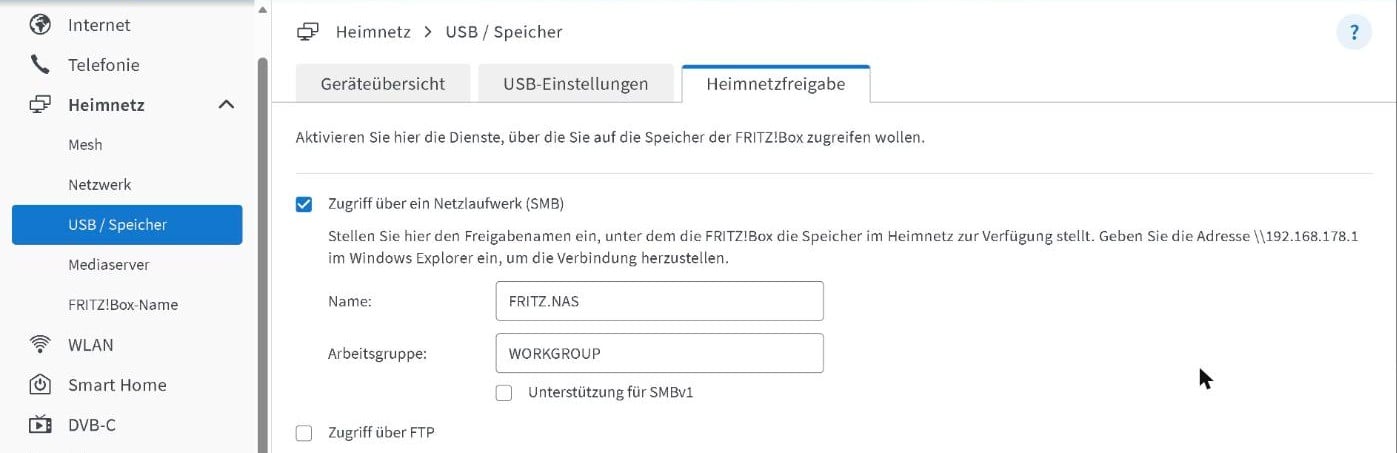
On the Home Network Sharing tab, tick Access via network drive (SMB). It’s off by default, and without it every mount attempt fails. Keep the name “FRITZ.NAS” and the workgroup as they are. Leave SMBv1 support unticked, as the Pi doesn’t need the old, insecure protocol. Click Apply.
Create a user for the Pi
The Pi logs in to the share with a FritzBox user. Give it its own account instead of reusing your admin login. Go to System → FRITZ!Box Users, click Add User and enter a name such as raspberrypi plus a password of its own.
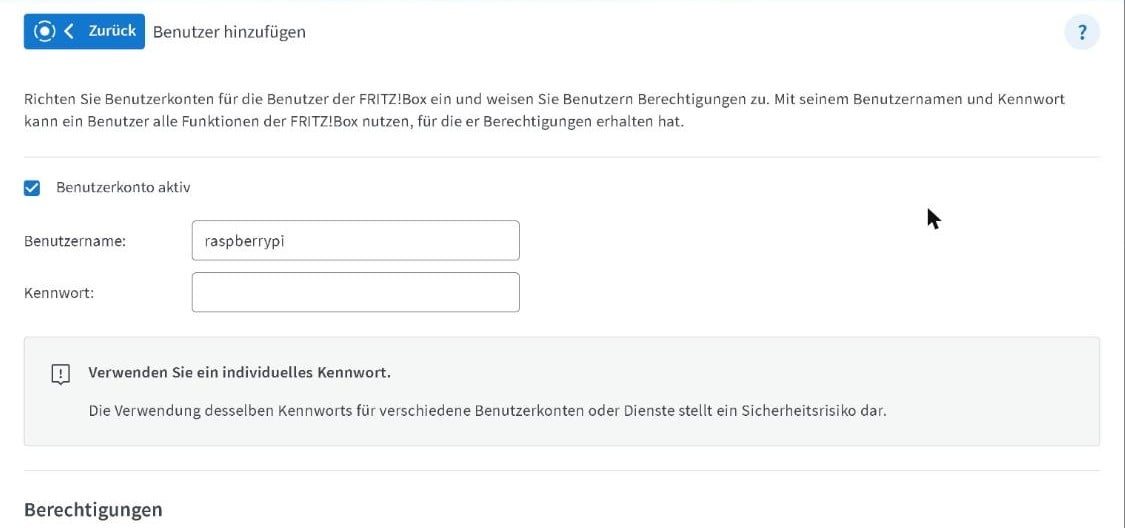
Under permissions, tick only Access to NAS contents. Below it you choose how much the user may do:
- Full access: read and write on all storage. Pick this if the Pi should save files there, such as backups.
- Read-only: the Pi can read files but not change anything. That’s enough for a media player.
- Individual settings: you share individual folders only and decide per folder whether the Pi may write to it.
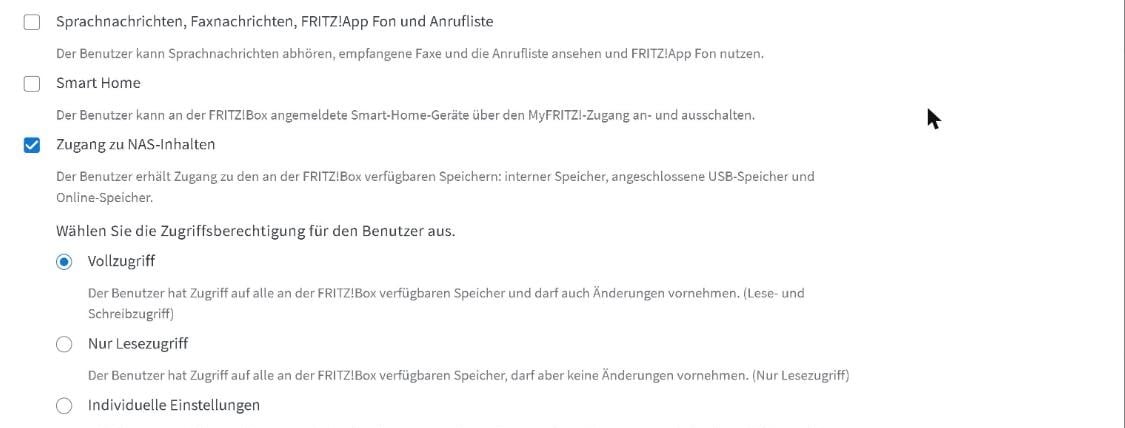
Leave every other permission unticked and save with Apply. If the FritzBox asks for an extra confirmation, press a button on the box or confirm on a phone, whichever the interface tells you.
Run all the following commands in a terminal on the Pi, either directly or over SSH.
Install cifs-utils
The cifs-utils package provides the tools Linux uses to mount SMB shares:
sudo apt update
sudo apt install cifs-utils
Create a mount point
The share needs an empty folder to appear in:
sudo mkdir -p /mnt/fritznasStore the credentials in a file
The username and password go into a separate file rather than into fstab. Every user on the Pi can read fstab, but only root can read the credentials file. Create it with nano:
sudo nano /etc/fritznas.credIt contains exactly two lines, with no spaces around the equals sign. Fill in the user and password you set on the FritzBox:
username=raspberrypi
password=YOUR-PASSWORD
Save with Ctrl+O and Enter, exit nano with Ctrl+X and lock down the permissions:
sudo chmod 600 /etc/fritznas.credUse nano rather than an echo or printf one-liner, which can lose the line break depending on your shell.
Test it by hand first
Before you touch fstab, mount the share once by hand:
sudo mount -t cifs //192.168.178.1/FRITZ.NAS /mnt/fritznas -o credentials=/etc/fritznas.cred,uid=$(id -u),gid=$(id -g)You don’t need to specify an SMB version. The Pi and the FritzBox negotiate it themselves; in our test they settled on SMB 3.1.1. uid and gid decide who owns the files on the Pi, and $(id -u) and $(id -g) fill in your own user’s IDs. Leave them out and the folder belongs to root, so your user gets “Permission denied” when writing.
If the command returns without a message, take a look inside the share and check that you can write to it:
ls /mnt/fritznas
touch /mnt/fritznas/pi-test.txt && rm /mnt/fritznas/pi-test.txt && echo write OK
On the internal storage you’ll see the folders the FritzBox creates itself, such as “Bilder”, “Dokumente” and “Musik” on a German box. Each USB drive gets its own subfolder in FRITZ.NAS. To mount just that drive, add the folder name to the path, e.g. //192.168.178.1/FRITZ.NAS/FOLDERNAME. When you’re done, unmount the share:
sudo umount /mnt/fritznasMount it permanently with fstab
To have the Pi mount the share at every boot, add it to /etc/fstab. First check your user’s IDs. For the first user you create when setting up the Pi, it’s almost always 1000:
id -u
id -g
Open fstab:
sudo nano /etc/fstabAdd this line at the end and replace both 1000s with your own values if they differ. To mount just one USB drive, append its folder name to FRITZ.NAS, as in the manual test:
//192.168.178.1/FRITZ.NAS /mnt/fritznas cifs credentials=/etc/fritznas.cred,uid=1000,gid=1000,iocharset=utf8,_netdev,nofail,x-systemd.automount 0 0Save the file, have systemd reload fstab and mount everything:
sudo systemctl daemon-reload
sudo mount -a
If mount -a doesn’t print an error, the entry is fine. Access the folder once, then list the mounted share:
ls /mnt/fritznas
findmnt -t cifs
The output shows a line with /mnt/fritznas, //192.168.178.1/FRITZ.NAS and the type cifs. From now on the Pi mounts the share at every boot, or at the latest the first time something accesses /mnt/fritznas. You don’t need to reboot, but it’s a good check: afterwards, ls /mnt/fritznas should show the contents again.
What the options do
| Option | Effect |
|---|---|
credentials=/etc/fritznas.cred | reads the username and password from the protected file |
uid=1000,gid=1000 | the files belong to your user, who can write to them |
iocharset=utf8 | special characters in file and folder names display correctly |
_netdev | marks the share as a network drive, so the Pi waits for the network before mounting it |
nofail | the Pi still boots if the FritzBox can’t be reached |
x-systemd.automount | mounts the share on first access. That helps on Pis using Wi-Fi, where the connection may not be up yet during boot. |
Troubleshooting
“mount error(13): Permission denied”
The FritzBox rejected the login. Check the username and password in /etc/fritznas.cred, and make sure the user has access to NAS contents on the FritzBox. The file must contain exactly two lines, with no spaces around the equals sign.
“Invalid username in credentials file”
The credentials file is broken, usually because the line break between the two lines is missing. Open it with sudo nano /etc/fritznas.cred and fix it.
“could not connect” or the command hangs
The Pi can’t reach an SMB service. Most of the time, access via network drive (SMB) isn’t ticked on the FritzBox. Also check that the Pi is on the FritzBox’s home network and that ping 192.168.178.1 gets a reply. If the Pi reaches your home network over WireGuard, see the next section.
Over WireGuard: allow NetBIOS
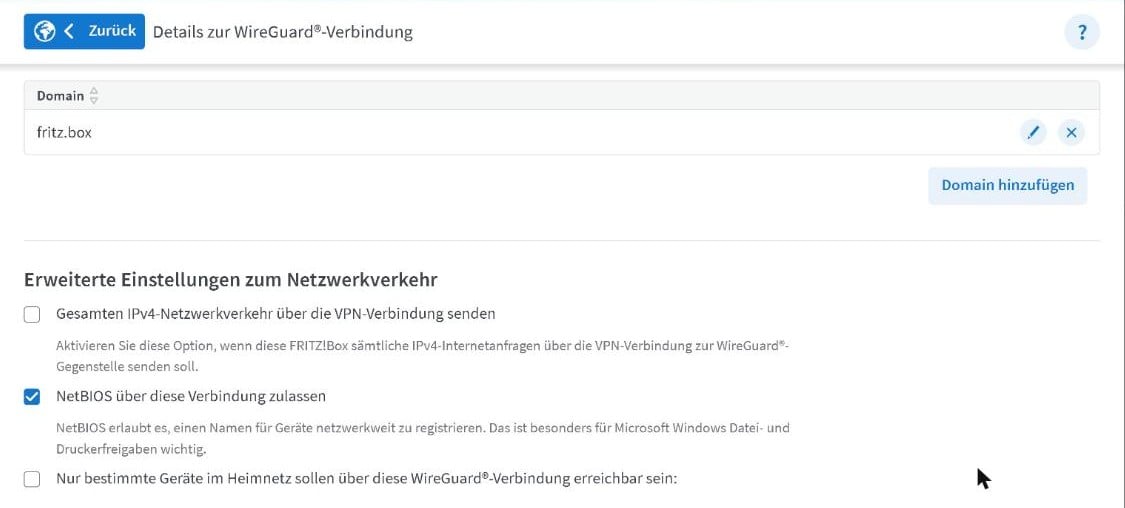
If the Pi connects to the FritzBox over WireGuard, say as a travel router, there’s one more block: by default the FritzBox doesn’t let SMB through a WireGuard connection. Go to Internet → Permit Access → VPN (WireGuard), edit the Pi’s connection and, under the advanced network traffic settings, tick Allow NetBIOS over this connection. After that the Pi can reach SMB shares on your home network, both the FritzBox’s and those on other devices.
“Host is down” or “Server abruptly closed the connection”
You’ll see these when the mount options include vers=1.0. Older guides recommend it, but SMBv1 is off on the FritzBox by default (AVM lists the supported SMB versions in its knowledge base), and according to its man page, mount.cifs no longer requests SMB1 by default either. Remove the option and the Pi and FritzBox will agree on SMB 2 or 3. If you want to pin a version, use vers=3.0.
Reading works, writing doesn’t
Without uid and gid in the options, the share belongs to root on the Pi, so add both values. If writing still fails, the FritzBox user only has read-only access. Switch it to full access or allow writing to that folder in the individual settings.
Test access without mounting
smbclient lets you check the login without mounting anything. It usually isn’t installed on Raspberry Pi OS:
sudo apt install smbclient
smbclient //192.168.178.1/FRITZ.NAS -U raspberrypi -m SMB3
After entering the password you’ll land at the smb: \> prompt. ls lists the contents and exit quits.
What to use the FritzBox NAS for
Once mounted, the share behaves like any other folder. Use it as a backup target, for example with the tools from our guide How to Back Up a Raspberry Pi, to collect sensor logs or to swap files between the Pi and your PC. The FritzBox streams music and video to the TV itself, under Home Network → Media Server.
With lots of data or heavy use, the FritzBox hits its limits, since it’s a router first. For more speed, set up dedicated network storage, such as a Raspberry Pi NAS with an NVMe SSD.
FAQ: FritzBox NAS on the Raspberry Pi
Not necessarily. Many FritzBox models have internal storage, the 6670 Cable for example has 1.4 GB. It shows up in FRITZ.NAS just like a USB drive. That’s rarely enough for backups or media, though, so plug in a USB drive for those.
SMBv1 is outdated and insecure. The FritzBox ships with it turned off, so a mount with vers=1.0 fails with “Host is down”. Leave the option out and let the Pi and the FritzBox negotiate SMB 2 or 3.
Yes. Over WireGuard, open the Pi’s VPN connection on the FritzBox and enable “Allow NetBIOS over this connection”. Without it, the FritzBox blocks SMB on the tunnel.
Run sudo umount /mnt/fritznas. To stop mounting it at boot, delete the line from /etc/fstab and run sudo systemctl daemon-reload.